Salta al contenuto principale

Removing the Jura IMPRESSA J5 brewing unit (brewgroup)

Cosa ti serve

  1. Removing the Jura IMPRESSA J5 brewing unit (brewgroup), Jura Capresso IMPRESSA J5  opening procedure: passo 1, immagine 1 di 1
    • Unplug the power cord!

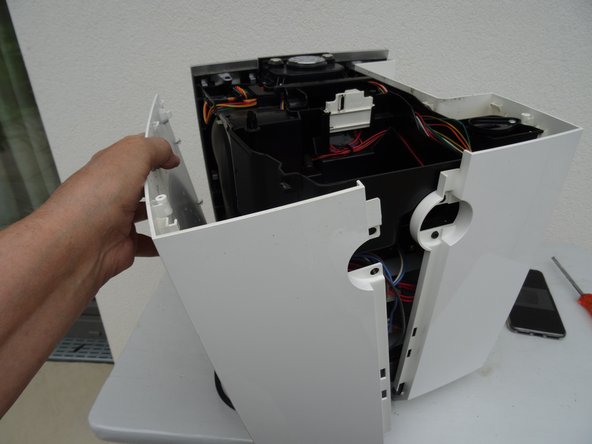
    • Remove the water tank and the drip tray. Remove all coffee beans from the storage container.

  2. Removing the Jura IMPRESSA J5 brewing unit (brewgroup): passo 2, immagine 1 di 3 Removing the Jura IMPRESSA J5 brewing unit (brewgroup): passo 2, immagine 2 di 3 Removing the Jura IMPRESSA J5 brewing unit (brewgroup): passo 2, immagine 3 di 3
    • Flip open the lid of the bean compartment.

    • Unscrew the two slotted screws inside the bean compartment. The screws have a rubber washer and will not come out completely.

    • Remove the bean compartment.

  3. Removing the Jura IMPRESSA J5 brewing unit (brewgroup): passo 3, immagine 1 di 3 Removing the Jura IMPRESSA J5 brewing unit (brewgroup): passo 3, immagine 2 di 3 Removing the Jura IMPRESSA J5 brewing unit (brewgroup): passo 3, immagine 3 di 3
    Attrezzo utilizzato in questo passaggio:
    iFixit Precision 4 mm Screwdriver Bit
    $2.99
    Compra
    • The top cover is fastened with oval head screws. Unscrew them.

    • These screws have an oval head that makes them look like rivets (picture 2). You need to use a special bit - also available at iFixit - for their removal. Here a DIY guide. If the right bit is not available, it could be done with a pair of needle nose pliers. Jura wants to keep us out of our own machines!!!

  4. Removing the Jura IMPRESSA J5 brewing unit (brewgroup): passo 4, immagine 1 di 1
    • Also remove the two oval head screws underneath the ground coffee compartment lid.

  5. Removing the Jura IMPRESSA J5 brewing unit (brewgroup): passo 5, immagine 1 di 1
    • Now you can pry up the top cover all around.

    • Remove the top cover. This often requires a little force.

    • Use plastic tools to avoid scratching your device.

  6. Removing the Jura IMPRESSA J5 brewing unit (brewgroup): passo 6, immagine 1 di 2 Removing the Jura IMPRESSA J5 brewing unit (brewgroup): passo 6, immagine 2 di 2
    • Turn the device with the back facing you.

    • Turn the Jura label a few degrees counterclockwise. If it's hard to do, use a small suction cup.

    • Remove the Jura label.

  7. Removing the Jura IMPRESSA J5 brewing unit (brewgroup): passo 7, immagine 1 di 3 Removing the Jura IMPRESSA J5 brewing unit (brewgroup): passo 7, immagine 2 di 3 Removing the Jura IMPRESSA J5 brewing unit (brewgroup): passo 7, immagine 3 di 3
    • Underneath the label you will find two Torx T15 screws. Remove them.

    • Carefully pull the top of the chrome cover slightly outwards, then push it down and put it aside.

  8. Removing the Jura IMPRESSA J5 brewing unit (brewgroup): passo 8, immagine 1 di 1
    • Remove the Torx T15 screw on the side panel with the water tank.

  9. Removing the Jura IMPRESSA J5 brewing unit (brewgroup): passo 9, immagine 1 di 2 Removing the Jura IMPRESSA J5 brewing unit (brewgroup): passo 9, immagine 2 di 2
    • Pull the right side panel slightly towards the back.

    • Remove the side panel.

  10. Removing the Jura IMPRESSA J5 brewing unit (brewgroup): passo 10, immagine 1 di 1
    • Pull the left side panel slightly towards the back and remove it.

  11. Removing the Jura IMPRESSA J5 brewing unit (brewgroup), Removing the Jura IMPRESSA J5 brewing unit (brewgroup): passo 11, immagine 1 di 2 Removing the Jura IMPRESSA J5 brewing unit (brewgroup), Removing the Jura IMPRESSA J5 brewing unit (brewgroup): passo 11, immagine 2 di 2
    • The brewing unit is on the left side of the machine.

  12. Removing the Jura IMPRESSA J5 brewing unit (brewgroup): passo 12, immagine 1 di 2 Removing the Jura IMPRESSA J5 brewing unit (brewgroup): passo 12, immagine 2 di 2
    • The cover over the brewing unit is only lightly gripped. Lift it out.

  13. Removing the Jura IMPRESSA J5 brewing unit (brewgroup): passo 13, immagine 1 di 1
    • In this image the brewing unit has been removed already to show you how it is connected.

    • Two Torx T15 machine screws

    • One Torx T15 screw

    • The hot water connection is plugged in.

    • The hose for the coffee spout is connected above.

  14. Removing the Jura IMPRESSA J5 brewing unit (brewgroup): passo 14, immagine 1 di 1
    • Unscrew the two Torx T15 machine screws.

    • Unscrew the lower Torx T15 screw near the hot water inlet pipe.

    • Pull off the coffee dispensing pipe.

  15. Removing the Jura IMPRESSA J5 brewing unit (brewgroup): passo 15, immagine 1 di 1
    • First pull the brewing unit outward slightly at the base, lift it out with a downward motion.

    • If you want to disassemble the brewing unit for maintenance or cleaning, use these oder these instructions.

Conclusione

Work your way through the instructions in reverse to re-assemble the device.

Un'altra persona ha completato questa guida.

Un ringraziamento speciale a questi traduttori:

de en

100%

Questi traduttori ci stanno aiutando ad aggiustare il mondo! Vuoi partecipare?
Inizia a tradurre ›

VauWeh

Membro da: 10/19/15

201.618 Reputazione

246 Guide realizzate

Team

Repair is War on Entropy Membro di Repair is War on Entropy

Community

24 Membri

1.097 Guide realizzate

0 Commenti

Aggiungi Commento

Visualizza Statistiche:

Ultime 24 Ore: 8

Ultimi 7 Giorni: 19

Ultimi 30 Giorni: 76

Tutti i Tempi: 4,659