Salta al contenuto principale

Razer Phone Rear Camera Replacement

Cosa ti serve

  1. Razer Phone Rear Camera Replacement, Display Assembly: passo 1, immagine 1 di 3 Razer Phone Rear Camera Replacement, Display Assembly: passo 1, immagine 2 di 3 Razer Phone Rear Camera Replacement, Display Assembly: passo 1, immagine 3 di 3
    • Remove the plastic speaker grills by using the metal spudger to pry underneath the strips.

    • Peel off the plastic speaker grill to reveal the screws.

    • Heating up the plastic grills make them easier to remove.

    • Peeling off the plastic speaker grill will ruin the adhesive used to keep it in place. A new adhesive must be used to put the grill back on the device.

  2. Razer Phone Rear Camera Replacement: passo 2, immagine 1 di 2 Razer Phone Rear Camera Replacement: passo 2, immagine 2 di 2
    • Pry the top plastic grill off with the metal spudger and reveal the screws.

  3. Razer Phone Rear Camera Replacement: passo 3, immagine 1 di 3 Razer Phone Rear Camera Replacement: passo 3, immagine 2 di 3 Razer Phone Rear Camera Replacement: passo 3, immagine 3 di 3
    • Remove five (two bottom, three top) 2.5 mm screws with the Phillips #000 screwdriver.

    • Remove five (four bottom, one top) 5.5 mm screws with the Torx Head T5 screwdriver.

  4. Razer Phone Rear Camera Replacement: passo 4, immagine 1 di 2 Razer Phone Rear Camera Replacement: passo 4, immagine 2 di 2
    • Remove the display assembly by using the Jimmy to separate the assembly from the phone's frame.

    • Lift the display assembly away from the other half of the phone.

  5. Razer Phone Rear Camera Replacement: passo 5, immagine 1 di 3 Razer Phone Rear Camera Replacement: passo 5, immagine 2 di 3 Razer Phone Rear Camera Replacement: passo 5, immagine 3 di 3
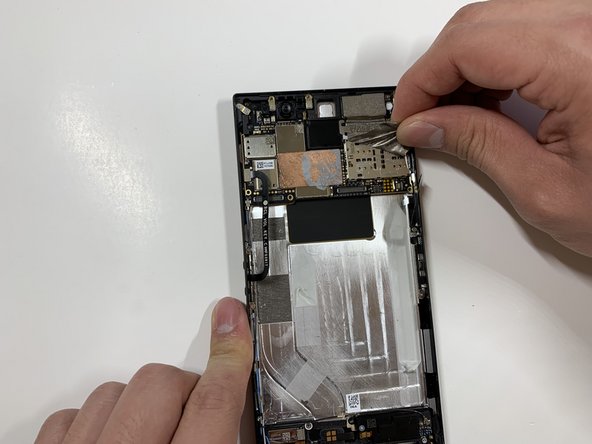
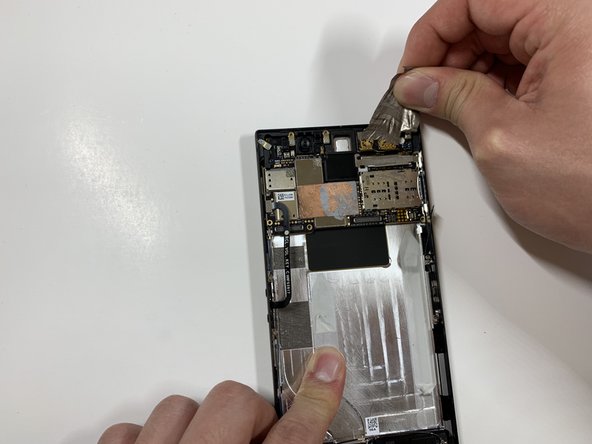
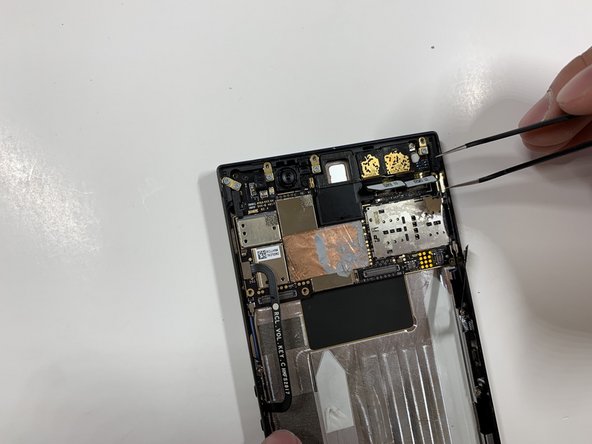
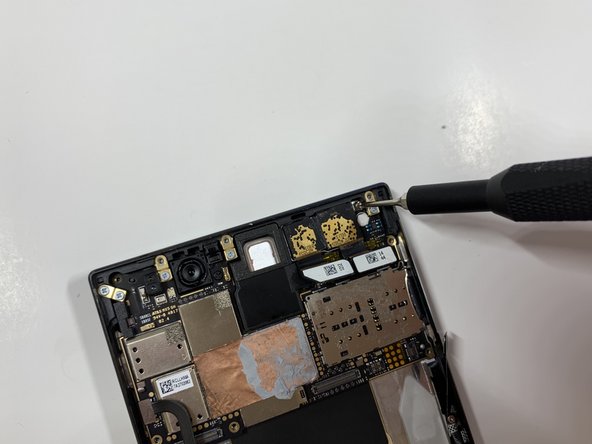
    • Remove one 2.5 mm screw holding down the metal bracket connector using the Phillips #000 screwdriver.

    • Peel back the metallic shielding over the connector using tweezers.

    • Remove the metal bracket connector.

  6. Razer Phone Rear Camera Replacement: passo 6, immagine 1 di 2 Razer Phone Rear Camera Replacement: passo 6, immagine 2 di 2
    • Grab hold of the the screen ribbon with the tweezers and remove it from the rest of the phone to free the assembly display.

  7. Razer Phone Rear Camera Replacement, Battery: passo 7, immagine 1 di 3 Razer Phone Rear Camera Replacement, Battery: passo 7, immagine 2 di 3 Razer Phone Rear Camera Replacement, Battery: passo 7, immagine 3 di 3
    • Grab hold of the connector on the right side of the phone (just above the battery) using the tweezers.

    • Remove the connector.

  8. Razer Phone Rear Camera Replacement: passo 8, immagine 1 di 2 Razer Phone Rear Camera Replacement: passo 8, immagine 2 di 2
    • Remove the 2.5 mm screw holding down the bracket with a Phillips #000 screwdriver.

    • Grab the bracket with the tweezers and remove it.

  9. Razer Phone Rear Camera Replacement: passo 9, immagine 1 di 3 Razer Phone Rear Camera Replacement: passo 9, immagine 2 di 3 Razer Phone Rear Camera Replacement: passo 9, immagine 3 di 3
    • Peel off and pull out the elastic tabs at the bottom of the battery.

  10. Razer Phone Rear Camera Replacement: passo 10, immagine 1 di 2 Razer Phone Rear Camera Replacement: passo 10, immagine 2 di 2
    • Carefully use the Jimmy to wedge the battery out of the phone.

  11. Razer Phone Rear Camera Replacement, Charging Port: passo 11, immagine 1 di 2 Razer Phone Rear Camera Replacement, Charging Port: passo 11, immagine 2 di 2
    • Using a Phillips #000 screwdriver, take out the seven 1 mm screws on the bottom panel of the device.

    • There are a few gold brackets under some of the screws. Make sure to remove these and keep them for reassembly.

  12. Razer Phone Rear Camera Replacement: passo 12, immagine 1 di 2 Razer Phone Rear Camera Replacement: passo 12, immagine 2 di 2
    • Grab hold of the blue connector on the upper left side of the phone with the tweezers.

    • Remove the connector.

  13. Razer Phone Rear Camera Replacement: passo 13, immagine 1 di 2 Razer Phone Rear Camera Replacement: passo 13, immagine 2 di 2
    • Use the tweezers to grab hold of the connector for the blue wire (bottom of the device), and remove the connector.

    • Use the tweezers to grab hold of the connector for the white wire, and remove the connector.

  14. Razer Phone Rear Camera Replacement: passo 14, immagine 1 di 1
    • Using the tweezers, grab the detached charging port and ribbon.

  15. Razer Phone Rear Camera Replacement, Rear Camera: passo 15, immagine 1 di 2 Razer Phone Rear Camera Replacement, Rear Camera: passo 15, immagine 2 di 2
    • Remove the one 2.5 mm screw with the Phillips #000 screwdriver.

  16. Razer Phone Rear Camera Replacement: passo 16, immagine 1 di 3 Razer Phone Rear Camera Replacement: passo 16, immagine 2 di 3 Razer Phone Rear Camera Replacement: passo 16, immagine 3 di 3
    • Remove the protective peel covering the rear cameras using your hands.

  17. Razer Phone Rear Camera Replacement: passo 17, immagine 1 di 1
    • Use the tweezers to remove the white tab connector.

  18. Razer Phone Rear Camera Replacement: passo 18, immagine 1 di 1
    • Grab and remove the metal tab with the tweezers.

  19. Razer Phone Rear Camera Replacement: passo 19, immagine 1 di 3 Razer Phone Rear Camera Replacement: passo 19, immagine 2 di 3 Razer Phone Rear Camera Replacement: passo 19, immagine 3 di 3
    • Grab the connectors with the tweezers and gently lift the connectors loose.

  20. Razer Phone Rear Camera Replacement: passo 20, immagine 1 di 2 Razer Phone Rear Camera Replacement: passo 20, immagine 2 di 2
    • Remove the one 2.5 mm screw with the Phillips #000 screwdriver.

  21. Razer Phone Rear Camera Replacement: passo 21, immagine 1 di 1
    • Remove the one 2.5 mm screw underneath the connectors with the Phillips #000 screwdriver.

  22. Razer Phone Rear Camera Replacement: passo 22, immagine 1 di 3 Razer Phone Rear Camera Replacement: passo 22, immagine 2 di 3 Razer Phone Rear Camera Replacement: passo 22, immagine 3 di 3
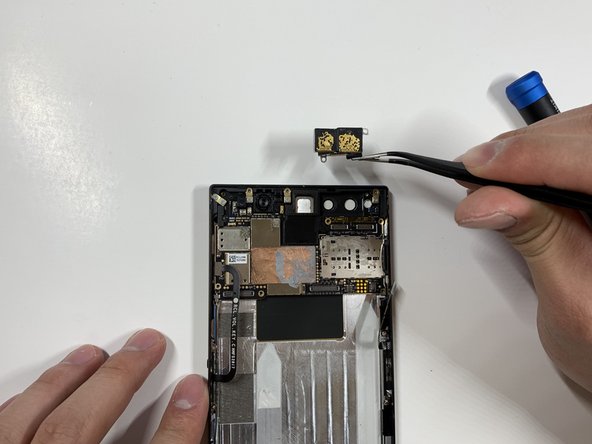
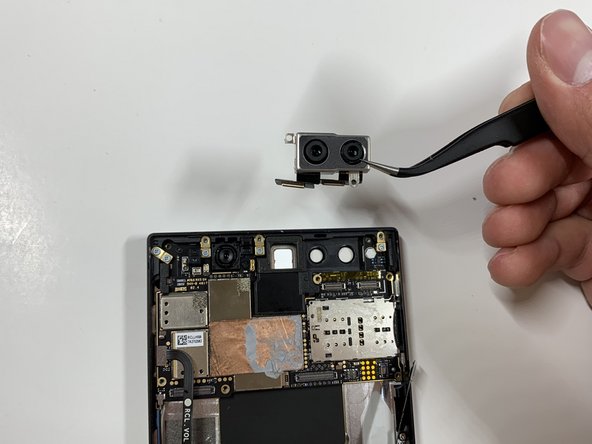
    • Grab the loose connectors with a tweezer and gently remove the rear camera unit from the phone.

Conclusione

To reassemble your device, follow these instructions in reverse order.

Kenny Lau

Membro da: 01/24/19

182 Reputazione

1 Guida realizzata

Team

Cal Poly, Team S19-G6, White Winter 2019 Membro di Cal Poly, Team S19-G6, White Winter 2019

CPSU-WHITE-W19S19G6

5 Membri

12 Guide realizzate

0 Commenti

Aggiungi Commento

Visualizza Statistiche:

Ultime 24 Ore: 0

Ultimi 7 Giorni: 2

Ultimi 30 Giorni: 7

Tutti i Tempi: 1,281