Salta al contenuto principale

Razer Basilisk V3 Motherboard Replacement

Cosa ti serve

  1. Razer Basilisk V3 Motherboard Replacement, Skates: passo 1, immagine 1 di 1
    • Locate each of the skates.

  2. Razer Basilisk V3 Motherboard Replacement: passo 2, immagine 1 di 3 Razer Basilisk V3 Motherboard Replacement: passo 2, immagine 2 di 3 Razer Basilisk V3 Motherboard Replacement: passo 2, immagine 3 di 3
    • Heat the skate using a heat gun or hair dryer.

    • Using the pointy end of the spudger pry away a corner of the skate.

    • If the adhesive does not pull away easily, heat the skate more.

    • Once the corner of the skate comes free use the flat end of the spudger to peel off the rest of the skate.

    • Repeat these steps for each of the skates.

  3. Razer Basilisk V3 Motherboard Replacement, Backplate: passo 3, immagine 1 di 1
    • Remove two 4.8 mm screws that were hidden under the skates using a JIS #1 screwdriver.

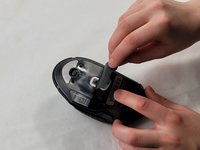
    • Remove the single 4 mm screw beneath the thumb grip using a JIS #1 screwdriver.

  4. Razer Basilisk V3 Motherboard Replacement: passo 4, immagine 1 di 3 Razer Basilisk V3 Motherboard Replacement: passo 4, immagine 2 di 3 Razer Basilisk V3 Motherboard Replacement: passo 4, immagine 3 di 3
    • Heat the label gently with a heat gun or hair dryer.

    • Once the adhesive is loosened, use a spudger to peel off the label carefully, revealing two additional screws.

    • Remove the two 4.8 mm screws using a JIS #1 screwdriver.

  5. Razer Basilisk V3 Motherboard Replacement: passo 5, immagine 1 di 3 Razer Basilisk V3 Motherboard Replacement: passo 5, immagine 2 di 3 Razer Basilisk V3 Motherboard Replacement: passo 5, immagine 3 di 3
    • Carefully pry apart the mouse's top and bottom halves. Using the iFixit opening tool, start at one corner and work around the edge.

    • Be cautious of the clips that may break during this process.

    • Using a plastic opening tool, gently pry the connector apart by moving side to side to avoid bending the pins.

    • When reassembling, be mindful that the connector only fits one way, as shown in the pictures.

  6. Razer Basilisk V3 Motherboard Replacement, Scroll Wheel Assembly: passo 6, immagine 1 di 3 Razer Basilisk V3 Motherboard Replacement, Scroll Wheel Assembly: passo 6, immagine 2 di 3 Razer Basilisk V3 Motherboard Replacement, Scroll Wheel Assembly: passo 6, immagine 3 di 3
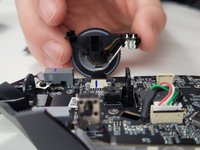
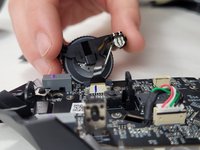
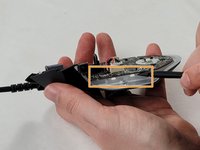
    • Use the flat end of the spudger to pop-out the scroll wheel assembly.

    • Make sure you are careful when removing the assembly since it is still connected to the device with a ribbon cable. If you pull too hard the cable could break.

  7. Razer Basilisk V3 Motherboard Replacement: passo 7, immagine 1 di 3 Razer Basilisk V3 Motherboard Replacement: passo 7, immagine 2 di 3 Razer Basilisk V3 Motherboard Replacement: passo 7, immagine 3 di 3
    • Pull up on the top half of the cable connector and pull the cable from the connector.

    • The connection pins on the wire face towards the scroll wheel assembly housing. When reassembling, make sure the connectors on the cable are facing the correct direction.

  8. Razer Basilisk V3 Motherboard Replacement, Motherboard: passo 8, immagine 1 di 3 Razer Basilisk V3 Motherboard Replacement, Motherboard: passo 8, immagine 2 di 3 Razer Basilisk V3 Motherboard Replacement, Motherboard: passo 8, immagine 3 di 3
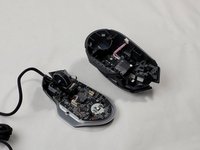
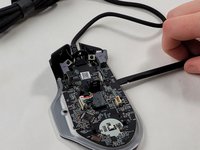
    • Remove six 4 mm screws using a JIS #0 screwdriver.

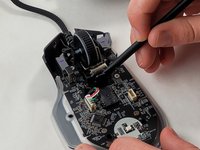
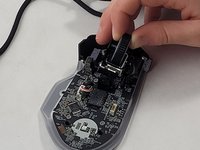
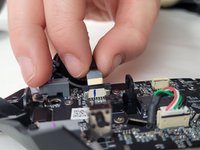
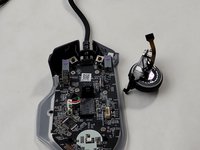
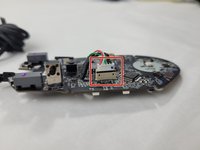
    • Insert the flat end of a spudger in the gap between the motherboard and the rest of the mouse.

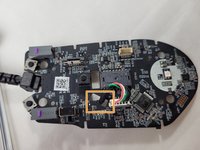
    • Slowly pry up the edge of the board, moving around the mouse slowly in a counterclockwise direction.

  9. Razer Basilisk V3 Motherboard Replacement: passo 9, immagine 1 di 3 Razer Basilisk V3 Motherboard Replacement: passo 9, immagine 2 di 3 Razer Basilisk V3 Motherboard Replacement: passo 9, immagine 3 di 3
    • Unplug the cable connection.

    • Feed the cable through the hole in the motherboard.

Conclusione

To reassemble your device, follow these instructions in reverse order.

Sarah

Membro da: 03/20/24

219 Reputazione

2 Guide realizzate

Team

0 Commenti

Aggiungi Commento

Visualizza Statistiche:

Ultime 24 Ore: 0

Ultimi 7 Giorni: 5

Ultimi 30 Giorni: 20

Tutti i Tempi: 35