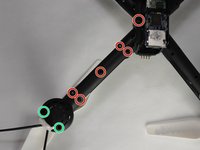
Salta al contenuto principale

Protocol Kaptur GPS Motor Replacement

Cosa ti serve

  1. Protocol Kaptur GPS Motor Replacement, Battery: passo 1, immagine 1 di 2 Protocol Kaptur GPS Motor Replacement, Battery: passo 1, immagine 2 di 2
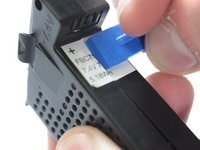
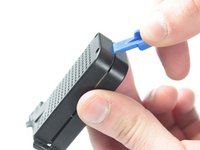
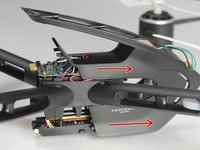
    • The battery is accessible through the back of the drone.

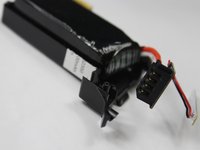
    • Press the tabs on both sides of the white stripe to pull the battery out.

  2. Protocol Kaptur GPS Motor Replacement: passo 2, immagine 1 di 3 Protocol Kaptur GPS Motor Replacement: passo 2, immagine 2 di 3 Protocol Kaptur GPS Motor Replacement: passo 2, immagine 3 di 3
    • Remove the screws starting with the three smaller ones on the top part of the battery.

    • Remove the three screws on the other side.

    • There are two screws tucked under where the yellow circle is located. You will need to remove the other screws first before you get to these two.

    • There should be one 7 mm Phillips head screw, three 6 mm Phillips head screws, and four 5 mm Phillips head screws.

  3. Protocol Kaptur GPS Motor Replacement: passo 3, immagine 1 di 2 Protocol Kaptur GPS Motor Replacement: passo 3, immagine 2 di 2
    • Remove the top piece, and gently pry the two halves apart. Divide the sticker if necessary.

  4. Protocol Kaptur GPS Motor Replacement: passo 4, immagine 1 di 2 Protocol Kaptur GPS Motor Replacement: passo 4, immagine 2 di 2
    • The battery is now removable from its container.

    • During reassembly, make sure the outlet is returned to its holder and faces the correct direction.

  5. Protocol Kaptur GPS Motor Replacement, Motor: passo 5, immagine 1 di 2 Protocol Kaptur GPS Motor Replacement, Motor: passo 5, immagine 2 di 2
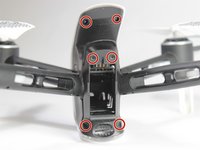
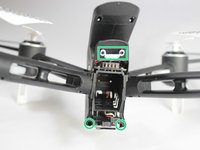
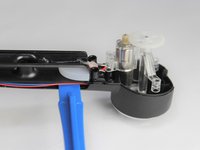
    • Remove the 4x 7mm Phillips head screws on the outside of the shell, and the 2x 5mm Phillips head screws from the middle, then remove the back part of the housing.

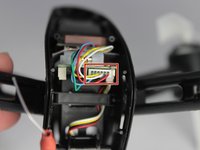
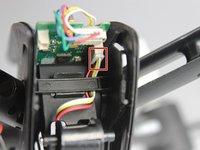
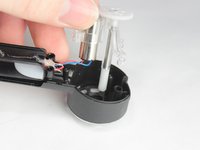
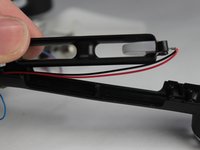
    • Remove the two hidden screws at the bottom, and the white power button.

    • There will be 6x 7 mm Phillips head screws, and 2x 5 mm Phillips head screws in total.

  6. Protocol Kaptur GPS Motor Replacement: passo 6, immagine 1 di 3 Protocol Kaptur GPS Motor Replacement: passo 6, immagine 2 di 3 Protocol Kaptur GPS Motor Replacement: passo 6, immagine 3 di 3
    • Unplug all the cords from the circuit boards.

    • Carefully slide the main body off of the arms.

  7. Protocol Kaptur GPS Motor Replacement: passo 7, immagine 1 di 3 Protocol Kaptur GPS Motor Replacement: passo 7, immagine 2 di 3 Protocol Kaptur GPS Motor Replacement: passo 7, immagine 3 di 3
    • Remove all screws from all four arms, and the screws on either side of the center.

    • The screws on the arms are 7mm.

    • The screws on the motor are 9mm.

    • Remove the 5mm screw holding the rotor onto the drone.

    • Note There should be 22x 7 mm Phillips head screws, 8x 9 mm Phillips head screws and 1x 5 mm Phillips head screw.

  8. Protocol Kaptur GPS Motor Replacement: passo 8, immagine 1 di 1
    • Gently pry apart the upper and lower part of the shell by working the opening tool along the middle seam.

  9. Protocol Kaptur GPS Motor Replacement: passo 9, immagine 1 di 3 Protocol Kaptur GPS Motor Replacement: passo 9, immagine 2 di 3 Protocol Kaptur GPS Motor Replacement: passo 9, immagine 3 di 3
    • Unscrew the motor screws, and remove the motor.

    • There will be 2x 6 mm Phillips head screws.

    • Pry up the middle portion of the arm to access the cables.

  10. Protocol Kaptur GPS Motor Replacement: passo 10, immagine 1 di 2 Protocol Kaptur GPS Motor Replacement: passo 10, immagine 2 di 2
    • Remove the motor by unsoldering the cords from the main circuit board.

    • The motor will either have blue and red cords, or black and white cords, with two of each kind on opposite sides of the drone. It is important that the new motor spins the same direction as the old one, and that you connect the leads to the correct port.

Conclusione

To reassemble your device, follow these instructions in reverse order.

Altre 9 persone hanno completato questa guida.

Team

UW Stout, Team S8-G6, Ogden Spring 2018 Membro di UW Stout, Team S8-G6, Ogden Spring 2018

UWSTOUT-OGDEN-S18S8G6

3 Membri

4 Guide realizzate

11 Commenti

What size and rpm does it take, but also is there a way to upgrade the motors for more punch?

Robert Roy - Replica

Thank you.for your information and time to make my grandson

tadashiflowers2 - Replica

What size is the main gear??

helpinstuck - Replica

2.0

I believe

helpinstuck - Replica

Anyone else having a problem with the props twisting on the shaft during flight

helpinstuck - Replica

Aggiungi Commento

Visualizza Statistiche:

Ultime 24 Ore: 1

Ultimi 7 Giorni: 5

Ultimi 30 Giorni: 9

Tutti i Tempi: 4,955