Salta al contenuto principale

ProScan PLT7223G Motherboard Replacement

Cosa ti serve

  1. ProScan PLT7223G Motherboard Replacement, Motherboard: passo 1, immagine 1 di 1
    • Remove both 4 mm screws from the top of the tablet using a PH00 screw driver.

  2. ProScan PLT7223G Motherboard Replacement: passo 2, immagine 1 di 1
    • Use the blue opening tool to pry the tablet open.

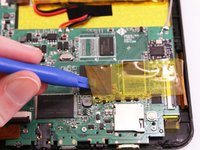
  3. ProScan PLT7223G Motherboard Replacement: passo 3, immagine 1 di 2 ProScan PLT7223G Motherboard Replacement: passo 3, immagine 2 di 2
    • Remove all yellow tape from the motherboard.

  4. ProScan PLT7223G Motherboard Replacement: passo 4, immagine 1 di 3 ProScan PLT7223G Motherboard Replacement: passo 4, immagine 2 di 3 ProScan PLT7223G Motherboard Replacement: passo 4, immagine 3 di 3
    • With the soldering tool remove the speaker wires, battery wires and gray wire that are connected to the motherboard.

    • Pay close attention to where each wire goes, so that you reconnect them in the correct order.

  5. ProScan PLT7223G Motherboard Replacement: passo 5, immagine 1 di 3 ProScan PLT7223G Motherboard Replacement: passo 5, immagine 2 di 3 ProScan PLT7223G Motherboard Replacement: passo 5, immagine 3 di 3
    • Lift all three ZIF connectors to disconnect the ribbon wire.

  6. ProScan PLT7223G Motherboard Replacement: passo 6, immagine 1 di 1
    • Use a PH00 screw driver to remove the three 4 mm screws holding the motherboard down.

  7. ProScan PLT7223G Motherboard Replacement: passo 7, immagine 1 di 1
    • Lift the motherboard off the device.

Conclusione

To reassemble your device, follow these instructions in reverse order.

Altre 2 persone hanno completato questa guida.

Un commento

Once the motherboard is out, what do you do ? Where do I go? More information would be appreciated.

rainbowsend14 - Replica

Aggiungi Commento

Visualizza Statistiche:

Ultime 24 Ore: 1

Ultimi 7 Giorni: 5

Ultimi 30 Giorni: 6

Tutti i Tempi: 1,469