Salta al contenuto principale

PowerBook 3400 M3553 RAM Replacement

Cosa ti serve

  1. PowerBook 3400 M3553 RAM Replacement, Battery: passo 1, immagine 1 di 1
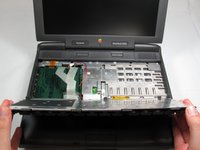
    • Close the screen and turn the PowerBook over, orienting the computer upside down, using the label to guide you.

  2. PowerBook 3400 M3553 RAM Replacement: passo 2, immagine 1 di 2 PowerBook 3400 M3553 RAM Replacement: passo 2, immagine 2 di 2
    • Hold the button on the front left side and slide the battery out.

  3. PowerBook 3400 M3553 RAM Replacement, Keyboard: passo 3, immagine 1 di 1
    • With a Torx T8 screwdriver, remove the three Torx 24mm screws along the center of the back panel.

  4. PowerBook 3400 M3553 RAM Replacement: passo 4, immagine 1 di 3 PowerBook 3400 M3553 RAM Replacement: passo 4, immagine 2 di 3 PowerBook 3400 M3553 RAM Replacement: passo 4, immagine 3 di 3
    • Turn the computer over and open the display. You should see that the keyboard is loose.

    • Before attempting to remove the keyboard, note that a ribbon cable connects the keyboard to the logic board. Improper removal may damage your keyboard.

    • Slightly lift the front of the keyboard up, and slide the keyboard towards yourself.

    • Carefully lift the top half of the keyboard and pull it towards yourself.

  5. PowerBook 3400 M3553 RAM Replacement: passo 5, immagine 1 di 2 PowerBook 3400 M3553 RAM Replacement: passo 5, immagine 2 di 2
    • Loosen the ribbon cables connecting the keyboard to the computer by using a plastic opening tool to lift the tabs on either side of the cable port.

    • Gently remove the ribbons from its tabs.

  6. PowerBook 3400 M3553 RAM Replacement, RAM: passo 6, immagine 1 di 2 PowerBook 3400 M3553 RAM Replacement, RAM: passo 6, immagine 2 di 2
    • Gently wiggle the RAM card to loosen the connection until it pulls free.

Conclusione

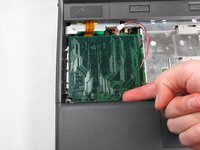
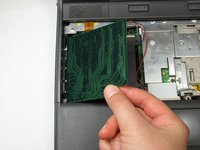
To install the new RAM card, follow these steps in reverse order.

Altre 2 persone hanno completato questa guida.

Team

Cal Poly, Team 24-59, Amido Spring 2011 Membro di Cal Poly, Team 24-59, Amido Spring 2011

CPSU-AMIDO-S11S24G59

4 Membri

9 Guide realizzate

1Commento della guida

To reattach the keyboard I found it necessary to keep the kid open and push the keyboard all the way down; otherwise, the screws didn’t engage.

Scott - Replica

Aggiungi Commento

Visualizza Statistiche:

Ultime 24 Ore: 0

Ultimi 7 Giorni: 3

Ultimi 30 Giorni: 10

Tutti i Tempi: 2,866