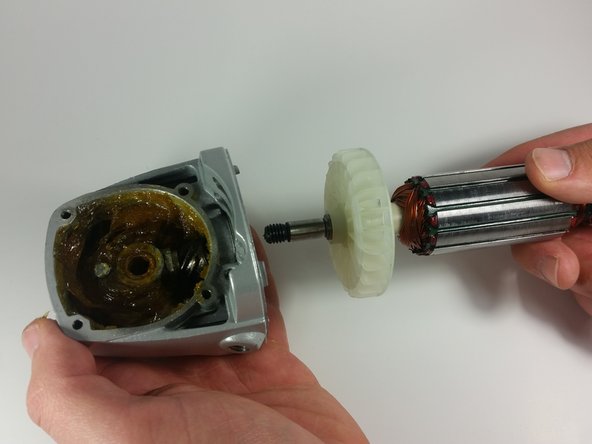
Salta al contenuto principale

Porter-Cable PC60TAG Motor Assembly Replacement

Cosa ti serve

  1. Porter-Cable PC60TAG Motor Assembly Replacement, Motor Assembly: passo 1, immagine 1 di 1
    • Using the Phillips #2 screwdriver, remove the 3/4" Phillips screw on the back cover.

  2. Porter-Cable PC60TAG Motor Assembly Replacement: passo 2, immagine 1 di 1
    • Holding the front of the device, carefully slide the back cover over the cord.

  3. Porter-Cable PC60TAG Motor Assembly Replacement: passo 3, immagine 1 di 1
    • Using the Phillips #2 screwdriver, remove the1/2" Phillips screw holding on the motor brush arm. Repeat on the other side.

  4. Porter-Cable PC60TAG Motor Assembly Replacement: passo 4, immagine 1 di 1
    • Carefully pull the motor brush arm away from the other device, you can leave the wire connected to device. Repeat on the other side.

  5. Porter-Cable PC60TAG Motor Assembly Replacement: passo 5, immagine 1 di 1
    • Using the Phillips #2 screwdriver, remove the 1 inch black retainer screw.

  6. Porter-Cable PC60TAG Motor Assembly Replacement: passo 6, immagine 1 di 1
    • Using the Phillips #2screwdriver, remove the 4, 1/2" Phillips screws around the head gear.

  7. Porter-Cable PC60TAG Motor Assembly Replacement: passo 7, immagine 1 di 1
    • Carefully pull the head gear away from the device, and set aside.

  8. Porter-Cable PC60TAG Motor Assembly Replacement: passo 8, immagine 1 di 1
    • Using the Phillips #2 screwdriver, remove the two, 1/2" screws holding the head to the body on the bottom side of the grinder.

  9. Porter-Cable PC60TAG Motor Assembly Replacement: passo 9, immagine 1 di 1
    • Using the Phillips #2 screwdriver, remove the other two 1/2" screws holding the head to the body on the top side of the grinder.

  10. Porter-Cable PC60TAG Motor Assembly Replacement: passo 10, immagine 1 di 1
    • Holding the head of the device, carefully pull the motor assembly out of the body of the device.

  11. Porter-Cable PC60TAG Motor Assembly Replacement: passo 11, immagine 1 di 1
    • Using a 9/16" wrench, loosen the spindle nut inside the head, from the motor assembly.

  12. Porter-Cable PC60TAG Motor Assembly Replacement: passo 12, immagine 1 di 1
    • Pull the motor assembly away from the head.

Conclusione

To reassemble your device, follow these instructions in reverse order.

0 Commenti

Aggiungi Commento

Visualizza Statistiche:

Ultime 24 Ore: 0

Ultimi 7 Giorni: 2

Ultimi 30 Giorni: 10

Tutti i Tempi: 505