Salta al contenuto principale

PlayStation Classic Controller Port Replacement

Cosa ti serve

  1. PlayStation Classic Controller Port Replacement, Motherboard: passo 1, immagine 1 di 1
    • Flip the console so its back is facing up.

  2. PlayStation Classic Controller Port Replacement: passo 2, immagine 1 di 1
    • Remove the five 3mm screws using the Phillips #00 screwdriver.

    • Make sure to keep your screws together in a secure location to avoid misplacement.

  3. PlayStation Classic Controller Port Replacement: passo 3, immagine 1 di 3 PlayStation Classic Controller Port Replacement: passo 3, immagine 2 di 3 PlayStation Classic Controller Port Replacement: passo 3, immagine 3 di 3
    • Remove the back plate from the rest of the console using your hands or the Jimmy tool.

  4. PlayStation Classic Controller Port Replacement: passo 4, immagine 1 di 1
    • Unscrew the motherboard's five 3mm screws with the Phillips #00 screwdriver.

    • Be careful not to apply too much force. The motherboard is flimsy and easy to break.

    • Keep track of your screws once they are removed.

  5. PlayStation Classic Controller Port Replacement: passo 5, immagine 1 di 3 PlayStation Classic Controller Port Replacement: passo 5, immagine 2 di 3 PlayStation Classic Controller Port Replacement: passo 5, immagine 3 di 3
    • Carefully remove the motherboard from the the rest of the console using your hands or the Jimmy tool.

  6. PlayStation Classic Controller Port Replacement: passo 6, immagine 1 di 3 PlayStation Classic Controller Port Replacement: passo 6, immagine 2 di 3 PlayStation Classic Controller Port Replacement: passo 6, immagine 3 di 3
    • The motherboard is connected to its metal protective casing with sticky pads. No tools are required to remove it.

    • Pull the metal casing off the motherboard.

    • Remember to be gentle when handling the motherboard.

  7. PlayStation Classic Controller Port Replacement, Controller Port: passo 7, immagine 1 di 2 PlayStation Classic Controller Port Replacement, Controller Port: passo 7, immagine 2 di 2
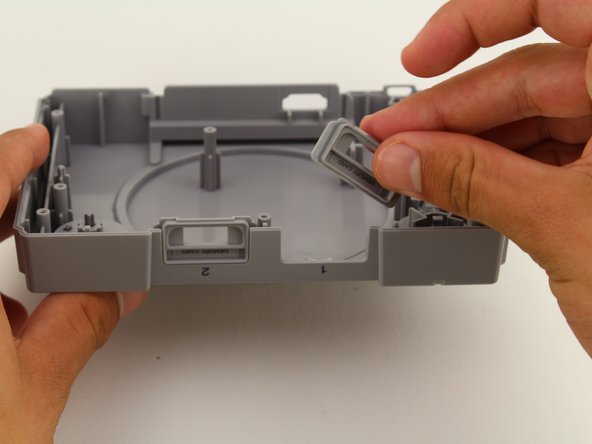
    • Identify the damaged or faulty controller port and simply use your fingers to remove.

Conclusione

To reassemble your device, follow these instructions in reverse order.

Un'altra persona ha completato questa guida.

Maxwell Webb

Membro da: 04/22/19

631 Reputazione

5 Guide realizzate

Team

Cal Poly, Team S2-G8, Maness Spring 2019 Membro di Cal Poly, Team S2-G8, Maness Spring 2019

CPSU-MANESS-S19S2G8

2 Membri

22 Guide realizzate

0 Commenti

Aggiungi Commento

Visualizza Statistiche:

Ultime 24 Ore: 1

Ultimi 7 Giorni: 2

Ultimi 30 Giorni: 24

Tutti i Tempi: 1,657