Questa versione può contenere modifiche errate. Passa all'ultima istantanea verificata.
Cosa ti serve
-
-
Usa la punta di uno spudger per rimuovere dal lato della PS3 il coprivite in plastica nera.
-
-
-
Rimuovi le seguenti sette viti:
-
Sei viti Phillips da 52 mm
-
Una vite Phillips da 30 mm
-
-
-
-
Solleva la cover superiore dal suo bordo posteriore e ruotano verso la parte anteriore della PS3.
-
Rimuovi la cover superiore.
-
C'è un gancio in plastica posizionato in un foro sul retro dell'angolo superiore destro. Spingi con delicatezza con uno spudger il gancio in plastica verso la parte posteriore della console in modo da liberare la parte posteriore destra della console.
-
-
-
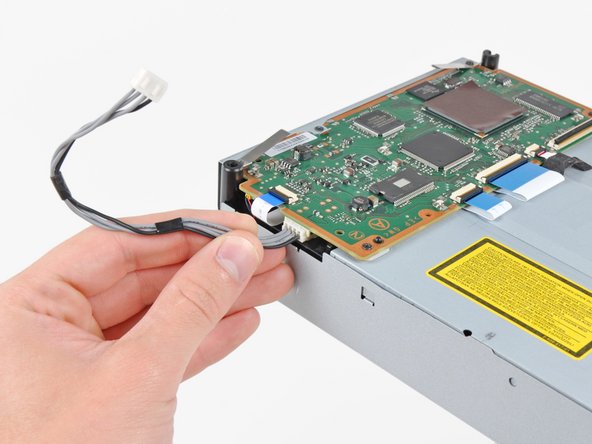
Disconnetti il cavo di alimentazione del lettore Blu-ray dalla scheda madre.
-
-
Questo passaggio è privo di traduzione. Aiuta a tradurlo
-
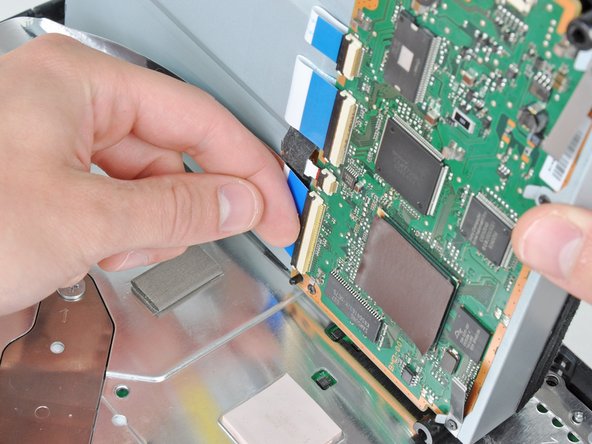
A2 ribbon cable was removed in Step 9 of the previous guide. Now remove ribbon cables A3, A4, A5 and A6 by using your fingernail to flip open the ribbon flaps.
-
With a Ph#00 screwdriver remove screws 9, 10, 11, 12 and 13.
-
Note that screws 11 & 13 are fastening a stabiliser on some models. These are pictured in the third photo in step 9, and you will need to recall their position for reassembly.
-
-
Questo passaggio è privo di traduzione. Aiuta a tradurlo
-
With extreme caution move the BluRay control board in a flipping motion by moving the left side of the controller upwards levering towards the right. Keep the right side of the controller close to the BluRay drive as the red and black A7 cable is delicate.
-
Remove cable A7 which is the cable that links the PS3s disc drive eject detector to the control board.
-
-
Questo passaggio è privo di traduzione. Aiuta a tradurlo
-
Remove screws 14 and 15.
-
Part C is a stabilizer and grounding contact to help absorb movement while the Blu-ray drive is in use. This may be located in a different area of your drive as decided by the manufacturer. There may also be additional ones. Make sure when reassembling to put this stabiliser back in the same place as it is originally found even if it is not found in exactly the same location as this article. Failure to do so could result in disc scratching.
-
Remove the silver coloured drive cover.
-
-
Questo passaggio è privo di traduzione. Aiuta a tradurlo
-
Remove screws 16, 17, 18, 19 and 20.
-
Remove magnetic spindle D.
-
Remove top of drive being careful again not to damage the red and black cable.
-
-
Questo passaggio è privo di traduzione. Aiuta a tradurlo
-
Remove screws 21 and 22 and the brackets they hold in place.
-
Now remove bar E.
-
Unclip ribbon F.
-
Remove and replace Laser Assembly G with new Laser Assembly.
-
Follow this guide in reverse to reassemble.
-
-
Questo passaggio è privo di traduzione. Aiuta a tradurlo
-
The KES-400AAA laser is known to work with the following models: CECHE03, CECHA03, CECHC03, CECHG03, CECHB0 and CECHC03 but more variants accept the KES-400AAA laser assembly. Please contact the seller for more information. Generally older models with 4 usb ports accept the KES-400AAA while the 2 usb models use the KES-410CA laser assembly.
-
Annulla: non ho completato questa guida.
Altre 73 persone hanno completato questa guida.
29 Commenti
Perhaps this guide can integrate the procedure for removing a stuck disc? Many YLOD units die with a disc in the drive and some repair service providers charge extra to remove it. What's worse, sometimes it is not your disc! I was going to send it to Sony for my repair except that the disc inside is rented and needs to be extracted right away. The repair providers who charge extra implied to me that they charge extra because the drive needs a disc reinserted if it is going to work again when booted up in a working PS3 (something about rails that would fall without a disc holding them up). I believe that they throw in a blank CD/DVD or one of those clear plastic separator discs that come in recordable disc cake-boxes on the top and bottom of the stack.
If you do these steps you will get to the disk and remove it easily
This tutorial is brilliant and saved my PS3. Thank you.
One comment or question really: Between steps 9 and 10 a heat shield magically appears. In Step 9 when you see the drive being taken off, there's no apparent heat shield.
But in Step 10 we see the heat shield. On my unit, there doesn't appear to be one. So this was - and is - a little confusing. I thought somehow I'd lost the part. (Though in the space I was working, there's just nowhere it could have gone.) Is this a problem to not have this? It's hard to tell from your pics whether the original had a shield or not or if these were two different units.
Thanks
You are correct, the units in steps 9 and 10 are different. Steps 1-9 are part of an original iFixit tear-down, steps 10-15 are my user-created guide which iFixit staff have merged with their own.
There may be some variation between units, if your original disc drive didn't have a heat shield then I wouldn't worry. It doesn't appear that the unit in steps 1-9 from iFixit had one either. Thanks for the feedback, I'm glad the guide helped you fix your issue.
It is not recommended to replace just the laser unit. It is better to replace the drive chassis (metal part, including the rail and disc spindle motor) as an assembly because the height of the rails are calibrated in factory. Unscrewing the rail screws will change the alignment and you can't calibrate it.


