Salta al contenuto principale

PlayStation 2 Slimline SCPH-900xx Fan Replacement

Cosa ti serve

  1. PlayStation 2 Slimline SCPH-900xx Fan Replacement, Lower Smart Plate: passo 1, immagine 1 di 1
    • Turn off your PlayStation 2 and remove the disc and Memory Card.

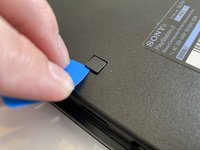
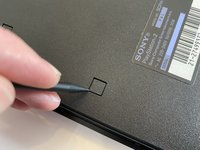
    • Turn over the PlayStation 2 and put it on a soft surface (e.g. a towel).

  2. PlayStation 2 Slimline SCPH-900xx Fan Replacement: passo 2, immagine 1 di 1
    • Locate the six covers.

    • Two are located underneath the feet.

    • One cover is located underneath the Void sticker.

  3. PlayStation 2 Slimline SCPH-900xx Fan Replacement: passo 3, immagine 1 di 1
    • Remove the Void sticker with a Spudger and some cleaning alcohol

    • Removing the Void sticker will void the warranty of your device!

    • Some versions of that console maybe don’t have the sticker or it’s relocated.

  4. PlayStation 2 Slimline SCPH-900xx Fan Replacement: passo 4, immagine 1 di 2 PlayStation 2 Slimline SCPH-900xx Fan Replacement: passo 4, immagine 2 di 2
    • Remove the covers by using either a Spudger, Opening Picks or your fingernail.

  5. PlayStation 2 Slimline SCPH-900xx Fan Replacement: passo 5, immagine 1 di 1
    • Remove the six Phillips #1 screws with a screwdriver.

    • The screws on the right are a bit deeper inside the shell as like the rest but are the same size.

  6. PlayStation 2 Slimline SCPH-900xx Fan Replacement: passo 6, immagine 1 di 2 PlayStation 2 Slimline SCPH-900xx Fan Replacement: passo 6, immagine 2 di 2
    • Separate the clips at the front and the overhanging side from their mounting using a Prying Tool.

    • Separate the two halves.

  7. PlayStation 2 Slimline SCPH-900xx Fan Replacement, Fan: passo 7, immagine 1 di 1
    • Pull the ribbon cable straight out from the socket.

    • To reinstall the cable, hold it near the end and push it straight into the connector, being careful not to kink the cable. If you can, apply the force to the plastic reinforcement rather than the cable itself.

  8. PlayStation 2 Slimline SCPH-900xx Fan Replacement: passo 8, immagine 1 di 1
    • Remove three Phillips #0 screws securing the fan.

    • Lift the fan straight up and out of the PS2.

Conclusione

To reassemble your device, follow the above steps in reverse order.

Un'altra persona ha completato questa guida.

Un ringraziamento speciale a questi traduttori:

de en

100%

MrJulian ci sta aiutando ad aggiustare il mondo! Vuoi partecipare?
Inizia a tradurre ›

MrJulian

Membro da: 10/22/20

1.543 Reputazione

7 Guide realizzate

0 Commenti

Aggiungi Commento

Visualizza Statistiche:

Ultime 24 Ore: 4

Ultimi 7 Giorni: 10

Ultimi 30 Giorni: 48

Tutti i Tempi: 395