Salta al contenuto principale

PlayStation 2 Slimline SCPH-900xx Clock Battery Replacement

Cosa ti serve

  1. PlayStation 2 Slimline SCPH-900xx Clock Battery Replacement, Lower Smart Plate: passo 1, immagine 1 di 1
    • Turn off your PlayStation 2 and remove the disc and Memory Card.

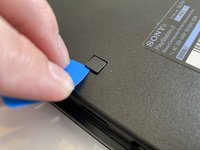
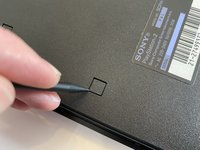
    • Turn over the PlayStation 2 and put it on a soft surface (e.g. a towel).

  2. PlayStation 2 Slimline SCPH-900xx Clock Battery Replacement: passo 2, immagine 1 di 1
    • Locate the six covers.

    • Two are located underneath the feet.

    • One cover is located underneath the Void sticker.

  3. PlayStation 2 Slimline SCPH-900xx Clock Battery Replacement: passo 3, immagine 1 di 1
    • Remove the Void sticker with a Spudger and some cleaning alcohol

    • Removing the Void sticker will void the warranty of your device!

    • Some versions of that console maybe don’t have the sticker or it’s relocated.

  4. PlayStation 2 Slimline SCPH-900xx Clock Battery Replacement: passo 4, immagine 1 di 2 PlayStation 2 Slimline SCPH-900xx Clock Battery Replacement: passo 4, immagine 2 di 2
    • Remove the covers by using either a Spudger, Opening Picks or your fingernail.

  5. PlayStation 2 Slimline SCPH-900xx Clock Battery Replacement: passo 5, immagine 1 di 1
    • Remove the six Phillips #1 screws with a screwdriver.

    • The screws on the right are a bit deeper inside the shell as like the rest but are the same size.

  6. PlayStation 2 Slimline SCPH-900xx Clock Battery Replacement: passo 6, immagine 1 di 2 PlayStation 2 Slimline SCPH-900xx Clock Battery Replacement: passo 6, immagine 2 di 2
    • Separate the clips at the front and the overhanging side from their mounting using a Prying Tool.

    • Separate the two halves.

  7. PlayStation 2 Slimline SCPH-900xx Clock Battery Replacement, Clock Battery: passo 7, immagine 1 di 1
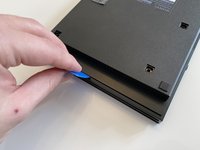
    • The clock battery is located under the drive.

    • Do not touch the Laser (red circle)! Otherwise it can’t read the disc anymore!

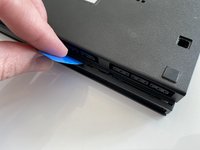
    • Make sure that the sensor array for the on/off switch sits correctly when reassembling the device.

    • This picture shows the European model (SCPH-90004). Some models with other region codes may not have a clock battery.

  8. PlayStation 2 Slimline SCPH-900xx Clock Battery Replacement: passo 8, immagine 1 di 1
    • Pull away the metal mounting on the right to remove the old button cell.

    • Replace the old button cell/clock battery with a new button cell type CR 2032 with 3V of voltage.

Conclusione

To reassemble your device, follow the above steps in reverse order.

Altre 3 persone hanno completato questa guida.

Un ringraziamento speciale a questi traduttori:

de en

100%

Questi traduttori ci stanno aiutando ad aggiustare il mondo! Vuoi partecipare?
Inizia a tradurre ›

MrJulian

Membro da: 10/22/20

1.543 Reputazione

7 Guide realizzate

5 Commenti

Simple and easy to follow. I really do miss how straightforward it used to be to take apart game consoles.

Melsypoo - Replica

Everything is okay but how I can extract drive?

Memozit - Replica

Hey Memozit,

To remove the optical drive of the PS2 follow this guide: PlayStation 2 Slimline SCPH-900xx Laufwerk ersetzen

Greetings

MrJulian

MrJulian -

I opened up my slim silver ps2 scph-90001, can't find the cmos battery anywhere. It's not under the fan, it's not under the motherboard. This is the American silver version. I have the replacement battery I just don't know where to put it.

Cory - Replica

Hey Cory,

The PS2 shown in the guide is a European model (SCPH-90004) which has a CMOS battery. The guide mentions that other region models may not have a clock battery which could be the case on 01 models (Northern America).

Greetings

MrJulian

MrJulian -

Aggiungi Commento

Visualizza Statistiche:

Ultime 24 Ore: 16

Ultimi 7 Giorni: 70

Ultimi 30 Giorni: 373

Tutti i Tempi: 9,424