Salta al contenuto principale

Pioneer MXT-X366BT Metal Case Replacement

Cosa ti serve

  1. Pioneer MXT-X366BT Metal Case Replacement, Metal Casing: passo 1, immagine 1 di 2 Pioneer MXT-X366BT Metal Case Replacement, Metal Casing: passo 1, immagine 2 di 2
    • Apply small amount of pressure inward with a plastic opening tool to release bottom clip.

    • Pry the top clip with the plastic opening tool to release it.

    • The head unit is symmetrical and has the same amount of clips on the other side.

  2. Pioneer MXT-X366BT Metal Case Replacement: passo 2, immagine 1 di 1
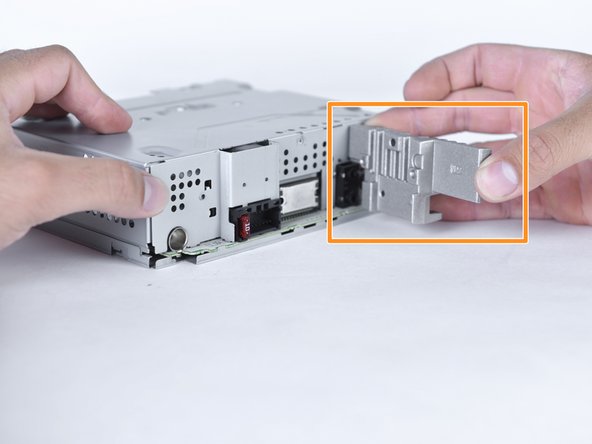
    • Remove the face plate holder.

  3. Pioneer MXT-X366BT Metal Case Replacement: passo 3, immagine 1 di 1
    • Remove the six 5mm Phillips-head screws with Philips #2 screwdriver.

  4. Pioneer MXT-X366BT Metal Case Replacement: passo 4, immagine 1 di 2 Pioneer MXT-X366BT Metal Case Replacement: passo 4, immagine 2 di 2
    • Remove the inner three 5mm Phillips head screws, with a Phillips #2 screwdriver, attached to the metal backing.

    • Remove the metal backing that is now free.

  5. Pioneer MXT-X366BT Metal Case Replacement: passo 5, immagine 1 di 1
    • Carefully slide the metal casing forward.

    • Metal piece standing is the rear of the head unit.

    • Edges are sharp.

  6. Pioneer MXT-X366BT Metal Case Replacement: passo 6, immagine 1 di 1
    • Lift the metal casing from the rear and pull it away.

    • Edges are sharp.

  7. Pioneer MXT-X366BT Metal Case Replacement: passo 7, immagine 1 di 1
    • The metal casing is now fully removed.

Conclusione

To reassemble your device, follow these instructions in reverse order.

Un'altra persona ha completato questa guida.

0 Commenti

Aggiungi Commento

Visualizza Statistiche:

Ultime 24 Ore: 1

Ultimi 7 Giorni: 2

Ultimi 30 Giorni: 7

Tutti i Tempi: 278