Questa versione può contenere modifiche errate. Passa all'ultima istantanea verificata.
Cosa ti serve
-
Questo passaggio è privo di traduzione. Aiuta a tradurlo
-
Remove the two 6.4 mm Phillips screws on each side of the device's casing.
-
-
Questo passaggio è privo di traduzione. Aiuta a tradurlo
-
Remove the two 6.5 mm Phillips screws on the back of the device casing.
-
-
Questo passaggio è privo di traduzione. Aiuta a tradurlo
-
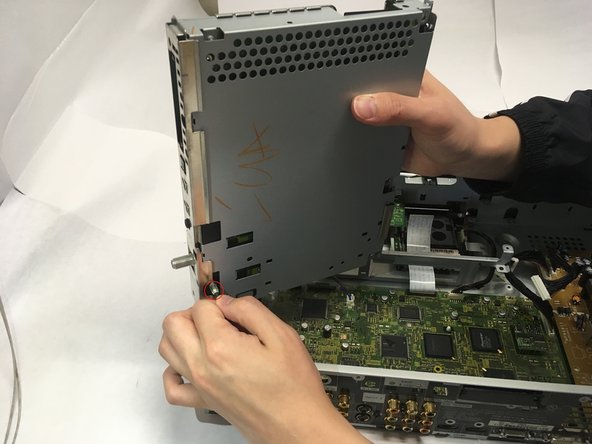
Grip the front panel in one hand and the back of the casing in the other. Pull the casing back, and slide it up and away from the inner box.
-
-
Questo passaggio è privo di traduzione. Aiuta a tradurlo
-
To replace the back cooling fan, grip the ribbon connector at slot M10 and remove by gently pulling upward.
-
-
Questo passaggio è privo di traduzione. Aiuta a tradurlo
-
Remove the two 6.5 mm Phillips mounting screws at the back of the device.
-
-
Questo passaggio è privo di traduzione. Aiuta a tradurlo
-
Grip the frame of the cooling fan and slide away from the back wall until the tabs are no longer in the holes of the casing.
-
Lift the cooling fan out of the device.
-
-
-
Questo passaggio è privo di traduzione. Aiuta a tradurlo
-
To remove the optical drive cooling fan, grip the ribbon connector at M11 and gently remove by pulling away for the slot.
-
-
Questo passaggio è privo di traduzione. Aiuta a tradurlo
-
Flip the latch on the ribbon connector upward to allow for cable removal.
-
Grip the ribbon cable and remove by gently pulling away from the unlatched connector.
-
-
Questo passaggio è privo di traduzione. Aiuta a tradurlo
-
Remove the two 6.4 mm Phillips mounting screws on the optical drive cooling fan.
-
-
Questo passaggio è privo di traduzione. Aiuta a tradurlo
-
Grip the frame of the cooling fan and slide it toward the front panel, then lift out of the device.
-
-
Questo passaggio è privo di traduzione. Aiuta a tradurlo
-
Unplug ribbon cables D4 and D5. To unplug D4, flip the gate up and pull the ribbon away.
-
-
Questo passaggio è privo di traduzione. Aiuta a tradurlo
-
Remove four 1/4th inch Phillips screws on the back of the casing.
-
Unscrew and remove the nut from the threaded connector.
-
-
Questo passaggio è privo di traduzione. Aiuta a tradurlo
-
Pull the optical drive toward the interior of the device and then lift upwards, then pull to remove the cord on the bottom left corner before removing the drive completely.
-
-
Questo passaggio è privo di traduzione. Aiuta a tradurlo
-
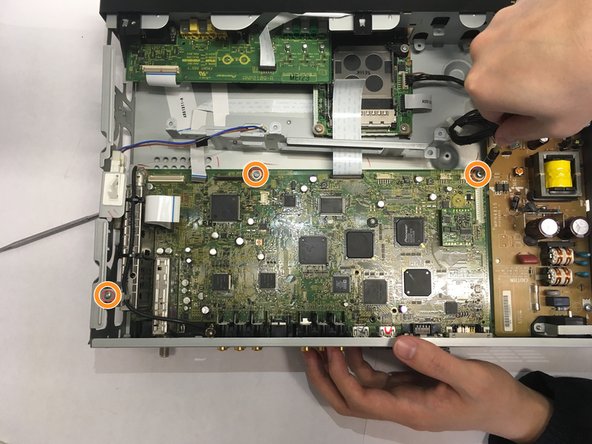
Unplug connectors at M1, M4, M7, M8, M9 by gently pulling upward.
-
Remove all 3/8 inch Phillips screws connecting motherboard to casing.
-
-
Questo passaggio è privo di traduzione. Aiuta a tradurlo
-
Remove the five 1/4 inch Phillips screws and two 1/8 inch Phillips screws on the back of the casing.
-
Unscrew and remove nut from threaded connector.
-
-
Questo passaggio è privo di traduzione. Aiuta a tradurlo
-
Remove four 1/2 inch screws using a nutdriver.
-
-
Questo passaggio è privo di traduzione. Aiuta a tradurlo
-
Pinch the securing tabs and lift the motherboard toward the interior of the device to remove it.
-
-
Questo passaggio è privo di traduzione. Aiuta a tradurlo
-
Pull it toward the interior of the device and lift it away.
-


Team

Baylor, Team S1-G5, Johnson Spring 2018 Membro di Baylor, Team S1-G5, Johnson Spring 2018
BU-JOHNSON-S18S1G5
3 Membri
6 Guide realizzate