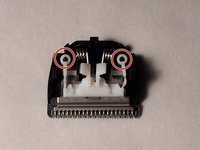
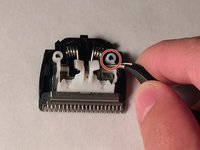
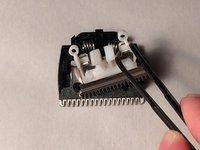
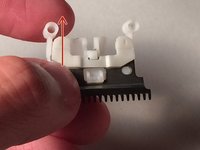
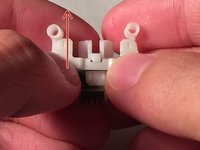
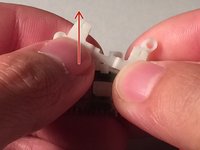
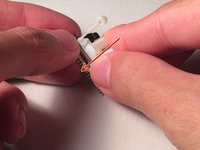
Salta al contenuto principale

Philips Norelco BeardTrimmer 3100 Blade Replacement

Cosa ti serve

  1. Philips Norelco BeardTrimmer 3100 Blade Replacement, Blade: passo 1, immagine 1 di 1
    • Remove the comb from the head of the trimmer.

  2. Philips Norelco BeardTrimmer 3100 Blade Replacement: passo 2, immagine 1 di 2 Philips Norelco BeardTrimmer 3100 Blade Replacement: passo 2, immagine 2 di 2
    • Place thumb underneath the blade; push upward to pop the blade off.

  3. Philips Norelco BeardTrimmer 3100 Blade Replacement: passo 3, immagine 1 di 3 Philips Norelco BeardTrimmer 3100 Blade Replacement: passo 3, immagine 2 di 3 Philips Norelco BeardTrimmer 3100 Blade Replacement: passo 3, immagine 3 di 3
    Attrezzo utilizzato in questo passaggio:
    Tweezers
    $4.99
    • Grab the plastic arms with the tweezers and pull them apart from the base.

  4. Philips Norelco BeardTrimmer 3100 Blade Replacement: passo 4, immagine 1 di 3 Philips Norelco BeardTrimmer 3100 Blade Replacement: passo 4, immagine 2 di 3 Philips Norelco BeardTrimmer 3100 Blade Replacement: passo 4, immagine 3 di 3
    • Remove the plastic casing from the underside of the blade.

  5. Philips Norelco BeardTrimmer 3100 Blade Replacement: passo 5, immagine 1 di 3 Philips Norelco BeardTrimmer 3100 Blade Replacement: passo 5, immagine 2 di 3 Philips Norelco BeardTrimmer 3100 Blade Replacement: passo 5, immagine 3 di 3
    • Remove the last plastic casing from the front side of the blade.

  6. Philips Norelco BeardTrimmer 3100 Blade Replacement: passo 6, immagine 1 di 2 Philips Norelco BeardTrimmer 3100 Blade Replacement: passo 6, immagine 2 di 2
    • Pull the spring off from the base with the tweezers.

  7. Philips Norelco BeardTrimmer 3100 Blade Replacement: passo 7, immagine 1 di 1
    • Pull the blade apart from the base with the tweezers.

Conclusione

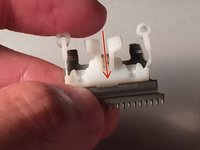
To reassemble your device, follow these instructions in reverse order.

Altre 21 persone hanno completato questa guida.

Darren Chu

Membro da: 09/03/15

1.617 Reputazione

3 Guide realizzate

Team

USF Tampa, Team 15-2, Blackwell Fall 2015 Membro di USF Tampa, Team 15-2, Blackwell Fall 2015

USFT-BLACKWELL-F15S15G2

4 Membri

14 Guide realizzate

10 Commenti

what about getting it back togeather

andrewv100 - Replica

Sadly it is impossible to put the parts back together. It isnt just as simple as start with the end. Normally i am quite good with fixing stuff. But this time... maybe because mine is broken? A guide for putting it back together should show me where it g9es wrong. But thanks for the guide anyways, thanks for the time you put into it.

Bart Teeuwen - Replica

Now I can't get it back :-(

AbdulJalil - Replica

Buy a new one. It not worth the time and effort unless you're trying to get away from the wife

zorba - Replica

It's easy to get it back.i assembled mine a lot of times... Guys just try

tarangill.zippy - Replica

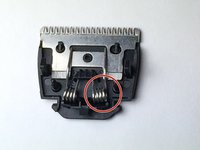
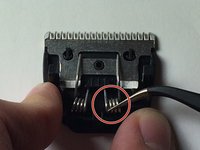
The only difficult part is the spring... Just pay attention to details and use something to hold the spring from within

tarangill.zippy - Replica

where can i find blade for trimmer ??

technology star - Replica

It's bit tough to re fix it.. however I done it in 15min try without any special tool..

First fix the basic assembly from bottom to top. Finally fix the tension spring with your finger by pushing it on the lock..

Try it once or twice, you can do it..

Ahamed navaz - Replica

Spring is a nightmare.

Michael Johnsey - Replica

Well I could reassemble mine. Just use your common sense to put the parts back together.

pranjal supratim - Replica

Aggiungi Commento

Visualizza Statistiche:

Ultime 24 Ore: 2

Ultimi 7 Giorni: 7

Ultimi 30 Giorni: 40

Tutti i Tempi: 22,536