Introduzione
This guide will lead users through the process of replacing a faulty touch screen. This may be required if the touch screen is unresponsive or does not turn on.
Cosa ti serve
-
-
Insert a nylon spudger underneath the top of the device.
-
Leverage the tool and pop off each of the eight tabs holding the plastic cover in place.
-
-
-
-
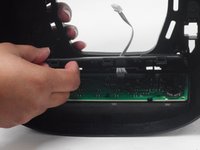
Remove the back panel from the touch screen motherboard by popping the tabs off using the nylon spudger.
-


To reassemble your device, follow these instructions in reverse order.
To reassemble your device, follow these instructions in reverse order.
Annulla: non ho completato questa guida.
Altre 2 persone hanno completato questa guida.
Team

University of Memphis, Team 3-1, Sneed Spring 2024 Membro di University of Memphis, Team 3-1, Sneed Spring 2024
UM-SNEED-S24S3G1
4 Membri
5 Guide realizzate