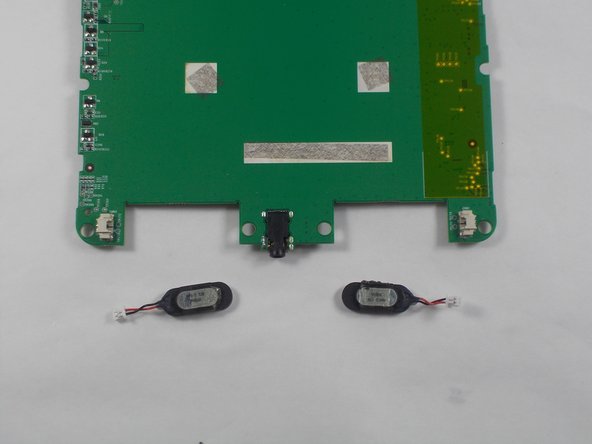
Salta al contenuto principale

Pandigital Novel PRD07T10WWH7 Speaker Replacement

Cosa ti serve

  1. Pandigital Novel PRD07T10WWH7 Speaker Replacement, Speaker: passo 1, immagine 1 di 1
    • Remove the back panel by sliding it downwards and pushing in slightly.

  2. Pandigital Novel PRD07T10WWH7 Speaker Replacement: passo 2, immagine 1 di 1
    • Pry off the second white panel, removing two clips underneath.

    • Start from the middle, and then work on the sides. The sides may be difficult to remove, so try to focus on one side and work your way around.

  3. Pandigital Novel PRD07T10WWH7 Speaker Replacement: passo 3, immagine 1 di 1
    • Using a Phillips #0 bit, remove the 12 4mm screws on the outer area of the gray area exposed by removing the back panels.

  4. Pandigital Novel PRD07T10WWH7 Speaker Replacement: passo 4, immagine 1 di 1
    • Carefully pry the back of the device from the front panel and motherboard. There are a series of clips holding them together that need to be separated.

  5. Pandigital Novel PRD07T10WWH7 Speaker Replacement: passo 5, immagine 1 di 1
    • Now, lift up the gray piece, unplug the battery connector, so the gray piece will come free from the rest of the device.

  6. Pandigital Novel PRD07T10WWH7 Speaker Replacement: passo 6, immagine 1 di 2 Pandigital Novel PRD07T10WWH7 Speaker Replacement: passo 6, immagine 2 di 2
    • Use the tip of your plastic spudger or your fingernail to flip up the long retaining flap. The longer, gold ribbon cable can now be pulled out safely.

  7. Pandigital Novel PRD07T10WWH7 Speaker Replacement: passo 7, immagine 1 di 2 Pandigital Novel PRD07T10WWH7 Speaker Replacement: passo 7, immagine 2 di 2
    • Use the tip of your plastic spudger or your fingernail to flip up the shorter retaining flap. The smaller gold ribbon cable can now be pulled out safely.

  8. Pandigital Novel PRD07T10WWH7 Speaker Replacement: passo 8, immagine 1 di 1
    • Starting from the side of the device, lift the motherboard off of the plastic standoffs.

    • You will need to peel both speakers off of the device's plastic frame.

  9. Pandigital Novel PRD07T10WWH7 Speaker Replacement: passo 9, immagine 1 di 3 Pandigital Novel PRD07T10WWH7 Speaker Replacement: passo 9, immagine 2 di 3 Pandigital Novel PRD07T10WWH7 Speaker Replacement: passo 9, immagine 3 di 3
    • Unplug the speakers from the connectors on the motherboard.

Conclusione

To reassemble your device, follow these instructions in reverse order.

Samuel Carey

Membro da: 10/19/16

401 Reputazione

3 Guide realizzate

Team

UMass Dartmouth, Team 3-7, Isaacson Fall 2016 Membro di UMass Dartmouth, Team 3-7, Isaacson Fall 2016

UMASSD-ISAACSON-F16S3G7

3 Membri

10 Guide realizzate

0 Commenti

Aggiungi Commento

Visualizza Statistiche:

Ultime 24 Ore: 0

Ultimi 7 Giorni: 0

Ultimi 30 Giorni: 0

Tutti i Tempi: 136