Questa versione può contenere modifiche errate. Passa all'ultima istantanea verificata.
Cosa ti serve
-
Questo passaggio è privo di traduzione. Aiuta a tradurlo
-
Locate the bay door for the battery on the left side of the laptop.
-
-
Questo passaggio è privo di traduzione. Aiuta a tradurlo
-
Slide the latch to the right and then down to unlock it.
-
Pull out the battery.
-
-
Questo passaggio è privo di traduzione. Aiuta a tradurlo
-
Remove the four hinge screws from the back of the computer.
-
-
Questo passaggio è privo di traduzione. Aiuta a tradurlo
-
Open the laptop and remove the four indicated screws with a Phillips size 0 screwdriver.
-
Pry off the plastic strip which was previously held in place by the screws.
-
-
Questo passaggio è privo di traduzione. Aiuta a tradurlo
-
Remove the four hinge screws to allow the hinges to rotate up and move.
-
-
-
Questo passaggio è privo di traduzione. Aiuta a tradurlo
-
Remove 16 screws from the top of the closed laptop.
-
12 Phillips size 1 screws
-
2 Phillips size 0 screws
-
2 Torx size 6 screws (T6)
-
-
Questo passaggio è privo di traduzione. Aiuta a tradurlo
-
Gently break the adhesive seal between the front and rear display cases with a plastic opening tool.
-
-
Questo passaggio è privo di traduzione. Aiuta a tradurlo
-
Pull the top halve of the casing up revealing the inside of the screen
-
-
Questo passaggio è privo di traduzione. Aiuta a tradurlo
-
The top half of the case can be removed by sliding the tabs out from under the hinges.
-
This makes unplugging the screen wiring much easier
-
-
Questo passaggio è privo di traduzione. Aiuta a tradurlo
-
There are 4 wires that need to be unplugged to remove the screen.
-
-
Questo passaggio è privo di traduzione. Aiuta a tradurlo
-
For the first wire, peel back the silver cover tape to reveal the connection.
-
-
Questo passaggio è privo di traduzione. Aiuta a tradurlo
-
Pull the wiring away from the connection to release it.
-
-
Questo passaggio è privo di traduzione. Aiuta a tradurlo
-
Remove the 3 strips of black tape as shown to reveal connections 2 and 3.
-
Pull the wiring for each away from the connections to remove.
-
-
Questo passaggio è privo di traduzione. Aiuta a tradurlo
-
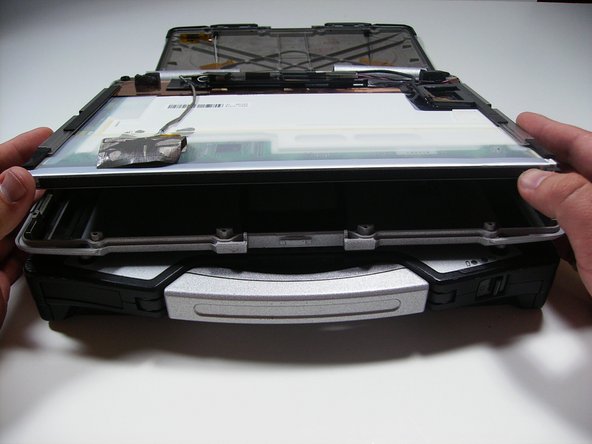
Using a plastic opening tool, lift the screen as shown from the case and pull free.
-


Annulla: non ho completato questa guida.
Altre 5 persone hanno completato questa guida.
Team

Cal Poly, Team 27-93, Amido Spring 2010 Membro di Cal Poly, Team 27-93, Amido Spring 2010
CPSU-AMIDO-S10S27G93
4 Membri
26 Guide realizzate
Un commento
This guide is good for replacing the LCD screen, but it is not complete for the touchscreen panel, which requires some more delicate and precise steps. I think the title of the guide needs to be changed.
Thanks