Salta al contenuto principale

Panasonic Toughbook CF-29 Optical Drive Replacement

  1. Panasonic Toughbook CF-29 Optical Drive Replacement, Battery: passo 1, immagine 1 di 1
    • Locate the bay door for the battery on the left side of the laptop.

  2. Panasonic Toughbook CF-29 Optical Drive Replacement: passo 2, immagine 1 di 2 Panasonic Toughbook CF-29 Optical Drive Replacement: passo 2, immagine 2 di 2
    • Slide the latch to the right and then down to unlock it.

    • Pull out the battery.

  3. Panasonic Toughbook CF-29 Optical Drive Replacement, Optical Drive: passo 3, immagine 1 di 1
    • Flip the device upside down with the handle facing away from you.

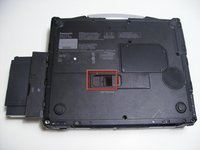
    • Open the optical drive bay by sliding its latch to the right.

    • Locate optical drive release mechanism on the bottom of the laptop.

  4. Panasonic Toughbook CF-29 Optical Drive Replacement: passo 4, immagine 1 di 1
    • Slide the latch cover to the right.

  5. Panasonic Toughbook CF-29 Optical Drive Replacement: passo 5, immagine 1 di 2 Panasonic Toughbook CF-29 Optical Drive Replacement: passo 5, immagine 2 di 2
    • Push the exposed switch to the left to eject the optical drive.

Conclusione

To reassemble your device, follow these instructions in reverse order.

Altre 2 persone hanno completato questa guida.

Clint Kirsop

Membro da: 04/13/10

109 Reputazione

4 Guide realizzate

Team

Cal Poly, Team 27-93, Amido Spring 2010 Membro di Cal Poly, Team 27-93, Amido Spring 2010

CPSU-AMIDO-S10S27G93

4 Membri

26 Guide realizzate

Un commento

What kind of USB enclosure would this fit in?

Terence Higgins - Replica

Aggiungi Commento

Visualizza Statistiche:

Ultime 24 Ore: 0

Ultimi 7 Giorni: 1

Ultimi 30 Giorni: 11

Tutti i Tempi: 6,791