Salta al contenuto principale

Panasonic Lumix DMC-ZS6 LCD Assembly Replacement

Cosa ti serve

  1. Panasonic Lumix DMC-ZS6 LCD Assembly Replacement, LCD Assembly: passo 1, immagine 1 di 1
    • Remove the battery and SD card.

  2. Panasonic Lumix DMC-ZS6 LCD Assembly Replacement: passo 2, immagine 1 di 3 Panasonic Lumix DMC-ZS6 LCD Assembly Replacement: passo 2, immagine 2 di 3 Panasonic Lumix DMC-ZS6 LCD Assembly Replacement: passo 2, immagine 3 di 3
    • Unscrew the two bottom 1.0 mm screws with a Phillips #000 screwdriver.

    • Unscrew the two 1.0 mm screws to the left with a Phillips #000 screwdriver.

    • Unscrew the two 1.0 mm screws to the right with a Phillips #000 screwdriver.

  3. Panasonic Lumix DMC-ZS6 LCD Assembly Replacement: passo 3, immagine 1 di 1
    • Separate the back of the camera from the main body carefully.

    • Do not apply excessive force. The LCD is connected by ribbon cables that can be easily damaged.

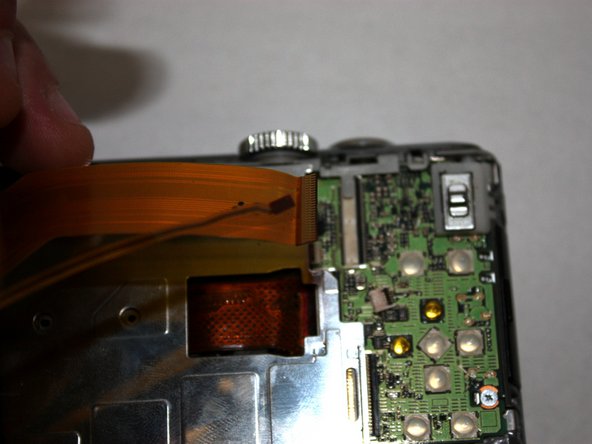
  4. Panasonic Lumix DMC-ZS6 LCD Assembly Replacement: passo 4, immagine 1 di 2 Panasonic Lumix DMC-ZS6 LCD Assembly Replacement: passo 4, immagine 2 di 2
    • Use the tip of the spudger to flip up the black tabs on the ribbon cables.

    • Pull gently on the ribbon cables to unseat them.

  5. Panasonic Lumix DMC-ZS6 LCD Assembly Replacement: passo 5, immagine 1 di 1
    • Use the tip of the spudger to flip up the metal tabs.

    • Lift the LCD panel out of place carefully.

Conclusione

To reassemble your device, follow these instructions in reverse order.

Team

Baylor, Team S2-G5, Johnson Spring 2018 Membro di Baylor, Team S2-G5, Johnson Spring 2018

BU-JOHNSON-S18S2G5

3 Membri

10 Guide realizzate

0 Commenti

Aggiungi Commento

Visualizza Statistiche:

Ultime 24 Ore: 0

Ultimi 7 Giorni: 0

Ultimi 30 Giorni: 2

Tutti i Tempi: 195