Salta al contenuto principale

Questa guida ha delle modifiche più recenti. Passa all'ultima versione non verificata.

Panasonic Lumix DMC-F7 Replacing LCD Screen Replacement

Cosa ti serve

  1. Panasonic Lumix DMC-F7 Replacing LCD Screen Replacement, Battery: passo 1, immagine 1 di 1
    • Slide the lock switch to the right so that it is in the unlocked position.

    • Use your finger to slide the battery hatch in the direction of the downward arrow so that the hatch is open.

    • Both battery and memory card should now be visible.

  2. Panasonic Lumix DMC-F7 Replacing LCD Screen Replacement: passo 2, immagine 1 di 1
    • Open the battery hatch and then the black cover to expose the battery compartment.

    • The camera used to create these repair guides did not have a battery and memory card.

    • Remove the battery.

    • When installing the new battery, ensure it is in the same orientation as before.

  3. Panasonic Lumix DMC-F7 Replacing LCD Screen Replacement, Back Case: passo 3, immagine 1 di 1
    • Using the Phillips #00 screwdriver, remove the two 2.8 mm screws located under the hatch.

  4. Panasonic Lumix DMC-F7 Replacing LCD Screen Replacement: passo 4, immagine 1 di 1
    • Use the Phillips #00 screwdriver to remove the three 2.8 mm screws on the bottom of the camera.

  5. Panasonic Lumix DMC-F7 Replacing LCD Screen Replacement: passo 5, immagine 1 di 1
    • Use the Phillips #00 screwdriver to remove the two 2.8 mm screws on the side of the camera.

  6. Panasonic Lumix DMC-F7 Replacing LCD Screen Replacement: passo 6, immagine 1 di 2 Panasonic Lumix DMC-F7 Replacing LCD Screen Replacement: passo 6, immagine 2 di 2
    • Use a spudger to pry open the case at all sides.

  7. Panasonic Lumix DMC-F7 Replacing LCD Screen Replacement: passo 7, immagine 1 di 2 Panasonic Lumix DMC-F7 Replacing LCD Screen Replacement: passo 7, immagine 2 di 2
    • Be careful not to damage the ribbon cable when opening. Ensure it is still attached.

    • Use your fingers to carefully remove the back casing from the front of the camera.

  8. Panasonic Lumix DMC-F7 Replacing LCD Screen Replacement: passo 8, immagine 1 di 1
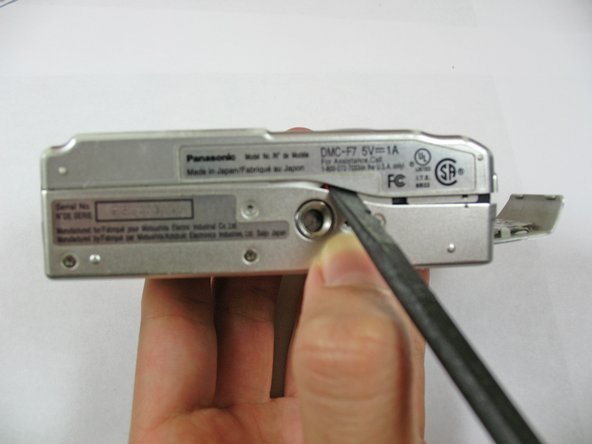
    • Place the camera on a flat surface with the front side facing down.

    • Use the spudger to flip up the retaining flap and slide the ribbon cable out of the connector.

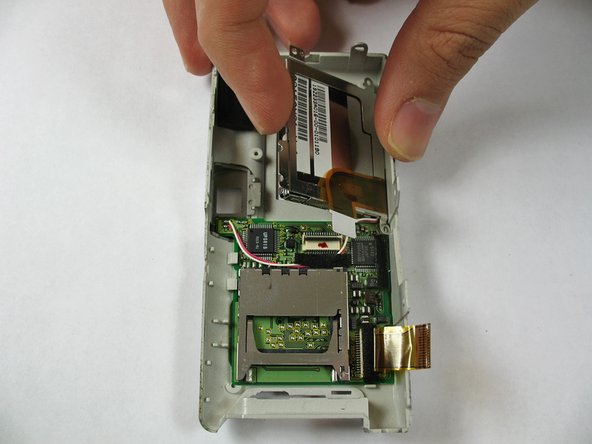
    • Hold down on the camera's metal casing with one hand. Using your other hand, remove the back case from the rest of the camera.

  9. Panasonic Lumix DMC-F7 Replacing LCD Screen Replacement, Replacing LCD Screen: passo 9, immagine 1 di 2 Panasonic Lumix DMC-F7 Replacing LCD Screen Replacement, Replacing LCD Screen: passo 9, immagine 2 di 2
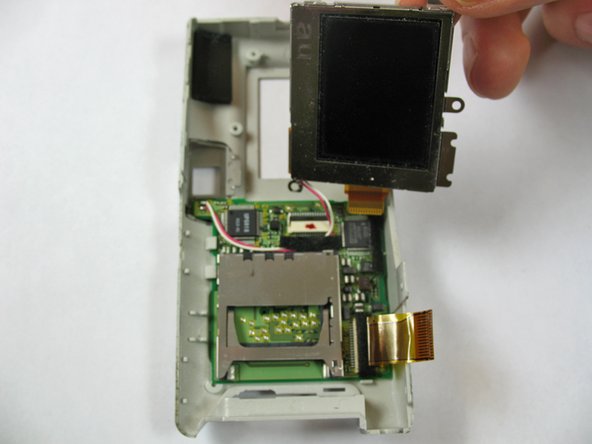
    • Use a spudger to lift the screen ZIF connector tab.

    • Use the back of the spudger to push the ribbon cable free.

  10. Panasonic Lumix DMC-F7 Replacing LCD Screen Replacement: passo 10, immagine 1 di 3 Panasonic Lumix DMC-F7 Replacing LCD Screen Replacement: passo 10, immagine 2 di 3 Panasonic Lumix DMC-F7 Replacing LCD Screen Replacement: passo 10, immagine 3 di 3
    • Remove the four 2.4 mm Phillips screws as shown in picture.

    • Lift up the LCD screen from the front case.

    • Beware of the wire that is connected to the board in the other side.

  11. Panasonic Lumix DMC-F7 Replacing LCD Screen Replacement: passo 11, immagine 1 di 1
    • Remove the LCD screen from its case.

  12. Panasonic Lumix DMC-F7 Replacing LCD Screen Replacement: passo 12, immagine 1 di 1
    • Desolder the wire connecting the LCD to the motherboard.

    • Solder wires from new LCD screen to the circuit board.

Conclusione

To reassemble your device, follow these instructions in reverse order.

Un'altra persona ha completato questa guida.

Alex Penman

Membro da: 01/28/11

463 Reputazione

4 Guide realizzate

Team

Cal Poly, Team 7-35, Regan Winter 2011 Membro di Cal Poly, Team 7-35, Regan Winter 2011

CPSU-REGAN-W11S7G35

4 Membri

10 Guide realizzate

0 Commenti

Aggiungi Commento

Visualizza Statistiche:

Ultime 24 Ore: 0

Ultimi 7 Giorni: 5

Ultimi 30 Giorni: 8

Tutti i Tempi: 3,002