Salta al contenuto principale

Panasonic KX-E603 Fuse Replacement

Cosa ti serve

  1. Panasonic KX-E603 Fuse Replacement, Case: passo 1, immagine 1 di 2 Panasonic KX-E603 Fuse Replacement, Case: passo 1, immagine 2 di 2
    • Flip the typewriter to expose the bottom body panel.

    • Be careful to not damage the top surface of the typewriter when you rest it upside-down.

  2. Panasonic KX-E603 Fuse Replacement: passo 2, immagine 1 di 1
    • Remove the three 19 mm screws located in the recessed holes on the edge of the black underside panel using a Phillips #2 screwdriver.

  3. Panasonic KX-E603 Fuse Replacement: passo 3, immagine 1 di 1
    • Flip the typewriter back to its original orientation, then rotate it so that the rear is facing towards you.

    • Remove the three 19 mm screws near the bottom of the tan body panel using a Phillips #2 screwdriver.

  4. Panasonic KX-E603 Fuse Replacement: passo 4, immagine 1 di 2 Panasonic KX-E603 Fuse Replacement: passo 4, immagine 2 di 2
    • Open the typewriter lid and push the carriage away to expose the two screws holding the case to the chassis.

    • Remove the two 19 mm screws using a Phillips #2 screwdriver.

  5. Panasonic KX-E603 Fuse Replacement: passo 5, immagine 1 di 2 Panasonic KX-E603 Fuse Replacement: passo 5, immagine 2 di 2
    • Flip the plastic lever on the right side of the roller wheel to disengage the paper lock.

  6. Panasonic KX-E603 Fuse Replacement: passo 6, immagine 1 di 3 Panasonic KX-E603 Fuse Replacement: passo 6, immagine 2 di 3 Panasonic KX-E603 Fuse Replacement: passo 6, immagine 3 di 3
    • Remove the roller wheel adjustment knobs by pulling firmly outward.

    • Both black knobs must be removed in this step.

  7. Panasonic KX-E603 Fuse Replacement: passo 7, immagine 1 di 2 Panasonic KX-E603 Fuse Replacement: passo 7, immagine 2 di 2
    • Unlock the roller wheel by simultaneously pressing down on the two spring levers on the left and right of the roller ends.

  8. Panasonic KX-E603 Fuse Replacement: passo 8, immagine 1 di 2 Panasonic KX-E603 Fuse Replacement: passo 8, immagine 2 di 2
    • While both spring levers are depressed, lift up with both hands to remove the roller wheel.

  9. Panasonic KX-E603 Fuse Replacement: passo 9, immagine 1 di 3 Panasonic KX-E603 Fuse Replacement: passo 9, immagine 2 di 3 Panasonic KX-E603 Fuse Replacement: passo 9, immagine 3 di 3
    • Flip the top down. Then, with both hands, lift straight up on the tan case to remove it from the chassis.

  10. Panasonic KX-E603 Fuse Replacement, Fuse: passo 10, immagine 1 di 1
    • The capacitors can be a shock hazard, avoid touching them.

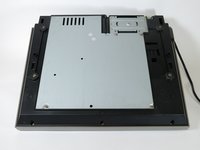
    • The fuse can be found very close to two large, blue capacitors near the rear of the typewriter.

  11. Panasonic KX-E603 Fuse Replacement: passo 11, immagine 1 di 1
    • The fuse body is made from glass; be careful not to use too much force or it could break.

    • Firmly grasp the fuse between your fingers and pull upwards to remove it from its mount.

    • If the fuse is difficult to grasp with your hands, a spudger may be used instead.

Conclusione

To reassemble your device, use the new fuse and follow these instructions in reverse order.

Team

Cal Poly, Team 17-1, Forte Spring 2015 Membro di Cal Poly, Team 17-1, Forte Spring 2015

CPSU-FORTE-S15S17G1

4 Membri

6 Guide realizzate

0 Commenti

Aggiungi Commento

Visualizza Statistiche:

Ultime 24 Ore: 0

Ultimi 7 Giorni: 0

Ultimi 30 Giorni: 6

Tutti i Tempi: 414