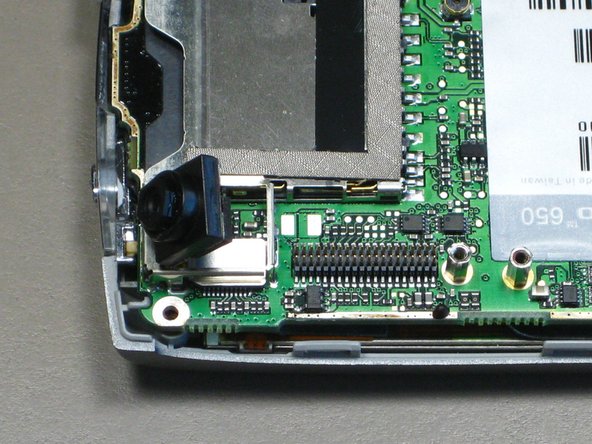
Salta al contenuto principale

Palm Treo 650 Camera Replacement

Cosa ti serve

  1. Palm Treo 650 Camera Replacement, Battery and Stylus: passo 1, immagine 1 di 1
    • Position the phone so the screen faces down.

    • Remove the stylus found on the back of the phone.

  2. Palm Treo 650 Camera Replacement: passo 2, immagine 1 di 1
    • Hold the button in the middle of the phone's back to remove the battery cover.

    • Slide the cover down to remove it, and set the cover aside.

  3. Palm Treo 650 Camera Replacement: passo 3, immagine 1 di 2 Palm Treo 650 Camera Replacement: passo 3, immagine 2 di 2
    • Lift the edge of the battery, separating contact points, and pull out as pictured.

  4. Palm Treo 650 Camera Replacement, Case: passo 4, immagine 1 di 1
    • Remove the round, rubber cover to expose a screw that will be removed in the next step.

  5. Palm Treo 650 Camera Replacement: passo 5, immagine 1 di 2 Palm Treo 650 Camera Replacement: passo 5, immagine 2 di 2
    • Remove the six 6.9 mm screws as pictured with a T5 Torx screwdriver.

    • Remove the single 9.8 mm screw next to the antenna on the back plate, using a Phillips #00 screwdriver.

  6. Palm Treo 650 Camera Replacement: passo 6, immagine 1 di 1
    • Pull the antenna outward to remove the antenna from the body of the phone.

  7. Palm Treo 650 Camera Replacement: passo 7, immagine 1 di 2 Palm Treo 650 Camera Replacement: passo 7, immagine 2 di 2
    • Pry the back cover off using an iFixit opening tool.

    • Several small clips on the inside attach to the back cover.

  8. Palm Treo 650 Camera Replacement, Camera: passo 8, immagine 1 di 3 Palm Treo 650 Camera Replacement, Camera: passo 8, immagine 2 di 3 Palm Treo 650 Camera Replacement, Camera: passo 8, immagine 3 di 3
    • Remove the two 3.75 mm screws.

    • Pull off the logic board.

  9. Palm Treo 650 Camera Replacement: passo 9, immagine 1 di 3 Palm Treo 650 Camera Replacement: passo 9, immagine 2 di 3 Palm Treo 650 Camera Replacement: passo 9, immagine 3 di 3
    • Pull the rubber ring off of the camera.

  10. Palm Treo 650 Camera Replacement: passo 10, immagine 1 di 2 Palm Treo 650 Camera Replacement: passo 10, immagine 2 di 2
    • Pry off the metal camera case.

    • Lift up the camera, but do not remove. The connector must be detatched first.

  11. Palm Treo 650 Camera Replacement: passo 11, immagine 1 di 2 Palm Treo 650 Camera Replacement: passo 11, immagine 2 di 2
    • Pry off the camera connector plug.

    • Remove the camera.

Conclusione

To reassemble your device, follow these instructions in reverse order.

cgood

Membro da: 10/28/09

122 Reputazione

7 Guide realizzate

Team

Cal Poly, Team 19-3, Maness Fall 2009 Membro di Cal Poly, Team 19-3, Maness Fall 2009

CPSU-MANESS-F09S19G3

4 Membri

18 Guide realizzate

0 Commenti

Aggiungi Commento

Visualizza Statistiche:

Ultime 24 Ore: 0

Ultimi 7 Giorni: 1

Ultimi 30 Giorni: 1

Tutti i Tempi: 2,117