Questa versione può contenere modifiche errate. Passa all'ultima istantanea verificata.
Cosa ti serve
-
-
Svita le quattro viti a croce Phillips sul retro della PSP Go.
-
Ruota la PSP così che puoi vedere la parte superiore del dispositivo.
-
Svita le due viti a croce Phillips accanto al bottone del volume.
-
-
-
Tira la copertura superiore dolcemente verso l'alto dalla sua custodia.
-
-
Questo passaggio è privo di traduzione. Aiuta a tradurlo
-
Use a plastic opening tool to gently flip up the left trigger connector.
-
-
Questo passaggio è privo di traduzione. Aiuta a tradurlo
-
Unscrew the lone Phillips screw holding the trigger in place. Remove both trigger and retaining plate from the PSP Go.
-
-
Questo passaggio è privo di traduzione. Aiuta a tradurlo
-
Use the plastic opening tool to gently peel away at the "Warranty Void" sticker. Start on one edge, as shown, and slide the tool from side to side until the sticker is removed from just the battery.
-
-
Questo passaggio è privo di traduzione. Aiuta a tradurlo
-
Gently pull the sticker away from the battery connector, just enough so that the connector is visible.
-
Wedge a plastic opening tool in between the connector and logic board, and gently pull the connector upwards.
-
-
-
Questo passaggio è privo di traduzione. Aiuta a tradurlo
-
Use a plastic opening tool to pop out the battery, being careful not to snag the "Warranty Void" sticker in the process.
-
-
Questo passaggio è privo di traduzione. Aiuta a tradurlo
-
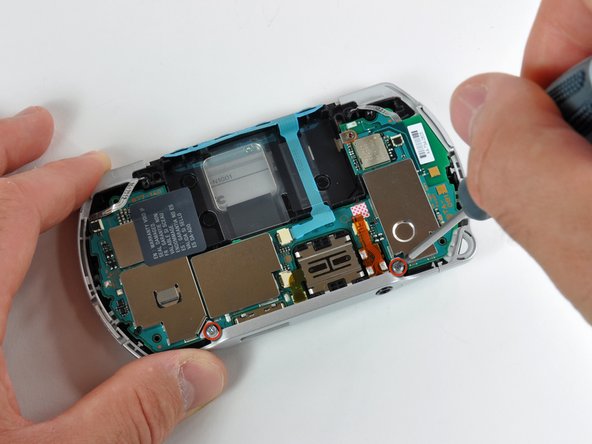
Remove the single Phillips screw securing the logic board to the inner case.
-
-
Questo passaggio è privo di traduzione. Aiuta a tradurlo
-
Use a plastic opening tool to gently flip up the right trigger connector.
-
Unscrew the lone Phillips screw holding the trigger in place. Remove both trigger and retaining plate from the PSP Go.
-
-
Questo passaggio è privo di traduzione. Aiuta a tradurlo
-
Use a #00 Phillips screwdriver to unscrew both bottom plate screws.
-
Remove the bottom plate by lifting it away from the device.
-
-
Questo passaggio è privo di traduzione. Aiuta a tradurlo
-
Remove both headphone jack and analog joystick screws using your #00 Phillips screwdriver.
-
-
Questo passaggio è privo di traduzione. Aiuta a tradurlo
-
Unplug the volume button cable using a pair of tweezers. Be careful not to damage the cable.
-
Unplug the Start/Select button cable the same way. Make sure to grasp the black plastic pull tab of the cable.
-
-
Questo passaggio è privo di traduzione. Aiuta a tradurlo
-
Use a pair of tweezers to pull out the battery's clear plastic cover.
-
-
Questo passaggio è privo di traduzione. Aiuta a tradurlo
-
Gently lift the logic board slightly out of its housing.
-
-
Questo passaggio è privo di traduzione. Aiuta a tradurlo
-
Use a plastic opening tool to disconnect the display cable from the logic board.
-
The logic board should now be free from the rest of the device.
-
-
Questo passaggio è privo di traduzione. Aiuta a tradurlo
-
Use a #00 Phillips screwdriver to remove the four display screws.
-
-
Questo passaggio è privo di traduzione. Aiuta a tradurlo
-
Wedge a plastic opening tool in the location shown in the first picture, and slightly separate the metal frame from the plastic front panel.
-
Slide the plastic opening tool around the perimeter of the display, increasing the gap between the metal frame and the front panel.
-
-
Questo passaggio è privo di traduzione. Aiuta a tradurlo
-
Use a plastic opening tool to disconnect the display cable from the rest of the device.
-
The PSP Go should now look similar to the second picture.
-
-
Questo passaggio è privo di traduzione. Aiuta a tradurlo
-
Wedge a plastic opening tool between the plastic front panel and display. Be very careful that you wedge it in the same location shown in the first picture.
-
Slide the plastic opening tool across the length of the display. This should loosen the glue binding the display to the plastic front panel.
-
Rotate the display 180 degrees and free the bottom side of the display in the same manner.
-
-
Questo passaggio è privo di traduzione. Aiuta a tradurlo
-
Gently separate the display from the front panel.
-


Annulla: non ho completato questa guida.
Altre 24 persone hanno completato questa guida.

5 Commenti
Omg seriously!,,, Took this Dental Hygienist exactly one hour to do this! Awesome ! Thank you!
My psp won't turn back on please help I followed the directions exactly.
I use this guides to perform a flexible replacement because the original one is just too old and it's snapped some how, I've done it and my PSP Go work normal as before but I did make a mistake. I cracked the display. Yes it is really, really, really fragile! When he said “be very gentle/careful” he really mean it.
Learn from my mistakes, but I will fix it. Again.