Introduzione
To complete this repair, the user must possess skills in soldering, and proper tools needed to perform the repair.
Cosa ti serve
-
-
Remove the 5 screws on the back of the controller.
-
The back housing of the controller can now be removed.
-
-
-
Remove battery by unlatching the battery cables from battery connector clip.
-
-
-
Remove the two screws holding the motherboard to the front controller housing.
-
Next, remove the motherboard assembly from the controller housing. This is done by pressing in the clips on each side of the handle.
-
Freeing the motherboard from the housing will provide better access to the charging port.
-
-
-
-
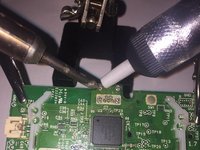
Prepare your station for the de-soldering of the charging port.
-
-
Attrezzo utilizzato in questo passaggio:Desoldering Pump$3.99
-
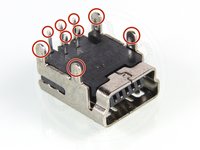
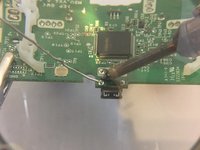
To remove the defective charging port, you will need to de-solder the 9 pins holding the port to the motherboard.
-
First, used the desoldering pump to remove the solder from all 9 pins.
-
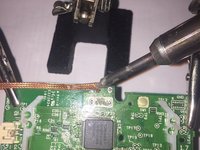
Then, use the desoldering wick to remove any excess solder left on the motherboard.
-
-
-
After the charging port is removed, place the new charging port into position.
-
Hold the new port in place by using a clip to keep it from moving.
-
-
-
Tin the soldering iron before soldering the connections. This is done by applying a small amount of solder to the tip of the hot iron.
-
Solder the 9 pin connections that connect the charging port to the motherboard.
-


To reassemble your device, follow instructions 1-3 in reverse order.
To reassemble your device, follow instructions 1-3 in reverse order.
Annulla: non ho completato questa guida.
Altre 16 persone hanno completato questa guida.
5Commenti sulla guida
Would you guys happen to know, if my labeling is correct? I’m going to upgrade to USB-C.
Thanks for this. But now there are four different USB charging ports, how to tell which one of them is suitable? kasynparts eg
please attak if you still using this platfrom i really need you to help me with a ps3 controller pins