Salta al contenuto principale

P775DM3 BIOS Battery

Cosa ti serve

  1. P775DM3 BIOS Battery, Battery: passo 1, immagine 1 di 2 P775DM3 BIOS Battery, Battery: passo 1, immagine 2 di 2
    • Unlock the lock circled in red.

  2. P775DM3 BIOS Battery: passo 2, immagine 1 di 3 P775DM3 BIOS Battery: passo 2, immagine 2 di 3 P775DM3 BIOS Battery: passo 2, immagine 3 di 3
    • Lift the battery while unlocking the lock circled in red.

  3. P775DM3 BIOS Battery, Access to major components: passo 3, immagine 1 di 2 P775DM3 BIOS Battery, Access to major components: passo 3, immagine 2 di 2
    • Unscrew the five screws circled in red.

  4. P775DM3 BIOS Battery: passo 4, immagine 1 di 2 P775DM3 BIOS Battery: passo 4, immagine 2 di 2
    • Slide the plate in the direction of the red arrow.

  5. P775DM3 BIOS Battery: passo 5, immagine 1 di 2 P775DM3 BIOS Battery: passo 5, immagine 2 di 2
    • Lift the plate.

  6. P775DM3 BIOS Battery, Keyboard: passo 6, immagine 1 di 2 P775DM3 BIOS Battery, Keyboard: passo 6, immagine 2 di 2
    • Unscrew the two screws circled in red

  7. P775DM3 BIOS Battery: passo 7, immagine 1 di 3 P775DM3 BIOS Battery: passo 7, immagine 2 di 3 P775DM3 BIOS Battery: passo 7, immagine 3 di 3
    • Press a paper clip in the three places marked in red

    • Lift the keyboard and feel free to put some strength

  8. P775DM3 BIOS Battery: passo 8, immagine 1 di 2 P775DM3 BIOS Battery: passo 8, immagine 2 di 2
    • Disconnect the three framed connectors in red

  9. P775DM3 BIOS Battery: passo 9, immagine 1 di 2 P775DM3 BIOS Battery: passo 9, immagine 2 di 2
    • Pull the white drawer in the direction of the arrow to unlock the connector

    • Disconnect the red circled connector

  10. P775DM3 BIOS Battery: passo 10, immagine 1 di 2 P775DM3 BIOS Battery: passo 10, immagine 2 di 2
    • Pull the black drawer in the direction of the arrow to unlock the connector

    • Disconnect the red circled connector

  11. P775DM3 BIOS Battery: passo 11, immagine 1 di 3 P775DM3 BIOS Battery: passo 11, immagine 2 di 3 P775DM3 BIOS Battery: passo 11, immagine 3 di 3
    • Lift the flap that holds the connector circled in red

    • Disconnect the red circled connector

    • Remove the keyboard

  12. P775DM3 BIOS Battery, BIOS Battery: passo 12, immagine 1 di 3 P775DM3 BIOS Battery, BIOS Battery: passo 12, immagine 2 di 3 P775DM3 BIOS Battery, BIOS Battery: passo 12, immagine 3 di 3
    • Disconnect the connector circled in red.

    • Remove the battery.

Conclusione

To reassemble your device, follow the instructions in the reverse order.

Altre 2 persone hanno completato questa guida.

Un ringraziamento speciale a questi traduttori:

fr en

100%

Questi traduttori ci stanno aiutando ad aggiustare il mondo! Vuoi partecipare?
Inizia a tradurre ›

Felice Suglia

Membro da: 06/15/13

30.884 Reputazione

263 Guide realizzate

Un commento

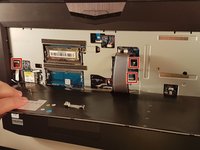
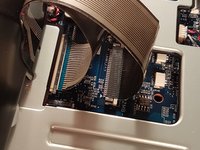
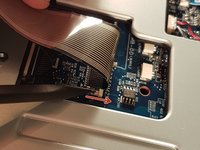
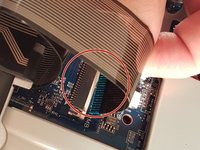
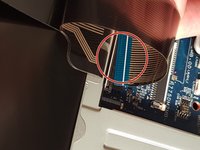
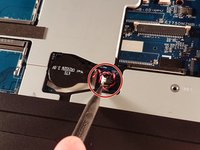
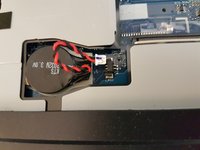
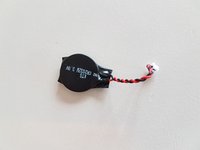
When sourcing a replacement battery note which connector pin has the red wire. This is shown most clearly in the middle photo for step 12. Be careful, as similar batteries have the reverse polarity.

I bought a ten-pack of batteries for less than some suppliers were selling a single battery. EEMB CR2032-Molex51021-RP (CR2032-MX51021-RP). The connecting wires were longer than the original, but were easy to fit into the battery space.

Very many thanks for this great guide - it saved me a lot of unnecessary work.

Terry Payman - Replica

Aggiungi Commento

Visualizza Statistiche:

Ultime 24 Ore: 4

Ultimi 7 Giorni: 12

Ultimi 30 Giorni: 63

Tutti i Tempi: 1,739