Salta al contenuto principale

Questa versione può contenere modifiche errate. Passa all'ultima istantanea verificata.

Cosa ti serve

  1. Questo passaggio è privo di traduzione. Aiuta a tradurlo

    : passo 1, immagine 1 di 2 : passo 1, immagine 2 di 2
    • Use a Phillips #1 screwdriver to loosen the screws that secure the panel on the bottom of the Optoma HD20.

  2. Questo passaggio è privo di traduzione. Aiuta a tradurlo

    : passo 2, immagine 1 di 1
    • Lift the panel off of the device.

  3. Questo passaggio è privo di traduzione. Aiuta a tradurlo

    : passo 3, immagine 1 di 1
    • Use a Phillips #1 screwdriver to loosen the two screws securing the black casing.

    • The screws don't come out all the way.

  4. Questo passaggio è privo di traduzione. Aiuta a tradurlo

    : passo 4, immagine 1 di 3 : passo 4, immagine 2 di 3 : passo 4, immagine 3 di 3
    • Remove the light bulb casing from the device.

    • Steps 5-9 are unnecessary if the replacement light bulb comes with housing.

  5. Questo passaggio è privo di traduzione. Aiuta a tradurlo

    : passo 5, immagine 1 di 1
    • Remove the three 4.5 mm screws on the light bulb case.

  6. Questo passaggio è privo di traduzione. Aiuta a tradurlo

    : passo 6, immagine 1 di 1
    • Carefully remove the light bulb insulator from the light bulb casing.

  7. Questo passaggio è privo di traduzione. Aiuta a tradurlo

    : passo 7, immagine 1 di 1
    • Gently pull the wires off of the pins using tweezers.

  8. Questo passaggio è privo di traduzione. Aiuta a tradurlo

    : passo 8, immagine 1 di 1
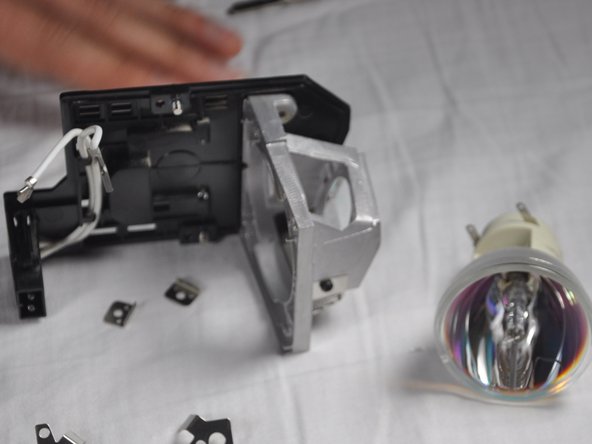
    • Remove the 4 screws on the back of the light bulb casing using a Phillips #1 screwdriver.

  9. Questo passaggio è privo di traduzione. Aiuta a tradurlo

    : passo 9, immagine 1 di 2 : passo 9, immagine 2 di 2
    • Remove the casing, then gently pull out the old light bulb and replace it with the new one.

Linea Traguardo

Altre 7 persone hanno completato questa guida.

Trever

Membro da: 01/22/15

1.264 Reputazione

6 Guide realizzate

Team

Cal Poly, Team 21-23, Maness Winter 2015 Membro di Cal Poly, Team 21-23, Maness Winter 2015

CPSU-MANESS-W15S21G23

4 Membri

6 Guide realizzate

5 Commenti

I recently replaced my bulb for the third time and the insulator had grown brittle I am guessing from the heat and it broke. I can't seem to find this part for sale anywhere. Does anyone know if is possible to purchase it?

Thomas - Replica

The screws in step 8 are extremely hard to get off. I went and bought proper screwdrivers before even attempting since theyre small, but in a day I've only managed to get one off and I'm having to resort to other tactics, even using a drill to just grind the heads off.

dv01_ - Replica

king@okinlamps.com

Need LAD60 20PCS

kingshen92 - Replica

The manual says the new light won’t come back on until a lamp reset I’d done via menu , but how can you see the text if the light isn’t on?????

Taringajohn - Replica

my hd 20 projects dull images i recently replaced my bulb for the first time successfully and i followed as per menu trying to bulb reset but it is not working and still image is dull how to solve the problem

kumar - Replica

Aggiungi Commento

Visualizza Statistiche:

Ultime 24 Ore: 1

Ultimi 7 Giorni: 21

Ultimi 30 Giorni: 70

Tutti i Tempi: 11,443