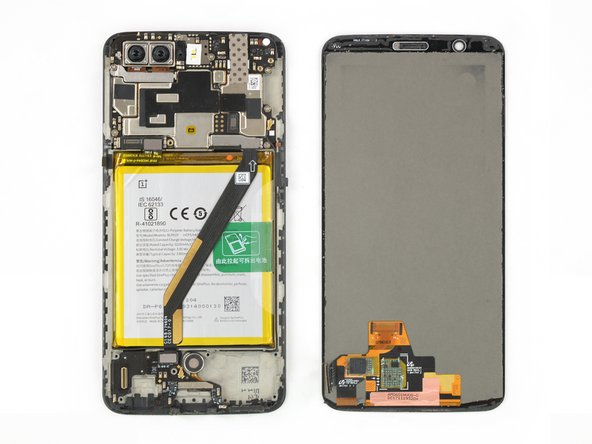
Salta al contenuto principale

OnePlus 5T AMOLED Screen & Digitizer Replacement

Cosa ti serve

  1. OnePlus 5T AMOLED Screen & Digitizer Replacement, Back Cover: passo 1, immagine 1 di 2 OnePlus 5T AMOLED Screen & Digitizer Replacement, Back Cover: passo 1, immagine 2 di 2
    • Before you begin, switch off your phone.

    • Remove the SIM card tray.

  2. OnePlus 5T AMOLED Screen & Digitizer Replacement: passo 2, immagine 1 di 1
    • Remove the two Torx T2 screws (2.5 mm length).

    • The OnePlus 5T doesn't use a lot of adhesive to secure the backcover, however the clamps are very strong and require some force during the opening procedure.

    Could you clarify the statement “The OnePlus 5T doesn't use a lot of adhesive“? Do you mean that it uses adhesive, but only a little? Or do you mean that it doesn’t use any adhesive at all to secure the back, just the clamps?

    Avram Grumer - Replica

    Hi Avram,

    there is a little bit of adhesive underneath the edges of the back cover, however it doesn’t require heating to soften it. In case the back cover doesn’t come of straight away it won’t help to apply an iOpener to further soften the adhesive but requires a little bit more force to open the plastic clamps.

    Dominik Schnabelrauch -

    i have tried t2 srewdrivers multiple times but they doesn’t seem work, could those be different screws?

    Mr Kono - Replica

    I had the same problem. I tried a T1 screwdriver, that fit perfectly.

    That said, the 'tools' section of this repair doesn't mention any torx screwdriver. That should be updated to include the T2 (or T1, for me!) screwdriver.

    Akka -

    I purchased the entire kit to do my battery replacement and found the opening tool was not capable of opening my One Plus 5t phone. I tried the tool for at least 30 minutes and couldn’t even get it started. Luckily I had a set of “plastic tools” for removing door panels from cars while doing stereo work. These tools have nice sharp points and are much longer and thicker, providing much better grip and leverage. With these tools, I had the back off the phone in just a few minutes. All the rest of the process was easy to follow and everything worked out great.

    David Dery - Replica

    I have all of the necessary parts/tools for replacement. Upon removing the two screws from the bottom, one came out no problem first try. The second bolt slipped andbis now completely stripped out. Any advice?

    Derek Basham - Replica

  3. OnePlus 5T AMOLED Screen & Digitizer Replacement: passo 3, immagine 1 di 3 OnePlus 5T AMOLED Screen & Digitizer Replacement: passo 3, immagine 2 di 3 OnePlus 5T AMOLED Screen & Digitizer Replacement: passo 3, immagine 3 di 3
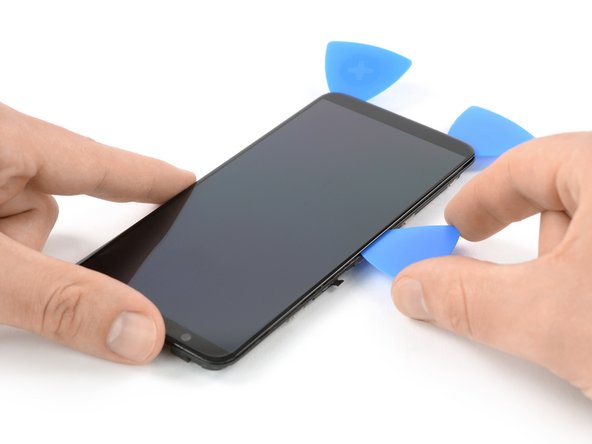
    • Insert an opening tool between the display and the backcover at the bottom end of the phone.

    • Use the opening tool to create a gap between back cover and display.

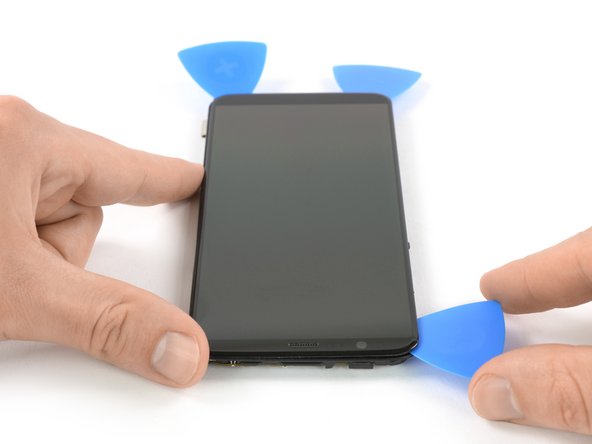
    • Insert an opening pick in the gap you created with the opening tool.

    Don’t make the same mistake as i did and put the opening tool between the screen and glass rather than the screen and body. Make sure its the second line from the top where you insert your tool

    Hayden Rooney - Replica

    This part is very difficult, i have been trying to open the phone up, still cannot.

    Taz - Replica

    The easiest way to open the back cover, is by starting from the bottom right corner, try find a plastic tool that is slim enough to go through the display and back cover.

    Taz - Replica

    I too had troubles with this step. I recommend having a look at the guide for opening up the back cover of the Oneplus 5 before proceeding. It has a lot of helpful images and the instructions go into far more detail than this one does.

    Sostituzione copertura posteriore OnePlus 5

    Iceblade02 - Replica

    This step was the hardest step for me. I could only succeed with suction cup pliers and a metal pry tool, which unfortunately scratched the device’s edges a little.

    Haggai Eran - Replica

    I found this hard. Look carefully and use a bright light. There are two small ridges. I worked ages on the top one which isn't actually a gap. You need to work on the bottom one of the two. I used a very small metal screw driver with a thin flat blade. I pushed this in to open the gap a fraction then put a plastic tool in the now slightly opened gap and worked it round.

    Duncan Putman - Replica

    For opening up the device, Sostituzione copertura posteriore OnePlus 5 that Iceblade02 mentions is excellent. The tools in the kit also correspond to it since the new kit that I received last week had no guitar picks and instead had the suction cup.

    Anirudh Ramanathan - Replica

    Be sure you are getting below the screen's LOWER lip, as in the photo, as HaydenRooney mentions.

    Try to minimize flexing of the screen when you are wedging, the clamps (like snaps or tabs) will demand force and you want to avoid turning that into screen flex. There are several forum posts here about device working-but-dark after a repair. Too bad user input is rather folded away on ifixit, and few will see these.

    Professor Z - Replica

  4. OnePlus 5T AMOLED Screen & Digitizer Replacement: passo 4, immagine 1 di 3 OnePlus 5T AMOLED Screen & Digitizer Replacement: passo 4, immagine 2 di 3 OnePlus 5T AMOLED Screen & Digitizer Replacement: passo 4, immagine 3 di 3
    • Slide the opening pick to the bottom right corner of the phone.

    • Insert a second opening pick and slide it to the bottom left corner of the phone.

  5. OnePlus 5T AMOLED Screen & Digitizer Replacement: passo 5, immagine 1 di 3 OnePlus 5T AMOLED Screen & Digitizer Replacement: passo 5, immagine 2 di 3 OnePlus 5T AMOLED Screen & Digitizer Replacement: passo 5, immagine 3 di 3
    • Slide the opening pick around the bottom left corner and then up along the left edge of the phone to open the plastic clamps that secure the backcover.

  6. OnePlus 5T AMOLED Screen & Digitizer Replacement: passo 6, immagine 1 di 3 OnePlus 5T AMOLED Screen & Digitizer Replacement: passo 6, immagine 2 di 3 OnePlus 5T AMOLED Screen & Digitizer Replacement: passo 6, immagine 3 di 3
    • Slide the opening pick around the bottom right corner and then up along the right edge of the phone to open the plastic clamps that secure the backcover.

  7. OnePlus 5T AMOLED Screen & Digitizer Replacement: passo 7, immagine 1 di 3 OnePlus 5T AMOLED Screen & Digitizer Replacement: passo 7, immagine 2 di 3 OnePlus 5T AMOLED Screen & Digitizer Replacement: passo 7, immagine 3 di 3
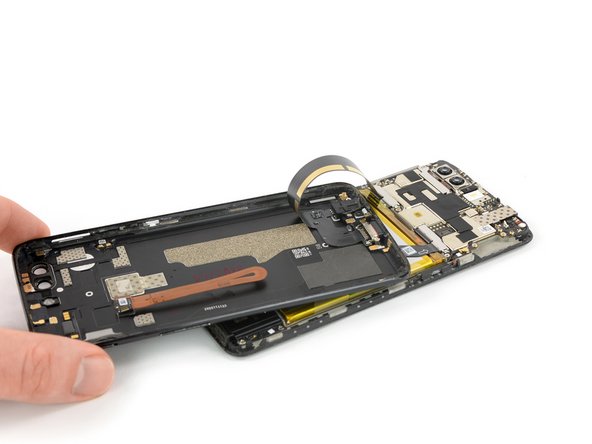
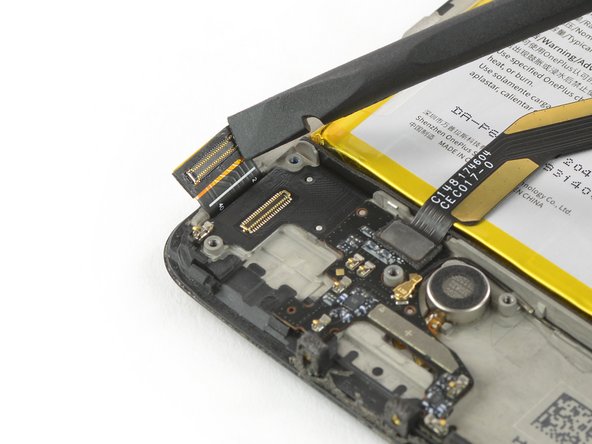
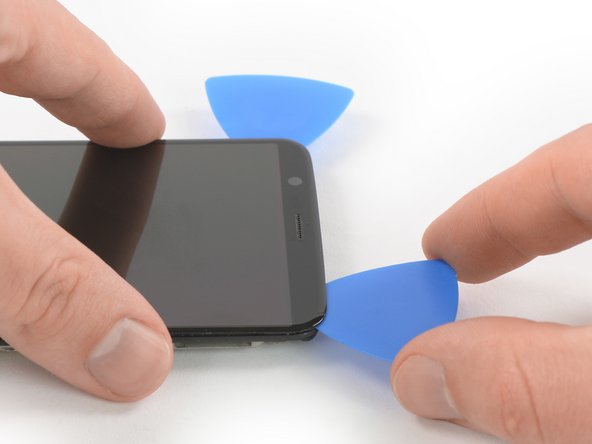
    • Try not to remove the backcover all the way yet. The fingerprint and the charging port and headphone flex cables are still connected to the motherboard.

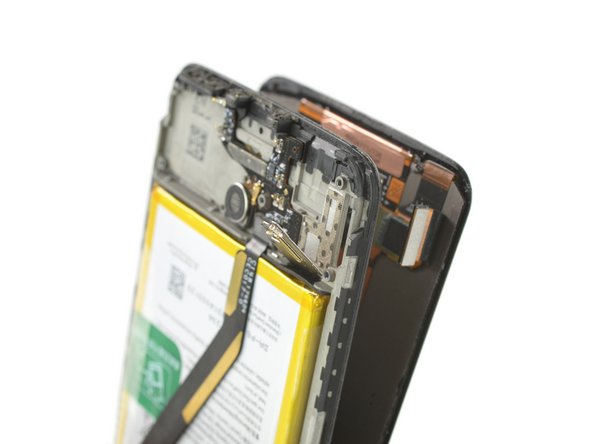
    • Flip your phone and carefully lift the bottom end of the backcover away from the phone assembly. Fold it to left and hold it at an 80° angle.

  8. OnePlus 5T AMOLED Screen & Digitizer Replacement: passo 8, immagine 1 di 2 OnePlus 5T AMOLED Screen & Digitizer Replacement: passo 8, immagine 2 di 2
    • Use a spudger to pry up and disconnect the fingerprint flex cable.

  9. OnePlus 5T AMOLED Screen & Digitizer Replacement: passo 9, immagine 1 di 3 OnePlus 5T AMOLED Screen & Digitizer Replacement: passo 9, immagine 2 di 3 OnePlus 5T AMOLED Screen & Digitizer Replacement: passo 9, immagine 3 di 3
    • Twist the backcover around 180° and lay it down to align the bottom end of the backcover the top edge of the battery.

  10. OnePlus 5T AMOLED Screen & Digitizer Replacement: passo 10, immagine 1 di 3 OnePlus 5T AMOLED Screen & Digitizer Replacement: passo 10, immagine 2 di 3 OnePlus 5T AMOLED Screen & Digitizer Replacement: passo 10, immagine 3 di 3
    • Use a pair of tweezers to remove the small metal shield which covers the battery and the charging port and headphone jack flex cable connectors.

  11. OnePlus 5T AMOLED Screen & Digitizer Replacement: passo 11, immagine 1 di 2 OnePlus 5T AMOLED Screen & Digitizer Replacement: passo 11, immagine 2 di 2
    • Use a spudger to pry up and disconnect the charging port and headphone jack flex cable.

  12. OnePlus 5T AMOLED Screen & Digitizer Replacement: passo 12, immagine 1 di 2 OnePlus 5T AMOLED Screen & Digitizer Replacement: passo 12, immagine 2 di 2
    • Remove the backcover.

  13. OnePlus 5T AMOLED Screen & Digitizer Replacement, Battery Disconnect: passo 13, immagine 1 di 2 OnePlus 5T AMOLED Screen & Digitizer Replacement, Battery Disconnect: passo 13, immagine 2 di 2
    • Use a spudger to pry up and disconnect the battery flex cable.

  14. OnePlus 5T AMOLED Screen & Digitizer Replacement, Speaker: passo 14, immagine 1 di 1
    • Remove the six Phillips #00 screws (2.9 mm length).

  15. OnePlus 5T AMOLED Screen & Digitizer Replacement: passo 15, immagine 1 di 3 OnePlus 5T AMOLED Screen & Digitizer Replacement: passo 15, immagine 2 di 3 OnePlus 5T AMOLED Screen & Digitizer Replacement: passo 15, immagine 3 di 3
    • Slide an opening pick underneath the left side of the speaker.

    • Use the opening pick to pry the speaker up and out of its recess.

  16. OnePlus 5T AMOLED Screen & Digitizer Replacement: passo 16, immagine 1 di 2 OnePlus 5T AMOLED Screen & Digitizer Replacement: passo 16, immagine 2 di 2
    • Remove the speaker.

  17. OnePlus 5T AMOLED Screen & Digitizer Replacement, AMOLED Screen & Digitizer: passo 17, immagine 1 di 2 OnePlus 5T AMOLED Screen & Digitizer Replacement, AMOLED Screen & Digitizer: passo 17, immagine 2 di 2
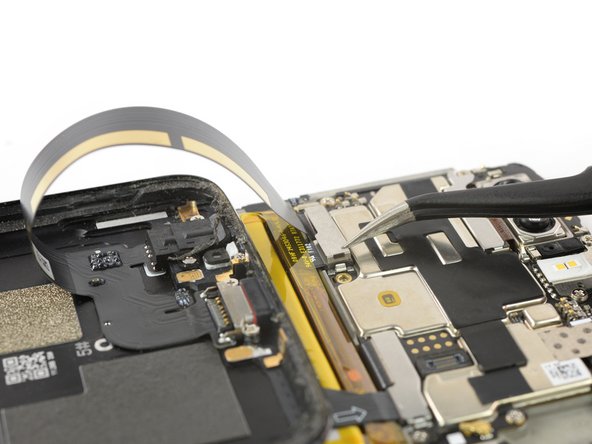
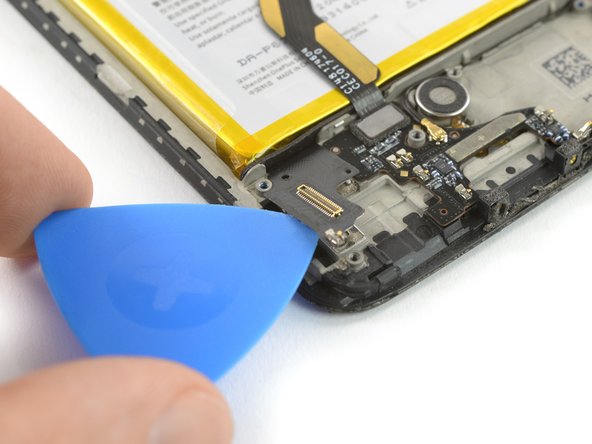
    • Use a spudger to pry up and disconnect the display flex cable.

  18. OnePlus 5T AMOLED Screen & Digitizer Replacement: passo 18, immagine 1 di 2 OnePlus 5T AMOLED Screen & Digitizer Replacement: passo 18, immagine 2 di 2
    • Slide an opening pick under the left side of the interconnect cable and pry it up.

    • The interconnect cable is held in place by mild adhesive. In case you're having trouble removing it, you can apply a heated iOpener to loosen the adhesive underneath.

  19. OnePlus 5T AMOLED Screen & Digitizer Replacement: passo 19, immagine 1 di 1
    • Apply a heated iOpener to the screen and all edges of the phone for at least two minutes, to loosen the adhesive.

  20. OnePlus 5T AMOLED Screen & Digitizer Replacement: passo 20, immagine 1 di 3 OnePlus 5T AMOLED Screen & Digitizer Replacement: passo 20, immagine 2 di 3 OnePlus 5T AMOLED Screen & Digitizer Replacement: passo 20, immagine 3 di 3
    • If the phone's screen is cracked, the suction handle may not stick. Try lifting it with strong tape, or superglue the suction handle in place and allow it to cure so you can proceed.

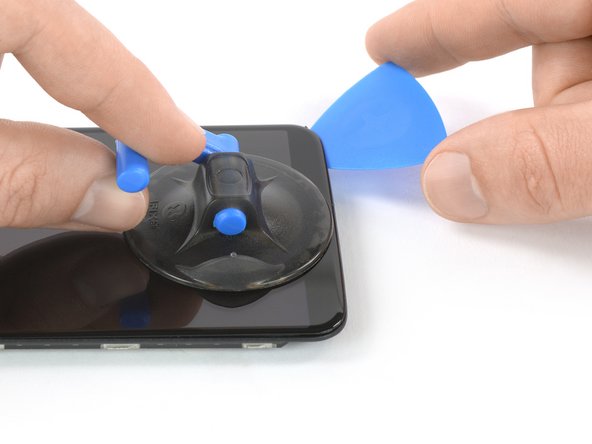
    • Once the screen is warm to the touch, apply a suction cup to the bottom edge of the phone.

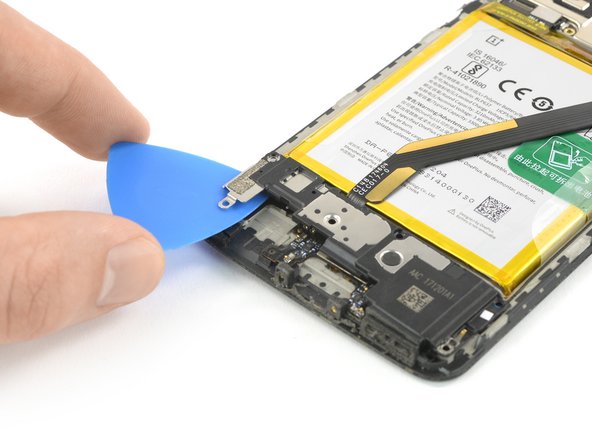
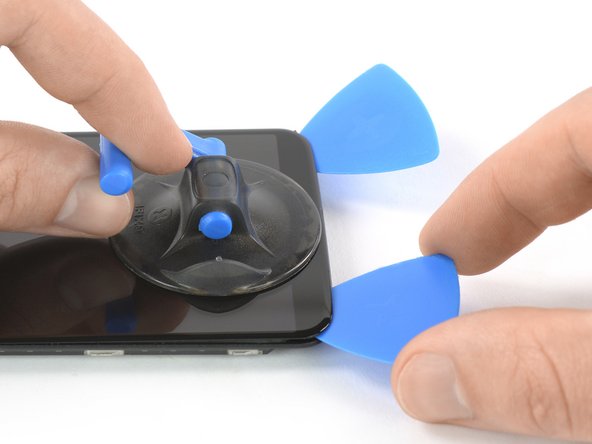
    • Pull the suction cup upwards and insert an opening pick in the gap between the display glass and the midframe. Start to cut the adhesive by sliding the opening pick to the bottom right corner.

    If your screen is cracked, the suction cup might not really adhere, and the screen might crack more.

    James Burton - Replica

    Hi James,

    thanks for mentioning. I added a note about what to do with cracked screens.

    Dominik Schnabelrauch -

    I had to resort to using a hair dryer to reach a higher temperature than the one I could reach with the iOpener …

    Anthony R - Replica

  21. OnePlus 5T AMOLED Screen & Digitizer Replacement: passo 21, immagine 1 di 2 OnePlus 5T AMOLED Screen & Digitizer Replacement: passo 21, immagine 2 di 2
    • Insert a second opening pick and slide it to the bottom left corner of the phone to cut the adhesive.

    • Leave the picks in place to prevent the adhesive from resealing.

  22. OnePlus 5T AMOLED Screen & Digitizer Replacement: passo 22, immagine 1 di 3 OnePlus 5T AMOLED Screen & Digitizer Replacement: passo 22, immagine 2 di 3 OnePlus 5T AMOLED Screen & Digitizer Replacement: passo 22, immagine 3 di 3
    • Insert a third opening pick under the bottom left corner of the phone.

    • Slide the opening pick up to the top left corner to cut the adhesive. Leave it there to prevent the adhesive from resealing.

    • If cutting becomes too difficult, reheat and reapply the iOpener.

  23. OnePlus 5T AMOLED Screen & Digitizer Replacement: passo 23, immagine 1 di 2 OnePlus 5T AMOLED Screen & Digitizer Replacement: passo 23, immagine 2 di 2
    • Insert a fourth opening pick at the top left corner.

    • When nearing the front facing camera, only work with the tip of the opening pick to avoid damaging or smearing the camera.

    • Slide the opening pick along the top edge of the phone to cut the adhesive. Leave the pick in the top right corner of the screen to prevent the adhesive from resealing.

  24. OnePlus 5T AMOLED Screen & Digitizer Replacement: passo 24, immagine 1 di 2 OnePlus 5T AMOLED Screen & Digitizer Replacement: passo 24, immagine 2 di 2
    • Insert a fifth opening pick and slide it along the right edge of the phone to cut the remaining adhesive.

    • Try not to remove the display all the way yet, the display cable is still threaded through the frame and possible adhered on the inner side of the midframe.

  25. OnePlus 5T AMOLED Screen & Digitizer Replacement: passo 25, immagine 1 di 3 OnePlus 5T AMOLED Screen & Digitizer Replacement: passo 25, immagine 2 di 3 OnePlus 5T AMOLED Screen & Digitizer Replacement: passo 25, immagine 3 di 3
    • Thread the display flex cable through the gap in the midframe and remove the display.

    • Before installing a new display, remove all traces of the old adhesive from the frame, and clean the glued areas with isopropyl alcohol (>90%) and a lint-free cloth.

    • If your replacement part doesn't come with preattached adhesive, the best way to secure the new screen is with a sheet of custom-cut double-sided tape. Apply the tape to the back of the screen, then carefully feed the display cable through the frame. Align the screen and press it into place.

Conclusione

To reassemble your device, follow these instructions in reverse order.

If possible, turn on your phone and test your repair before installing new adhesive and resealing the phone.

Take your e-waste to an R2 or e-Stewards certified recycler.

Repair didn’t go as planned? Check out our Answers community for troubleshooting help.

Altre 10 persone hanno completato questa guida.

Team

iFixit Membro di iFixit

Staff

135 Membri

16.731 Guide realizzate

Un commento

What adhesive do you use? B-7000 glue , 1mm or 2mm adhesive tape?

purepeanutz - Replica

Aggiungi Commento

Visualizza Statistiche:

Ultime 24 Ore: 8

Ultimi 7 Giorni: 60

Ultimi 30 Giorni: 226

Tutti i Tempi: 22,837