Salta al contenuto principale
Unisciti alla Community delle riparazioni - Crea un account

One Education Infinity:One Hinge Contact Assembly Replacement

Cosa ti serve

  1. One Education Infinity:One Hinge Contact Assembly Replacement, Back Case: passo 1, immagine 1 di 2 One Education Infinity:One Hinge Contact Assembly Replacement, Back Case: passo 1, immagine 2 di 2
    • Use a spudger to pry the four rubber pads away from the bottom of the case.

    • Use a Phillips #00 screwdriver to unscrew the four 6.4 mm screws.

  2. One Education Infinity:One Hinge Contact Assembly Replacement: passo 2, immagine 1 di 2 One Education Infinity:One Hinge Contact Assembly Replacement: passo 2, immagine 2 di 2
    • Insert a Jimmy or other prying tool into the seam on the edge of the casing.

    • Trace along the edges of the device until all clips are released.

    • Lift the back case away from the device.

  3. One Education Infinity:One Hinge Contact Assembly Replacement: passo 3, immagine 1 di 1
    • Use a Phillips #00 screwdriver to unscrew the four 6.4mm screws on the hinge mounts.

  4. One Education Infinity:One Hinge Contact Assembly Replacement: passo 4, immagine 1 di 2 One Education Infinity:One Hinge Contact Assembly Replacement: passo 4, immagine 2 di 2
    Attrezzo utilizzato in questo passaggio:
    Tweezers
    $4.99
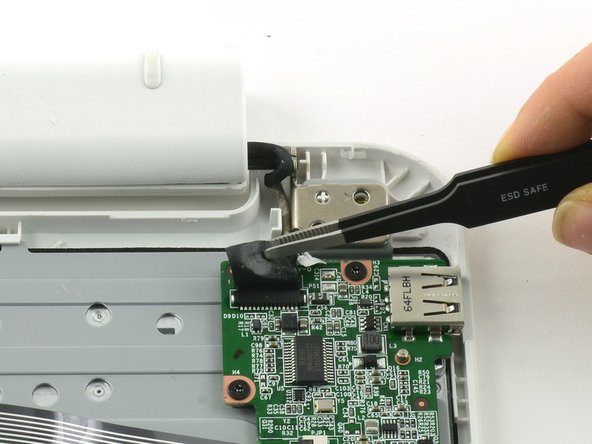
    • Use tweezers to lift the fabric cover and hinge connector away from the daughterboard.

    • Always use ESD safe tools when working with delicate electrical components.

  5. One Education Infinity:One Hinge Contact Assembly Replacement, Hinge Contact Assembly: passo 5, immagine 1 di 2 One Education Infinity:One Hinge Contact Assembly Replacement, Hinge Contact Assembly: passo 5, immagine 2 di 2
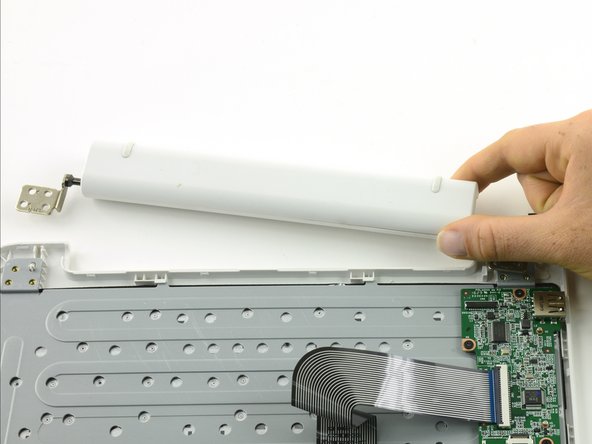
    • Lift the hinge away from the device.

  6. One Education Infinity:One Hinge Contact Assembly Replacement: passo 6, immagine 1 di 1
    • Use a Phillips #00 screwdriver to unscrew the two 6.5mm screws.

  7. One Education Infinity:One Hinge Contact Assembly Replacement: passo 7, immagine 1 di 2 One Education Infinity:One Hinge Contact Assembly Replacement: passo 7, immagine 2 di 2
    • Slide a Jimmy or other prying tool along the seam of the hinge to pry the casing apart.

  8. One Education Infinity:One Hinge Contact Assembly Replacement: passo 8, immagine 1 di 1
    • Use a Phillips #00 screwdriver to remove the two 4.3mm screws holding the circuit board in place.

  9. One Education Infinity:One Hinge Contact Assembly Replacement: passo 9, immagine 1 di 1
    • Use a spudger to pry the circuit board away from the casing.

    • Always use ESD safe tools when removing delicate components.

Conclusione

To reassemble your device, follow these instructions in reverse order.

1Commento della guida

Everything is very detailed and shown. Everything is also done in detail on this site ++https://oceanessay.com/buy-thesis-pape... , which helps students learn. There you will find a lot of educational materials.

Nathan Joyce - Replica Condividi

Aggiungi Commento

Visualizza Statistiche:

Ultime 24 Ore: 1

Ultimi 7 Giorni: 16

Ultimi 30 Giorni: 56

Tutti i Tempi: 478