Questa versione può contenere modifiche errate. Passa all'ultima istantanea verificata.
Cosa ti serve
-
Questo passaggio è privo di traduzione. Aiuta a tradurlo
-
Pull the SIM card holder out of the top of the phone using your fingernail.
-
-
Questo passaggio è privo di traduzione. Aiuta a tradurlo
-
Place tweezers or an opening tool in the SIM card slot and push upwards until the back panel pops out.
-
-
Questo passaggio è privo di traduzione. Aiuta a tradurlo
-
Wedge a plastic opening tool between the two panels. Slide it along each side of the phone to completely remove the back panel.
-
-
Questo passaggio è privo di traduzione. Aiuta a tradurlo
-
Remove the 4mm Torx #4 screw that's securing the battery connector.
-
-
Questo passaggio è privo di traduzione. Aiuta a tradurlo
-
Use tweezers to remove the battery connector strap.
-
-
Questo passaggio è privo di traduzione. Aiuta a tradurlo
-
Remove all ten 4mm Torx #4 screws that secure the battery cover to the frame of the phone.
-
-
Questo passaggio è privo di traduzione. Aiuta a tradurlo
-
Use the flat end of a spudger to pry the battery cover from the phone's frame.
-
-
-
Questo passaggio è privo di traduzione. Aiuta a tradurlo
-
Use the flat end of the spudger to lift up the battery.
-
-
Questo passaggio è privo di traduzione. Aiuta a tradurlo
-
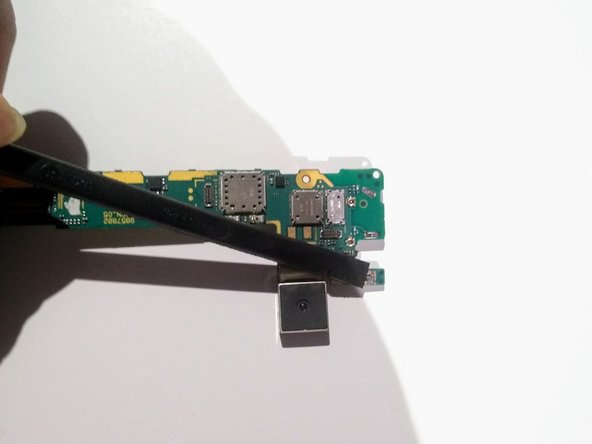
Use the flat end of a spudger to disconnect the camera connectors.
-
Pull the camera up and out to remove it from the phone.
-
-
Questo passaggio è privo di traduzione. Aiuta a tradurlo
-
Use the flat end of a spudger to disconnect the six ribbon cables from the motherboard.
-
-
Questo passaggio è privo di traduzione. Aiuta a tradurlo
-
Use the flat end of a spudger to pry up the orange flex cable underneath the battery.
-
Remove the orange flex cable from the phone.
-
-
Questo passaggio è privo di traduzione. Aiuta a tradurlo
-
Repeat the previous step for the black jumper flex cable under the battery.
-
-
Questo passaggio è privo di traduzione. Aiuta a tradurlo
-
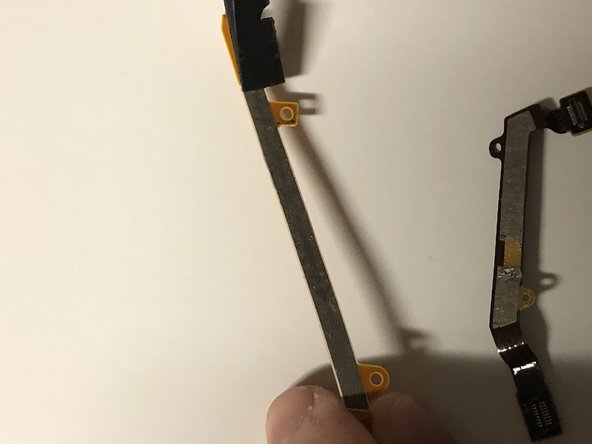
Use the flat end of a spudger to disconnect both ends of the antenna cable from the motherboard.
-
Remove the antenna.
-
-
Questo passaggio è privo di traduzione. Aiuta a tradurlo
-
Use tweezers to grab the adhesive that is under the LTE flex cable and pull it outwards and towards the bottom end of the phone.
-
-
Questo passaggio è privo di traduzione. Aiuta a tradurlo
-
Use a spudger to pry up the bottom end of the motherboard, then pull it out.
-
-
Questo passaggio è privo di traduzione. Aiuta a tradurlo
-
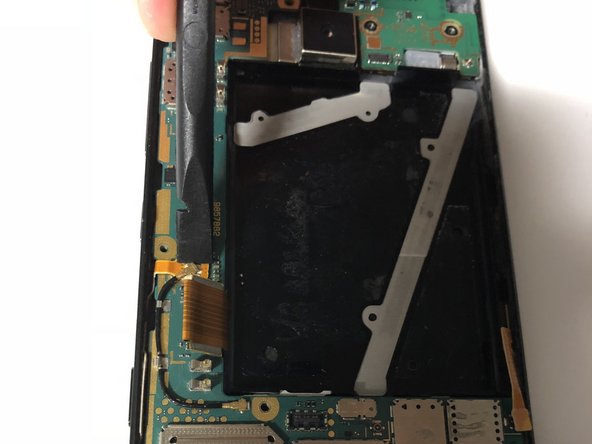
Use the pointed end of the spudger to pry up the daughterboard.
-
Use tweezers to lift the daughterboard out of the phone.
-
-
Questo passaggio è privo di traduzione. Aiuta a tradurlo
-
Locate all microphones. The first two microphones you will find are on the engine board. The two microphones will be back to back with each other. The third microphone will be on the engine cover. The last microphone will be on the last layer of the phone before the screen.
-
-
Questo passaggio è privo di traduzione. Aiuta a tradurlo
-
You are gonna wanna use akistan to pop off the microphone.
-
Remove all remainings with the Spudger #2.
-
Repeat both steps on second microphone which is located on the other side of the first microphone.
-
-
Questo passaggio è privo di traduzione. Aiuta a tradurlo
-
Use spudger to remove 3rd microphone. Located on the engine board cover.
-
-
Questo passaggio è privo di traduzione. Aiuta a tradurlo
-
Use spudger to remove 3rd microphone. Located on the last layer before the display screen.
-


Annulla: non ho completato questa guida.
Un'altra persona ha completato questa guida.
Team

University of North Texas, Team S1-G3, Thompson Spring 2018 Membro di University of North Texas, Team S1-G3, Thompson Spring 2018
UNT-THOMPSON-S18S1G3
4 Membri
7 Guide realizzate