Salta al contenuto principale

Nokia C7 - 00 Touchscreen Replacement

Cosa ti serve

  1. Nokia  C7 - 00 Touchscreen  Replacement, Touchscreen and LCD: passo 1, immagine 1 di 3 Nokia  C7 - 00 Touchscreen  Replacement, Touchscreen and LCD: passo 1, immagine 2 di 3 Nokia  C7 - 00 Touchscreen  Replacement, Touchscreen and LCD: passo 1, immagine 3 di 3
    • With a thin tool insert it in the cover at the bottom and pry up to release it

  2. Nokia  C7 - 00 Touchscreen  Replacement: passo 2, immagine 1 di 2 Nokia  C7 - 00 Touchscreen  Replacement: passo 2, immagine 2 di 2
    • Pry up the two points indicated by the arrows to release the keyboard

  3. Nokia  C7 - 00 Touchscreen  Replacement: passo 3, immagine 1 di 2 Nokia  C7 - 00 Touchscreen  Replacement: passo 3, immagine 2 di 2
    • Remove battery and battery cover

  4. Nokia  C7 - 00 Touchscreen  Replacement: passo 4, immagine 1 di 2 Nokia  C7 - 00 Touchscreen  Replacement: passo 4, immagine 2 di 2
    • Unscrew the 2 rear screws

    • Unscrew the 2 front screws

  5. Nokia  C7 - 00 Touchscreen  Replacement: passo 5, immagine 1 di 3 Nokia  C7 - 00 Touchscreen  Replacement: passo 5, immagine 2 di 3 Nokia  C7 - 00 Touchscreen  Replacement: passo 5, immagine 3 di 3
    • Gently lift the front glass and slide it slightly in the direction of the arrow so you can free it

  6. Nokia  C7 - 00 Touchscreen  Replacement: passo 6, immagine 1 di 3 Nokia  C7 - 00 Touchscreen  Replacement: passo 6, immagine 2 di 3 Nokia  C7 - 00 Touchscreen  Replacement: passo 6, immagine 3 di 3
    • if the display needs to be replaced and then you have no problems if it is broken in the door, proceed with a heat source and a thin tool to be able to break it from underneath

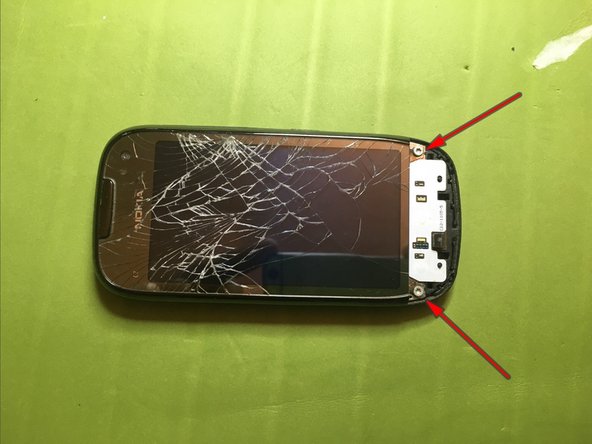
    • If the display is as good as in my case to avoid the risk of breaking it, unscrew the two red arrow screws

    • Gradually unscrew the purple arrow screw so that you do not lose too much on the back of the display to avoid breaking it, at the same time lift it from the keyboard area and gradually unscrew Dino to the complete lifting of the display and its housing doing Leva also laterally on the releases

  7. Nokia  C7 - 00 Touchscreen  Replacement: passo 7, immagine 1 di 2 Nokia  C7 - 00 Touchscreen  Replacement: passo 7, immagine 2 di 2
    • Lift up display assembly.

  8. Nokia  C7 - 00 Touchscreen  Replacement: passo 8, immagine 1 di 3 Nokia  C7 - 00 Touchscreen  Replacement: passo 8, immagine 2 di 3 Nokia  C7 - 00 Touchscreen  Replacement: passo 8, immagine 3 di 3
    • Disconnect touch screen connector

    • Disconnect display connector

Conclusione

To reassemble the device, follow these instructions in reverse order.

Altre 4 persone hanno completato questa guida.

Un ringraziamento speciale a questi traduttori:

it en

100%

Questi traduttori ci stanno aiutando ad aggiustare il mondo! Vuoi partecipare?
Inizia a tradurre ›

Smilzo

Membro da: 11/09/13

11.267 Reputazione

39 Guide realizzate

0 Commenti

Aggiungi Commento

Visualizza Statistiche:

Ultime 24 Ore: 0

Ultimi 7 Giorni: 5

Ultimi 30 Giorni: 18

Tutti i Tempi: 2,188