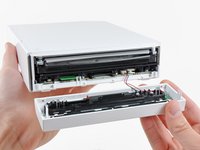
Salta al contenuto principale

Nintendo Wii Fan Replacement

Cosa ti serve

  1. Nintendo Wii Fan Replacement, Faceplate: passo 1, immagine 1 di 2 Nintendo Wii Fan Replacement, Faceplate: passo 1, immagine 2 di 2
    • Use a metal spudger to remove the white plastic screw covers stuck to the lower case near the front of the Wii.

  2. Nintendo Wii Fan Replacement: passo 2, immagine 1 di 1
    • Remove the two 8.3 mm Tri-Point screws hidden under the covers you just removed.

  3. Nintendo Wii Fan Replacement: passo 3, immagine 1 di 1
    • Remove the single 5.9 mm Phillips screw under the controller port door nearest the faceplate.

  4. Nintendo Wii Fan Replacement: passo 4, immagine 1 di 1
    • Use a metal spudger to remove the rubber foot stuck to the side of the Wii near the DVD drive opening.

  5. Nintendo Wii Fan Replacement: passo 5, immagine 1 di 1
    • Remove the single 5.9 mm Phillips screw hidden under the foot you just removed.

  6. Nintendo Wii Fan Replacement: passo 6, immagine 1 di 2 Nintendo Wii Fan Replacement: passo 6, immagine 2 di 2
    Attrezzo utilizzato in questo passaggio:
    Tweezers
    $4.99
    • Carefully pull the faceplate away from the front of the Wii.

    • Use a pair of tweezers to disconnect the LED cable's plastic connector from the motherboard.

    • Remove the faceplate.

  7. Nintendo Wii Fan Replacement, Outer Case: passo 7, immagine 1 di 3 Nintendo Wii Fan Replacement, Outer Case: passo 7, immagine 2 di 3 Nintendo Wii Fan Replacement, Outer Case: passo 7, immagine 3 di 3
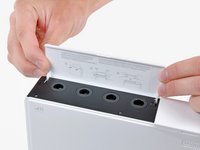
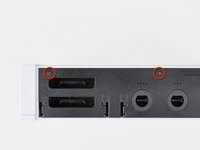
    • Open the controller port cover until it is perpendicular to the black controller port bezel.

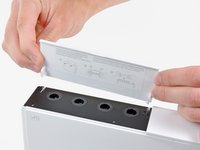
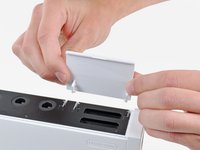
    • Pull the controller port cover straight up to release it from the outer case.

    • Repeat this procedure for the memory card port cover.

  8. Nintendo Wii Fan Replacement: passo 8, immagine 1 di 2 Nintendo Wii Fan Replacement: passo 8, immagine 2 di 2
    • Remove the two remaining 4.1 mm Phillips screws along the top edge of the black plastic controller port bezel.

    • Lift the bezel from the long edge furthest away from the controller ports and remove it from the Wii.

  9. Nintendo Wii Fan Replacement: passo 9, immagine 1 di 1
    • Remove the two 5 mm Phillips screws above the controller ports.

  10. Nintendo Wii Fan Replacement: passo 10, immagine 1 di 1
    • Use a metal spudger to remove the three highlighted screw covers stuck to the side of the Wii.

  11. Nintendo Wii Fan Replacement: passo 11, immagine 1 di 1
    • Remove the following screws:

    • Two 5 mm Phillips screws

    • One 8.2 mm Tri-Point screw

  12. Nintendo Wii Fan Replacement: passo 12, immagine 1 di 1
    • Use a metal spudger to remove the two rubber feet stuck to the bottom face of the Wii near the rear ports.

  13. Nintendo Wii Fan Replacement: passo 13, immagine 1 di 1
    Attrezzo utilizzato in questo passaggio:
    iFixit Precision 4 mm Screwdriver Bit
    $2.99
    • Remove the two 8.2 mm Tri-Point screws hidden under the feet you just removed.

    • You may use a 4 mm hex nut driver to extend your bit into the recesses and reach the screws.

  14. Nintendo Wii Fan Replacement: passo 14, immagine 1 di 1
    • Lift the outer case straight up off the body of the Wii.

  15. Nintendo Wii Fan Replacement, Fan: passo 15, immagine 1 di 1
    Attrezzo utilizzato in questo passaggio:
    Tweezers
    $4.99
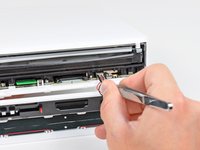
    • Grab the fan connector with a pair of tweezers and lift it straight up and out of its socket on the motherboard.

    • Be sure your tweezers are clamped down on the fan connector, not the socket attached to the motherboard.

  16. Nintendo Wii Fan Replacement: passo 16, immagine 1 di 1
    • Remove the two 10 mm Phillips screws securing the fan to the fan shroud.

  17. Nintendo Wii Fan Replacement: passo 17, immagine 1 di 1
    • Remove the fan from the Wii.

Conclusione

To reassemble your device, follow these instructions in reverse order.

Altre 34 persone hanno completato questa guida.

9Commenti sulla guida

Awesome guide, just replaced faulty fan unit in my 9 year old wii. Should hopefully keep it going for another 9 years :)

Finlay Macrae - Replica

Super easy and great instructions! I feel a little guilty that my Wii sat in the garage for 4 years! Now it'll be a great birthday present for my 2 boys.

e_gayheart - Replica

Does anyone have a diagram for the Wii’s airflow? I’m looking to install a booster fan at the bottom to help blow air in but I want to make sure it is effective.

Jessica Parnelli Fawkes - Replica

nice¡¡¡¡¡¡¡¡¡¡¡¡¡¡

RIGO NOLASCO - Replica

Thanks! Wii Quarantine’n in 2021!

Daniel Thomas - Replica

Aggiungi Commento

Visualizza Statistiche:

Ultime 24 Ore: 16

Ultimi 7 Giorni: 106

Ultimi 30 Giorni: 522

Tutti i Tempi: 47,640