Introduzione
The circuit board connects all the components within the controller and provides structural support for buttons, sticks, and chips.
Cosa ti serve
-
-
Place the controller (buttons down) on a solid surface.
-
Remove the six 9.2mm Tri-wing Y0 screws that hold the back panel in place.
-
-
-
Gently lift the back panel up, separating it from the front panel.
For some reason, it was simpler to take the top half off, although it could be because it is most probably refurbished before
-
-
-
-
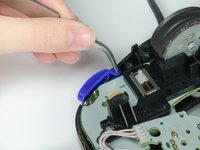
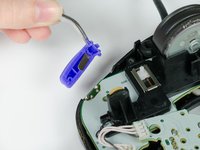
Grab the Z-button by the peg with tweezers and lift it out of the controller.
So how do you put it back in like the replacement because I have a controller I'm working a junker my Friend gave me and I'm trying to fix it the z button doesn't work here it's a pelican wireless controller it's actually not to bad bulky but not bad
-
-
-
Carefully unhook the cable that is looped around the peg.
Um can soneone explain the peg and cable part? I dont understand it...
I would say that the cable is somehow "hooked" to the case and you have to get the cable away from the case so that you can pull out the board
My1 -
-


To reassemble your device, follow these instructions in reverse order.
To reassemble your device, follow these instructions in reverse order.
Annulla: non ho completato questa guida.
Altre 5 persone hanno completato questa guida.
Team

Cal Poly, Team 19-44, Regan Winter 2013 Membro di Cal Poly, Team 19-44, Regan Winter 2013
CPSU-REGAN-W13S19G44
4 Membri
31 Guide realizzate
2 Commenti
Yeah this isn't very in-depth, I was hoping for a little more. I need to desolder and rewire the buttons to use for another project and I was hoping this might be a nice guide to help me do that... it's not.
You left out the fun facts about every part and components so we know what the are and what they do. Well for me that would have been ideal as I'm fixing 2 controls that don't do anything and I already have to fix a game cube as I got 2 and one works and one don't lol