Introduzione
In questa guida ti mostrerò come sostituire lo schermo del tuo Game Boy Advance.
Cosa ti serve
-
-
Gira al contrario il tuo GBA in modo che l'alloggiamento della batteria sia rivolto in alto.
-
Rimuovi la vite a stella che tiene il coperchio della batteria in posizione.
-
Rimuovi il coperchio dell'alloggiamento della batteria.
-
-
-
Spingi la batteria verso l'alto con il dito o tramite l'ausilio dello Spudger.
-
-
-
Rimuovi le 6 viti Tripoint che tengono assieme la scocca.
-
Separa le due metà della scocca. Non forzare eccessivamente, potresti rompere il tuo GBA.
-
Riponi la parte inferiore per montarla nuovamente in seguito.
-
Assicurati di non perdere la piccola vite che mantiene in posizione il coperchio della batteria, o non sarai in grado di rimontarlo in seguito.
-
-
-
-
Svita le tre viti a croce Phillips che fissano la scheda madre alla copertura centrale.
-
ATTENZIONE!!! NON rimuovere ancora la scheda madre: è ancora collegata con un cavo a nastro.
-
Gira il GBA come mostrato nella terza immagine.
-
-
-
Inclina la scheda madre come mostrato nella prima immagine. Assicurati che la copertura sia SOPRA la scheda madre.
-
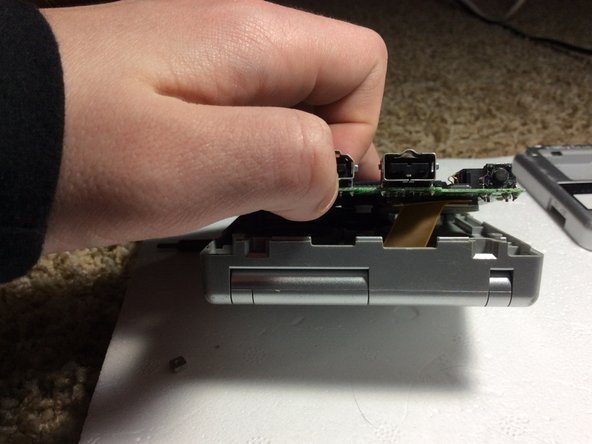
Usa un cacciavite o delle pinzette per scollegare il connettore ZIF dalla scheda madre.
-
Sfila il cavo a nastro dello schermo dalla sua presa sulla scheda madre.
This section could use some better close-up photos, because it’s very hard to see what’s needs to be done. I had to find a YouTube guide to get through this part.
If you’re looking at the photos and don’t know what to do, look for tiny black bits on the sides of the connector. Those lock the ribbon cable in place, and you have to unlock them first before you can get the ribbon cable out. This is the part that you need the screwdriver or tweezers for - don’t try to pull on the cable with the tweezers before you’ve unlocked the connector! After you’ve done that the ribbon cable will come out easily pretty much by itself.
Tip: opening the clamshell all the way gives more flex cable to work with during this part of the repair when reconnecting and disconnecting the ribbon cable.
In addition to Rathori's post, push the black locking pieces up from the connector to disengage them properly.
-
-
-
Usa la punta di una cacciavite a testa piatta o di uno spudger per rimuovere le 5 coperture in gomma delle viti.
-
Svita le 5 viti Tri-Point sotto le coperture in gomma.
-
Chiudi il GBA e svita la vite a croce Phillips sulla parte inferiore.
what do you do from here if your gba somehow has no screen...
dont ask xD i got it like that for free
-
-
-
Apri il GBA e il tutto dovrebbe separarsi. Fai passare il cavo a nastro dello schermo attraverso l'apertura nella copertura e solleva lo schermo dalla copertura superiore.
-
Ecco fatto!!
Observe the ribbon cable & how it’s curled inside the hinge. When rebuilding make sure to curl the ribbon cable inside the hinge.
-


Per assemblare nuovamente il tuo dispositivo, segui queste istruzioni in ordine inverso.
Per assemblare nuovamente il tuo dispositivo, segui queste istruzioni in ordine inverso.
Annulla: non ho completato questa guida.
Altre 34 persone hanno completato questa guida.
Un ringraziamento speciale a questi traduttori:
100%


Questi traduttori ci stanno aiutando ad aggiustare il mondo! Vuoi partecipare?
Inizia a tradurre ›


8 Commenti
One issue - you never mentioned how to get the hinge off, so getting the ribbon in and out is.. hard.
Last part of step 5, that screw hidden under the ribbon cable, is what holds the hinge in.
hello can i ask something? can you take apart the lcd? because my lcd has fungus
I am pretty sure, as the actual screen can be separated from the plastic cover (the thing that says game boy advance). I’ve never seen fungus in a screen though. That’s interesting.
Hello friend! One question: in the replace screen there is retroillumination? or i have to do something? Thx for your answer!
The light is built in on all GBA SPs.
there is a model with a better backlit display instead of a front lit display, but both have a light.
Heya! I was wondering if it’s possible to use an ag101 screen with an ag 001 motherboard? I’d prefer the better lit screen but ag101 models aren’t common in the uk
Says replacement screen, guide only covers taking the old one out