Salta al contenuto principale

Nintendo 3DS Wi-Fi Antenna Replacement

Cosa ti serve

  1. Nintendo 3DS Wi-Fi Antenna Replacement, Back Cover: passo 1, immagine 1 di 1
    • Unscrew the four Phillips #00 screws along the top of the back cover.

    • The screws are held in place by locking washers, and will not come out of the back cover.

    • The comments section is full of unlucky souls who will tell you that the screws here through step 4 will strip incredibly easily. Press down fairly hard, and go slow.

  2. Nintendo 3DS Wi-Fi Antenna Replacement: passo 2, immagine 1 di 2 Nintendo 3DS Wi-Fi Antenna Replacement: passo 2, immagine 2 di 2
    • Hold the device in one hand and turn it over.

    • Grab the top edge of the back cover with your opposite hand so that the cover does not fall back into place.

    • Flip the 3DS over again so that the back cover is facing up.

    • Pull the back cover up and away from the rest of the device to remove it.

  3. Nintendo 3DS Wi-Fi Antenna Replacement, Battery: passo 3, immagine 1 di 3 Nintendo 3DS Wi-Fi Antenna Replacement, Battery: passo 3, immagine 2 di 3 Nintendo 3DS Wi-Fi Antenna Replacement, Battery: passo 3, immagine 3 di 3
    • Insert a plastic opening tool into the notch in the lower case above the battery.

    • Pry the battery up with the plastic opening tool.

    • Grab the top edge of the battery and lift it out of the lower case.

  4. Nintendo 3DS Wi-Fi Antenna Replacement, Lower Case: passo 4, immagine 1 di 1
    • Remove the nine 6.3 mm black Phillips screws from the lower case.

    • These screws will strip very easily unless you use the correct size bit. Apply pressure to the screws while turning to avoid stripping them.

    • Remove the 2.4 mm silver Phillips screw above the game cartridge slot.

  5. Nintendo 3DS Wi-Fi Antenna Replacement: passo 5, immagine 1 di 3 Nintendo 3DS Wi-Fi Antenna Replacement: passo 5, immagine 2 di 3 Nintendo 3DS Wi-Fi Antenna Replacement: passo 5, immagine 3 di 3
    • Lift the bottom edge of the lower case off the rest of the 3DS.

    • There are still two ribbon cables connecting the mother board to the case, so be sure not to pull the lower case all the way off.

    • Use a plastic opening tool to pry the shoulder button ribbon cables off their sockets on the motherboard.

    • Remove the lower case from the device.

  6. Nintendo 3DS Wi-Fi Antenna Replacement, Circle Pad Joystick: passo 6, immagine 1 di 1
    • Remove the two 7.7 mm Phillips screws securing the back of the Circle Pad to the motherboard.

  7. Nintendo 3DS Wi-Fi Antenna Replacement: passo 7, immagine 1 di 3 Nintendo 3DS Wi-Fi Antenna Replacement: passo 7, immagine 2 di 3 Nintendo 3DS Wi-Fi Antenna Replacement: passo 7, immagine 3 di 3
    • Use the flat end of a spudger to pry the back of the Circle Pad off the motherboard.

    • Lift the Circle Pad joystick off the motherboard and lay it on its back so that the ribbon cable connector is accessible.

  8. Nintendo 3DS Wi-Fi Antenna Replacement: passo 8, immagine 1 di 3 Nintendo 3DS Wi-Fi Antenna Replacement: passo 8, immagine 2 di 3 Nintendo 3DS Wi-Fi Antenna Replacement: passo 8, immagine 3 di 3
    • Use the flat end of a spudger or your fingernail to flip up the retaining flap on the Circle Pad ribbon cable ZIF socket.

    • Be sure you are prying up on the hinged retaining flap, not the socket itself.

    • Lift the Circle Pad joystick off the motherboard.

  9. Nintendo 3DS Wi-Fi Antenna Replacement: passo 9, immagine 1 di 2 Nintendo 3DS Wi-Fi Antenna Replacement: passo 9, immagine 2 di 2
    • To decrease the chance of losing it during repairs, you may want to remove the two thin pads underneath the Circle Pad joystick.

    • Use a spudger or screwdriver to lift the pads up and remove them from the device.

  10. Nintendo 3DS Wi-Fi Antenna Replacement, SD Board: passo 10, immagine 1 di 1
    • Remove the two 4.5 mm Phillips screws securing the SD board to the motherboard.

  11. Nintendo 3DS Wi-Fi Antenna Replacement: passo 11, immagine 1 di 2 Nintendo 3DS Wi-Fi Antenna Replacement: passo 11, immagine 2 di 2
    • Use the flat end of a spudger to pry the SD board ribbon cable connector off its socket on the motherboard.

  12. Nintendo 3DS Wi-Fi Antenna Replacement: passo 12, immagine 1 di 3 Nintendo 3DS Wi-Fi Antenna Replacement: passo 12, immagine 2 di 3 Nintendo 3DS Wi-Fi Antenna Replacement: passo 12, immagine 3 di 3
    • Insert the flat end of a spudger between the SD board and the motherboard.

    • Pry up slowly to loosen the SD board from the RF shield underneath it. If you pry too quickly, you may tear the shield or break its solder points.

    • Run the spudger along the sides of the SD board to free it from the adhesive holding it in place.

    • Once completely freed, lift the SD board straight off the motherboard.

  13. Nintendo 3DS Wi-Fi Antenna Replacement, Wi-Fi Board: passo 13, immagine 1 di 2 Nintendo 3DS Wi-Fi Antenna Replacement, Wi-Fi Board: passo 13, immagine 2 di 2
    • Slide the flat end of a spudger under the corner of the Wi-Fi board, and lift it away from the motherboard.

    • The Wi-Fi antenna cable is still connected to the Wi-Fi board, so you cannot completely remove the Wi-Fi board yet.

  14. Nintendo 3DS Wi-Fi Antenna Replacement: passo 14, immagine 1 di 3 Nintendo 3DS Wi-Fi Antenna Replacement: passo 14, immagine 2 di 3 Nintendo 3DS Wi-Fi Antenna Replacement: passo 14, immagine 3 di 3
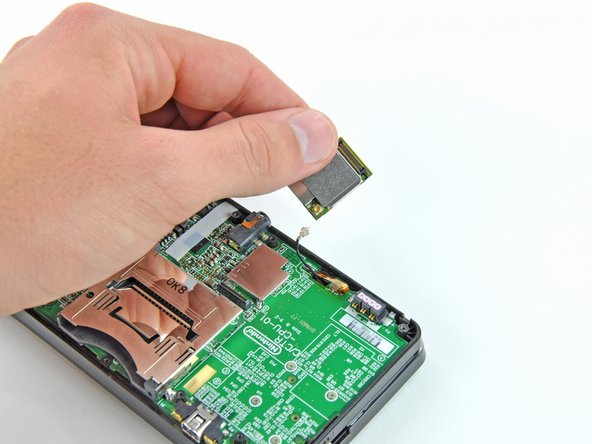
    • Lift the Wi-Fi board off the motherboard and rotate it so that the bottom side is facing up.

    • Use the flat end of a spudger to pry the Wi-Fi antenna cable connector off its socket on the Wi-Fi board.

    • Remove the Wi-Fi board from the device.

  15. Nintendo 3DS Wi-Fi Antenna Replacement, Motherboard Assembly: passo 15, immagine 1 di 2 Nintendo 3DS Wi-Fi Antenna Replacement, Motherboard Assembly: passo 15, immagine 2 di 2
    • Grasp the microphone ribbon cable near the microphone with a pair of tweezers.

    • Pull the microphone straight up out of the upper case.

  16. Nintendo 3DS Wi-Fi Antenna Replacement: passo 16, immagine 1 di 3 Nintendo 3DS Wi-Fi Antenna Replacement: passo 16, immagine 2 di 3 Nintendo 3DS Wi-Fi Antenna Replacement: passo 16, immagine 3 di 3
    • Use the flat end of a spudger or your fingernail to flip up the retaining flap on the speaker assembly ribbon cable ZIF socket.

    • Be sure you are prying up on the hinged retaining flap, NOT the socket itself. Damaging the socket or cable will result in a 3DS that will blink its power LED when you press the power button - and do nothing else.

    • Disconnect the speaker assembly ribbon cable with a pair of tweezers.

  17. Nintendo 3DS Wi-Fi Antenna Replacement: passo 17, immagine 1 di 2 Nintendo 3DS Wi-Fi Antenna Replacement: passo 17, immagine 2 di 2
    • Use the flat end of a spudger or your fingernail to flip up the retaining flap on the camera ribbon cable ZIF socket.

    • Be sure you are prying up on the hinged retaining flap, not the socket itself.

    • When reassembling, note that the gold contacts face toward the motherboard (as opposed to the camera cable's gold contacts facing away).

  18. Nintendo 3DS Wi-Fi Antenna Replacement: passo 18, immagine 1 di 3 Nintendo 3DS Wi-Fi Antenna Replacement: passo 18, immagine 2 di 3 Nintendo 3DS Wi-Fi Antenna Replacement: passo 18, immagine 3 di 3
    • Remove seven Phillips screws securing the motherboard to the upper case:

    • Four 2.5 mm gold screws

    • Two 3.5 mm black screws

    • One 2.5 mm silver screw

    • When you remove this screw the volume slider can fall out.

    • Lift the side of the motherboard that sits along the bottom edge of the 3DS.

  19. Nintendo 3DS Wi-Fi Antenna Replacement: passo 19, immagine 1 di 3 Nintendo 3DS Wi-Fi Antenna Replacement: passo 19, immagine 2 di 3 Nintendo 3DS Wi-Fi Antenna Replacement: passo 19, immagine 3 di 3
    • Continue lifting the motherboard assembly and rotate it until it is resting next to the rest of the device.

    • Use the flat end of a spudger or your fingernail to flip up the retaining flap on the LCD ribbon cable ZIF socket.

    • Be sure you are prying up on the hinged retaining flap, not the socket itself. Damaging the socket or cable will result in a 3DS that won't have a functional top screen.

  20. Nintendo 3DS Wi-Fi Antenna Replacement: passo 20, immagine 1 di 1
    • Remove the motherboard assembly from the rest of the device.

  21. Nintendo 3DS Wi-Fi Antenna Replacement, Upper Display Front Panel: passo 21, immagine 1 di 1
    • Before continuing with disassembly, use a pair of tweezers to remove the clear plastic diffuser for the wireless notification LED. The small piece is likely to fall out on its own, and may be difficult to find if it lands on the floor.

  22. Nintendo 3DS Wi-Fi Antenna Replacement: passo 22, immagine 1 di 2 Nintendo 3DS Wi-Fi Antenna Replacement: passo 22, immagine 2 di 2
    • De-route the Wi-Fi antenna cable from the bottom of the upper case.

    • This step is not necessary if you are only replacing the front panel; however, the replacement of the upper screen, speakers, cameras, and Wi-Fi antenna require it.

  23. Nintendo 3DS Wi-Fi Antenna Replacement: passo 23, immagine 1 di 2 Nintendo 3DS Wi-Fi Antenna Replacement: passo 23, immagine 2 di 2
    • Heat the edges of the upper display front panel with a hair dryer or heat gun to soften the adhesive holding it to the display bezel.

    • Begin prying the edges of the front panel off with a plastic opening tool.

    • If it is difficult to pry the front panel off, reheat the area you are working on with the heat gun, and then return to prying. Applying excessive force could crack the front panel.

  24. Nintendo 3DS Wi-Fi Antenna Replacement: passo 24, immagine 1 di 2 Nintendo 3DS Wi-Fi Antenna Replacement: passo 24, immagine 2 di 2
    • Continue prying the remaining sides of the front panel by sliding the plastic opening tool down each edge.

    • Too little heat will result in excessive bending/breaking of the front panel, and too much will melt and destroy the LCD underneath. Take your time.

  25. Nintendo 3DS Wi-Fi Antenna Replacement: passo 25, immagine 1 di 2 Nintendo 3DS Wi-Fi Antenna Replacement: passo 25, immagine 2 di 2
    • With all of the sides free, lift the upper display front panel off the display bezel.

  26. Nintendo 3DS Wi-Fi Antenna Replacement, Rear Display Bezel: passo 26, immagine 1 di 1
    • Remove the six 3.6 mm Phillips screws securing the rear display bezel to the front display bezel.

  27. Nintendo 3DS Wi-Fi Antenna Replacement: passo 27, immagine 1 di 2 Nintendo 3DS Wi-Fi Antenna Replacement: passo 27, immagine 2 di 2
    • Flip the device over so that the rear display bezel is on top and the hinge is on the side opposite from you.

    • Lift the edge of the rear display bezel closest to you and rotate it towards the hinge.

    • Continue to lift the rear display bezel off the rest of the device until it is free.

    • There are clips toward the bottom of the rear display bezel holding it in place. Use enough force to disengage the clips, but be careful not to break them.

  28. Nintendo 3DS Wi-Fi Antenna Replacement, Upper Display Assembly: passo 28, immagine 1 di 1
    • Remove the 3D adjustment switch from the front display bezel.

    • This step is not necessary for disassembly, but the switch is likely to fall out on its own. By removing it yourself, you reduce the chance of losing it.

  29. Nintendo 3DS Wi-Fi Antenna Replacement: passo 29, immagine 1 di 3 Nintendo 3DS Wi-Fi Antenna Replacement: passo 29, immagine 2 di 3 Nintendo 3DS Wi-Fi Antenna Replacement: passo 29, immagine 3 di 3
    • Insert a metal probe into the space above the ABXY buttons with the point touching the metal hinge.

    • Push the hinge towards the center of the upper case. This will require a fair amount of force.

    • Before and after images of the hinge location when looking at the back of the upper display are shown.

  30. Nintendo 3DS Wi-Fi Antenna Replacement: passo 30, immagine 1 di 3 Nintendo 3DS Wi-Fi Antenna Replacement: passo 30, immagine 2 di 3 Nintendo 3DS Wi-Fi Antenna Replacement: passo 30, immagine 3 di 3
    • Before proceeding, note how the 3 ribbon cables are oriented (what direction the gold contacts face) and layered together (which cable is on top of which). The cables are too short to reach if they are threaded through in any other orientation.

    • Slowly pull the upper display assembly away from the upper case.

    • Make sure that the various ribbon cables are being fed through the slit in the upper case.

    • Separate the upper display assembly from the upper case.

  31. Nintendo 3DS Wi-Fi Antenna Replacement, Speaker Assembly: passo 31, immagine 1 di 2 Nintendo 3DS Wi-Fi Antenna Replacement, Speaker Assembly: passo 31, immagine 2 di 2
    • Carefully feed the speaker assembly ribbon cable through the hole in the upper display bezel.

    • You must gently coil the ribbon cables (similar to an ice-cream cone) to allow them to fit - the cables are wider than the hole.

  32. Nintendo 3DS Wi-Fi Antenna Replacement: passo 32, immagine 1 di 1
    • Remove the 2.5 mm Phillips screw securing the right speaker board to the upper display bezel.

  33. Nintendo 3DS Wi-Fi Antenna Replacement: passo 33, immagine 1 di 3 Nintendo 3DS Wi-Fi Antenna Replacement: passo 33, immagine 2 di 3 Nintendo 3DS Wi-Fi Antenna Replacement: passo 33, immagine 3 di 3
    • Use the flat end of a spudger or your fingernail to flip up the retaining flaps on the parallax barrier ribbon cable ZIF sockets.

    • Be sure you are prying up on the hinged retaining flap, not the socket itself.

    • Use a pair of metal tweezers to disconnect the two ribbon cables.

  34. Nintendo 3DS Wi-Fi Antenna Replacement: passo 34, immagine 1 di 3 Nintendo 3DS Wi-Fi Antenna Replacement: passo 34, immagine 2 di 3 Nintendo 3DS Wi-Fi Antenna Replacement: passo 34, immagine 3 di 3
    • Use the flat end of a spudger to pry the left and right speakers out of their places in the upper display bezel.

    • Pry the camera status LED out of the upper display bezel with the tip of a spudger.

  35. Nintendo 3DS Wi-Fi Antenna Replacement: passo 35, immagine 1 di 1
    • Remove the speaker assembly from the rest of the display assembly.

  36. Nintendo 3DS Wi-Fi Antenna Replacement, Cameras: passo 36, immagine 1 di 2 Nintendo 3DS Wi-Fi Antenna Replacement, Cameras: passo 36, immagine 2 di 2
    • Gently roll the upper LCD ribbon cable and camera ribbon cable together and insert them into the hinge opening.

  37. Nintendo 3DS Wi-Fi Antenna Replacement: passo 37, immagine 1 di 3 Nintendo 3DS Wi-Fi Antenna Replacement: passo 37, immagine 2 di 3 Nintendo 3DS Wi-Fi Antenna Replacement: passo 37, immagine 3 di 3
    • Use a pair of metal tweezers to remove the black metal hinge ring from the upper display bezel.

    • Carefully pull the camera and upper LCD ribbon cables through their hole in the upper display bezel.

  38. Nintendo 3DS Wi-Fi Antenna Replacement: passo 38, immagine 1 di 2 Nintendo 3DS Wi-Fi Antenna Replacement: passo 38, immagine 2 di 2
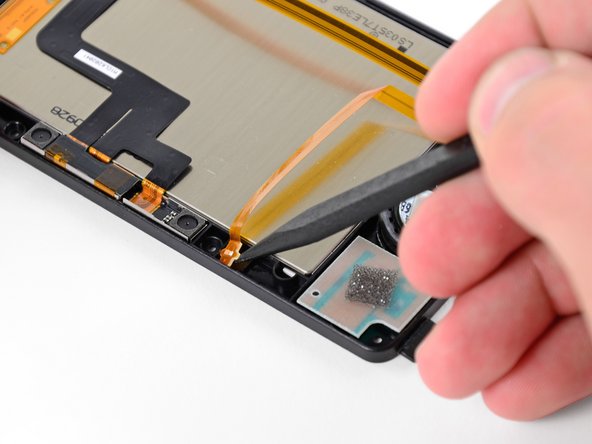
    • Peel the camera ribbon cable off the back of the upper LCD.

    • The ribbon cable is held to the back of the LCD housing by an adhesive, so pull on it gently to avoid tearing the ribbon cable.

    • Remove the camera ribbon cable assembly.

  39. Nintendo 3DS Wi-Fi Antenna Replacement, Upper LCD: passo 39, immagine 1 di 2 Nintendo 3DS Wi-Fi Antenna Replacement, Upper LCD: passo 39, immagine 2 di 2
    • Use your thumbs to push the upper LCD from the front out of the upper display bezel.

    • Remove the upper LCD.

  40. Nintendo 3DS Wi-Fi Antenna Replacement, Wi-Fi Antenna: passo 40, immagine 1 di 2 Nintendo 3DS Wi-Fi Antenna Replacement, Wi-Fi Antenna: passo 40, immagine 2 di 2
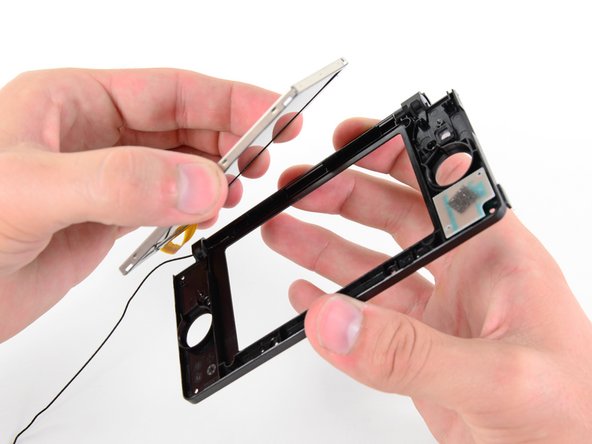
    • Pull the Wi-Fi antenna cable through its hole in the upper display bezel.

    • De-route the Wi-Fi antenna cable from the upper display bezel.

  41. Nintendo 3DS Wi-Fi Antenna Replacement: passo 41, immagine 1 di 1
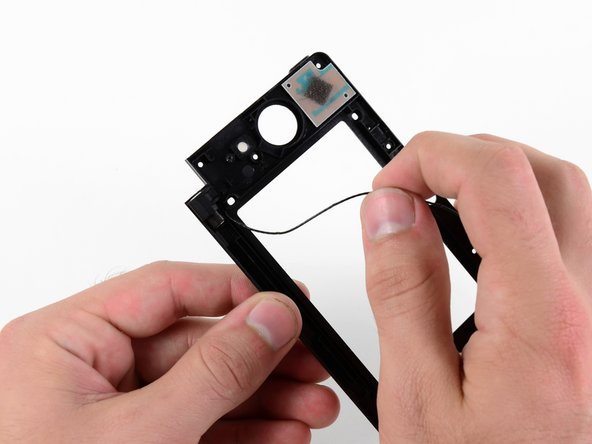
    • Remove the Wi-Fi antenna from the upper display bezel.

Conclusione

To reassemble your device, follow these instructions in reverse order.

Altre 5 persone hanno completato questa guida.

David Hodson

Membro da: 04/13/10

150.318 Reputazione

127 Guide realizzate

2 Commenti

this guide is idiotic, i followed it to the letter and all it did was make me realize that there is a much easier and much safer way of replacing the antenna; steps 1-29 (step 30 if you want to, not necessary though) are fine and right on the money, however pushing the ribbons through makes it way more difficult when you could just remove the antenna board, thred just the wire through leaving the ribbons unchanched, and put in the replacement board and thread the wire through, then reassemble the console. this method almost guarantees that the ribbons wont get scratch and you wont get frustrated.

Andrew Clayton - Replica

this is amazing i will going to follow all steps it seems very difficult before i read this but now this will really helpful and easier than i thought thank you!! Antenna Amplifier

Rachel Gelller - Replica

Aggiungi Commento

Visualizza Statistiche:

Ultime 24 Ore: 1

Ultimi 7 Giorni: 16

Ultimi 30 Giorni: 104

Tutti i Tempi: 17,140