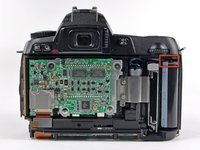
Salta al contenuto principale

Nikon D70 LCD Board Replacement

Cosa ti serve

  1. Nikon D70 LCD Board Replacement, Battery: passo 1, immagine 1 di 1
    • Use your finger tip to pull the battery release tab toward the center of the D70.

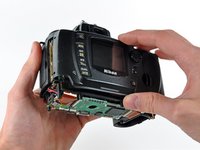
    • Open the battery door and rotate it away from the bottom cover.

  2. Nikon D70 LCD Board Replacement: passo 2, immagine 1 di 1
    • Pull the battery out of the D70.

    • It may be necessary to wiggle the battery while pulling to free it from its pocket in the case.

  3. Nikon D70 LCD Board Replacement, Rear Cover Assembly: passo 3, immagine 1 di 1
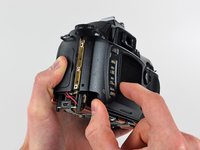
    • Remove the two 4.8 mm Phillips screws securing the battery side of the rear cover to the D70.

  4. Nikon D70 LCD Board Replacement: passo 4, immagine 1 di 1
    • Remove the two 4.8 mm Phillips screws securing the port side of the rear cover to the D70.

  5. Nikon D70 LCD Board Replacement: passo 5, immagine 1 di 2 Nikon D70 LCD Board Replacement: passo 5, immagine 2 di 2
    • Use your fingernail to flip up the ZIF locking flap on the LCD ribbon cable socket.

    • Be sure you are opening the locking tab, not pulling against the socket mounted to the board.

    • Pull the LCD board ribbon cable out of its socket.

  6. Nikon D70 LCD Board Replacement: passo 6, immagine 1 di 2 Nikon D70 LCD Board Replacement: passo 6, immagine 2 di 2
    • Carefully pull the sides of the rear cover away from the body of the D70.

  7. Nikon D70 LCD Board Replacement: passo 7, immagine 1 di 2 Nikon D70 LCD Board Replacement: passo 7, immagine 2 di 2
    • Pull the rear cover off the body of the D70, minding the LCD board ribbon cable that may get caught.

    • At this point, the capacitor is visible and its exposed contacts are boxed in red in the second picture. Even though they are recessed, be careful not to touch the contacts to avoid shocking yourself.

  8. Nikon D70 LCD Board Replacement, LCD Assembly: passo 8, immagine 1 di 2 Nikon D70 LCD Board Replacement, LCD Assembly: passo 8, immagine 2 di 2
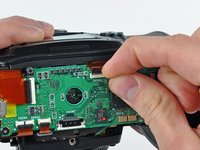
    • Use your thumbnails to push the ZIF cable lock toward the LCD.

    • Do not completely remove the ZIF cable lock. It should move about 1 mm and stop. Be sure you are pushing against the lock, not the socket.

    • Pull the LCD ribbon cable out of its socket.

  9. Nikon D70 LCD Board Replacement: passo 9, immagine 1 di 1
    • Use a pair of tweezers to pull the LCD backlight connector away from its socket.

    • It may help to wiggle the connector as you pull it out of its socket.

  10. Nikon D70 LCD Board Replacement: passo 10, immagine 1 di 2 Nikon D70 LCD Board Replacement: passo 10, immagine 2 di 2
    • Remove the two 4.8 mm Phillips screws securing the LCD bracket to the rear cover.

    • Lift the LCD bracket out of the rear cover.

  11. Nikon D70 LCD Board Replacement: passo 11, immagine 1 di 1
    • Remove the LCD assembly from the rear cover.

    • Be sure both the face of the LCD and the inner face of the clear LCD cover are perfectly clean before reassembly, as any dust or fingerprints trapped inside will be annoyingly visible when the device is turned on.

  12. Nikon D70 LCD Board Replacement, LCD Board: passo 12, immagine 1 di 1
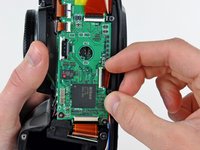
    • Remove the three 3.1 mm Phillips screws securing the LCD board to the rear cover.

  13. Nikon D70 LCD Board Replacement: passo 13, immagine 1 di 1
    • Remove the LCD board from the rear cover.

Conclusione

To reassemble your device, follow these instructions in reverse order.

Altre 4 persone hanno completato questa guida.

0 Commenti

Aggiungi Commento

Visualizza Statistiche:

Ultime 24 Ore: 0

Ultimi 7 Giorni: 2

Ultimi 30 Giorni: 9

Tutti i Tempi: 9,253