Salta al contenuto principale

Nikon D3000 On/Off Switch and Shutter Button Replacement

Cosa ti serve

  1. Nikon D3000 On/Off Switch and Shutter Button Replacement, On/Off Switch and Shutter Button: passo 1, immagine 1 di 2 Nikon D3000 On/Off Switch and Shutter Button Replacement, On/Off Switch and Shutter Button: passo 1, immagine 2 di 2
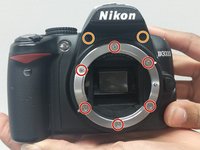
    • Remove six 3 mm x 2.5 mm Phillips head screws from the bottom of the camera.

    • Remove three 3 mm x 5.5 mm Phillips head screws from the bottom of the camera near the battery cover.

    • Lift the battery cover and remove two 3 mm x 5.5 mm Phillips head screws as shown.

    • Remove the bottom cover.

  2. Nikon D3000 On/Off Switch and Shutter Button Replacement: passo 2, immagine 1 di 3 Nikon D3000 On/Off Switch and Shutter Button Replacement: passo 2, immagine 2 di 3 Nikon D3000 On/Off Switch and Shutter Button Replacement: passo 2, immagine 3 di 3
    • Remove two 3 mm x 5.5 mm Phillips head screws from either side of the viewfinder.

    • Remove four 3 mm x 5.5 mm Phillips head screws above and below the USB port cover and on either side of the SD card slot cover.

    • Remove two 3 mm x 4 mm Phillips head screws inside the SD card slot cover.

  3. Nikon D3000 On/Off Switch and Shutter Button Replacement: passo 3, immagine 1 di 2 Nikon D3000 On/Off Switch and Shutter Button Replacement: passo 3, immagine 2 di 2
    • Lift the LCD panel off up to expose a ribbon connector. Then lift the ribbon connector tab as shown and slide the ribbon out.

    • Use this technique for all ribbon connectors in this guide.

    • Lift the LCD panel away and off the camera

  4. Nikon D3000 On/Off Switch and Shutter Button Replacement: passo 4, immagine 1 di 2 Nikon D3000 On/Off Switch and Shutter Button Replacement: passo 4, immagine 2 di 2
    • Remove six 3 mm x 5.5 mm Phillips head screws from around the lens ring and remove the lens ring.

    • Remove two 2.5 mm x 4 mm Phillips head screws from above the lens ring to allow the front of the camera to be removed.

    • Lift and remove the grip and the front panel of the camera.

  5. Nikon D3000 On/Off Switch and Shutter Button Replacement: passo 5, immagine 1 di 3 Nikon D3000 On/Off Switch and Shutter Button Replacement: passo 5, immagine 2 di 3 Nikon D3000 On/Off Switch and Shutter Button Replacement: passo 5, immagine 3 di 3
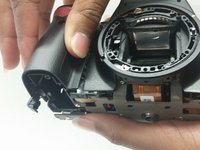
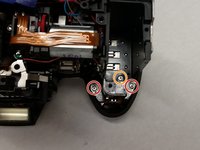
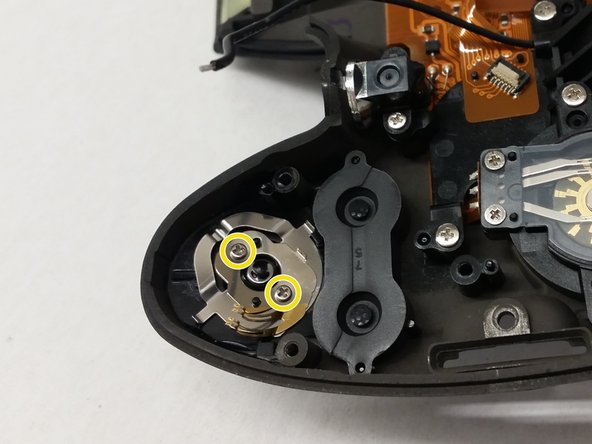
    • Remove two 3 mm x 4 mm Phillips head screws from where the camera grip was just removed.

    • Remove one 2 mm x 3 mm Phillips head screw from the same location as above.

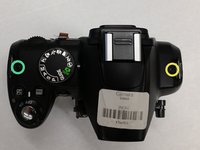
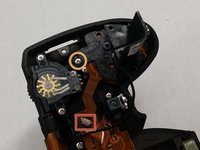
    • Remove one 3 mm x 5.5 mm Phillips head screw from the top right side of the camera shown.

    • Remove one 3 mm x 3 mm Phillips head screw from the top left side of the camera shown.

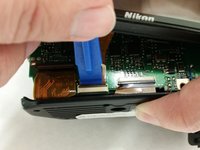
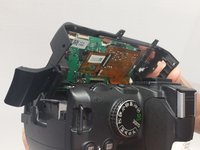
    • Gently lift the top of the camera up to separate it from the main body of the camera. At this point, it will still be connected via wires.

  6. Nikon D3000 On/Off Switch and Shutter Button Replacement: passo 6, immagine 1 di 1
    • Soldering irons are hot. Take all necessary precautions before soldering to prevent damage to the camera or yourself.

    • De-solder the wire shown on the grip side of the camera to allow sufficient access to the top of the camera.

  7. Nikon D3000 On/Off Switch and Shutter Button Replacement: passo 7, immagine 1 di 2 Nikon D3000 On/Off Switch and Shutter Button Replacement: passo 7, immagine 2 di 2
    • Remove the ribbon connector.

    • Remove the 3 mm x 4 mm Phillips head screw and lift off the plastic bracket to expose the on/off switch underneath.

    • A quick inspection should take place before replacing the button and the metal contacts.

    • Remove the two 2 mm x 4 mm Phillips head screws and the shutter button and on/off switch will fall down away from the top of the panel.

Conclusione

To reassemble your device, follow these instructions in reverse order.

Altre 4 persone hanno completato questa guida.

Team

USF Tampa, Team 14-7, Meier Fall 2015 Membro di USF Tampa, Team 14-7, Meier Fall 2015

USFT-MEIER-F15S14G7

4 Membri

6 Guide realizzate

Un commento

Thanks for the guide. It was very helpful. I had problem with a shutter button. I have not replace it but disassembled and cleaned two tiny metal contacts inside, now my camera works well.

rsa91 - Replica

Aggiungi Commento

Visualizza Statistiche:

Ultime 24 Ore: 0

Ultimi 7 Giorni: 7

Ultimi 30 Giorni: 29

Tutti i Tempi: 4,837