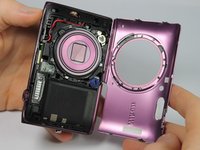
Salta al contenuto principale

Nikon Coolpix S5300 Outer Casing Replacement

Cosa ti serve

  1. Nikon Coolpix S5300  Outer Casing Replacement, Battery: passo 1, immagine 1 di 1
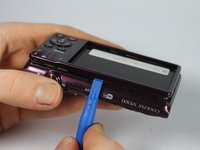
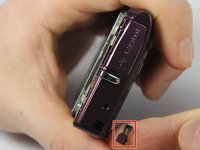
    • Turn the camera upside down and locate the battery compartment.

    • Slide the compartment open following the direction of the arrow.

  2. Nikon Coolpix S5300  Outer Casing Replacement: passo 2, immagine 1 di 1
    • Press the orange release button to release and remove the battery.

    • Replace or insert battery in it's respective terminals

  3. Nikon Coolpix S5300  Outer Casing Replacement, Outer Casing: passo 3, immagine 1 di 3 Nikon Coolpix S5300  Outer Casing Replacement, Outer Casing: passo 3, immagine 2 di 3 Nikon Coolpix S5300  Outer Casing Replacement, Outer Casing: passo 3, immagine 3 di 3
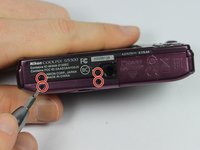
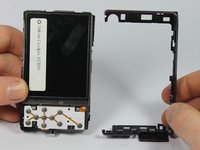
    • Remove the four 0.1mm screws from the bottom of the camera using the phillips head screwdriver

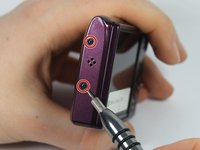
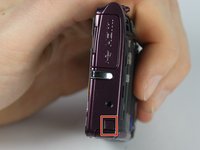
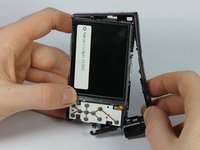
    • Using the same screwdriver, remove the 2 screws on the side of the camera.

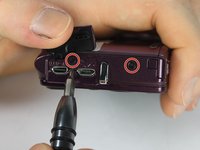
    • Remove the 2 screws from the other side of the camera.

    • One of the screws is under the I/O port cover.

  4. Nikon Coolpix S5300  Outer Casing Replacement: passo 4, immagine 1 di 3 Nikon Coolpix S5300  Outer Casing Replacement: passo 4, immagine 2 di 3 Nikon Coolpix S5300  Outer Casing Replacement: passo 4, immagine 3 di 3
    • Use the plastic opening tool to carefully separate the cover from the camera.

    • Work the plastic opening tool around all the edges of the front plate.

    • Pull the purple plastic cover off gently from the screen.

  5. Nikon Coolpix S5300  Outer Casing Replacement: passo 5, immagine 1 di 3 Nikon Coolpix S5300  Outer Casing Replacement: passo 5, immagine 2 di 3 Nikon Coolpix S5300  Outer Casing Replacement: passo 5, immagine 3 di 3
    • Turn the camera over so the LCD screen is facing you.

    • Carefully remove the front shell by gently prying around the corners with the plastic opening tool until it releases.

  6. Nikon Coolpix S5300  Outer Casing Replacement: passo 6, immagine 1 di 2 Nikon Coolpix S5300  Outer Casing Replacement: passo 6, immagine 2 di 2
    • Be careful to keep track of little pieces of the outside casing.

  7. Nikon Coolpix S5300  Outer Casing Replacement: passo 7, immagine 1 di 2 Nikon Coolpix S5300  Outer Casing Replacement: passo 7, immagine 2 di 2
    • Carefully remove the top button casing by pulling it away from main camera.

Conclusione

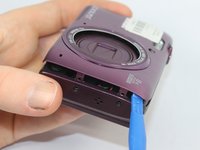
To reassemble your device, follow these instructions in reverse order.

Team

0 Commenti

Aggiungi Commento

Visualizza Statistiche:

Ultime 24 Ore: 0

Ultimi 7 Giorni: 0

Ultimi 30 Giorni: 2

Tutti i Tempi: 178