Salta al contenuto principale

Nikon Coolpix E5700 Back Panel Replacement

Cosa ti serve

  1. Nikon Coolpix E5700 Back Panel Replacement, Battery: passo 1, immagine 1 di 2 Nikon Coolpix E5700 Back Panel Replacement, Battery: passo 1, immagine 2 di 2
    • Use your finger tip to slide the battery release tab toward the battery symbol on the E5700.

    • Open the battery door.

  2. Nikon Coolpix E5700 Back Panel Replacement: passo 2, immagine 1 di 1
    • Pull the battery out of the E5700.

    • It may be necessary to wiggle the battery while pulling to free it from its pocket in the case.

  3. Nikon Coolpix E5700 Back Panel Replacement, Back Panel: passo 3, immagine 1 di 1
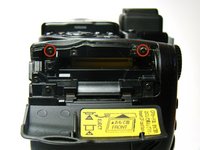
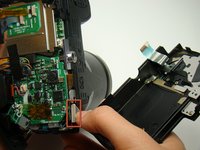
    • Turn to the bottom of the camera.

    • Remove the two Phillips screws located directly below the back monitor

  4. Nikon Coolpix E5700 Back Panel Replacement: passo 4, immagine 1 di 2 Nikon Coolpix E5700 Back Panel Replacement: passo 4, immagine 2 di 2
    • Turn the camera to the side with the memory card slot and open the compartment for the CF card.

    • Remove the top two Phillips screws closest to the back panel.

  5. Nikon Coolpix E5700 Back Panel Replacement: passo 5, immagine 1 di 1
    • Turn to the back of the camera.

    • Remove the top most Phillips screw on the back panel.

  6. Nikon Coolpix E5700 Back Panel Replacement: passo 6, immagine 1 di 1
    • Turn to the last side of the back panel.

    • Remove the Phillips screw below the eyepiece.

    • Remove the Phillips screw located above the speaker.

  7. Nikon Coolpix E5700 Back Panel Replacement: passo 7, immagine 1 di 2 Nikon Coolpix E5700 Back Panel Replacement: passo 7, immagine 2 di 2
    • Gently begin to remove the back panel.

    • Caution: There are two bundles of wires connecting the back panel to the camera. Be sure not to pull too hard and yank these out.

  8. Nikon Coolpix E5700 Back Panel Replacement: passo 8, immagine 1 di 2 Nikon Coolpix E5700 Back Panel Replacement: passo 8, immagine 2 di 2
    • Now gently unplug the two wires at the bottom of the panel.

Conclusione

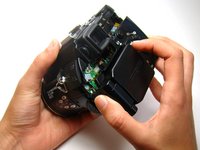
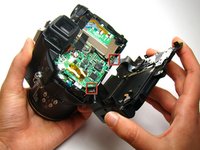
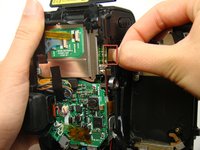
To reassemble your device, follow these instructions in reverse order.

Altre 2 persone hanno completato questa guida.

Raana

Membro da: 04/12/11

78 Reputazione

2 Guide realizzate

Team

Cal Poly, Team 24-58, Amido Spring 2011 Membro di Cal Poly, Team 24-58, Amido Spring 2011

CPSU-AMIDO-S11S24G58

4 Membri

18 Guide realizzate

0 Commenti

Aggiungi Commento

Visualizza Statistiche:

Ultime 24 Ore: 0

Ultimi 7 Giorni: 1

Ultimi 30 Giorni: 3

Tutti i Tempi: 1,954