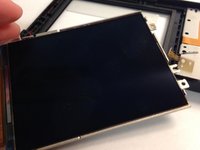
Salta al contenuto principale

Nikon Coolpix AW130 LCD Screen Replacement

Cosa ti serve

  1. Nikon Coolpix AW130 LCD Screen Replacement, Battery: passo 1, immagine 1 di 2 Nikon Coolpix AW130 LCD Screen Replacement, Battery: passo 1, immagine 2 di 2
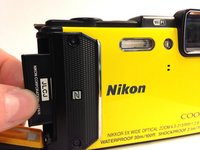
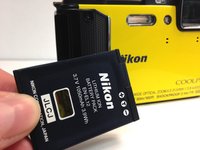
    • Using your thumb and pointer finger, open the card/battery hatch by pressing the center button of the wheel and turning the entire wheel to the left.

    • When reassembling, you must turn this wheel to the right until it clicks.

  2. Nikon Coolpix AW130 LCD Screen Replacement: passo 2, immagine 1 di 2 Nikon Coolpix AW130 LCD Screen Replacement: passo 2, immagine 2 di 2
    • You should feel the door begin to loosen. Carefully pull the hatch open.

  3. Nikon Coolpix AW130 LCD Screen Replacement: passo 3, immagine 1 di 1
    • Push the yellow battery/charger compartment tab up using your thumb nail.

  4. Nikon Coolpix AW130 LCD Screen Replacement: passo 4, immagine 1 di 2 Nikon Coolpix AW130 LCD Screen Replacement: passo 4, immagine 2 di 2
    • After pressing the yellow tab, the battery should loosen.

    • Slowly pull the battery completely out.

  5. Nikon Coolpix AW130 LCD Screen Replacement, Back Panel: passo 5, immagine 1 di 2 Nikon Coolpix AW130 LCD Screen Replacement, Back Panel: passo 5, immagine 2 di 2
    • Using the T5 Torx screwdriver, remove all four 4mm screws.

  6. Nikon Coolpix AW130 LCD Screen Replacement: passo 6, immagine 1 di 1
    • Using a Phillips #000 screwdriver, remove the single 3mm screw found inside the battery/charging compartment.

  7. Nikon Coolpix AW130 LCD Screen Replacement: passo 7, immagine 1 di 1
    • Remove the upper cover (connected by glue) and unscrew the single Philips screw.

  8. Nikon Coolpix AW130 LCD Screen Replacement: passo 8, immagine 1 di 2 Nikon Coolpix AW130 LCD Screen Replacement: passo 8, immagine 2 di 2
    • Remove two Philips screws from the bottom cover, lift gently the cover and remove the single Philips screw under it.

  9. Nikon Coolpix AW130 LCD Screen Replacement: passo 9, immagine 1 di 1
    • Carefully remove the back cover from the camera body.

  10. Nikon Coolpix AW130 LCD Screen Replacement, LCD Screen: passo 10, immagine 1 di 3 Nikon Coolpix AW130 LCD Screen Replacement, LCD Screen: passo 10, immagine 2 di 3 Nikon Coolpix AW130 LCD Screen Replacement, LCD Screen: passo 10, immagine 3 di 3
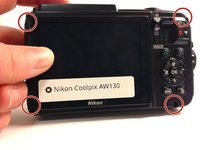
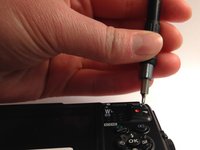
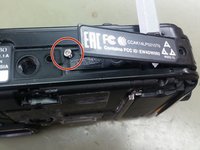
    • Using a Phillips #000 screwdriver, remove all 11, 4mm screws on the LCD screen cover.

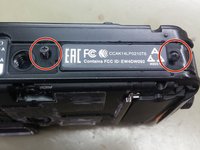
    • Two screws are located on the right.

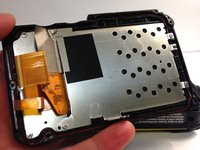
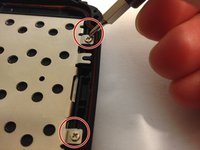
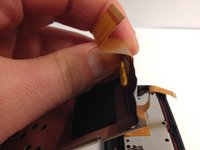
    • The remaining screws are hidden behind a connector ribbon on the left.

  11. Nikon Coolpix AW130 LCD Screen Replacement: passo 11, immagine 1 di 2 Nikon Coolpix AW130 LCD Screen Replacement: passo 11, immagine 2 di 2
    • Pull the LCD screen from the plastic frame after removing all of the screws.

  12. Nikon Coolpix AW130 LCD Screen Replacement: passo 12, immagine 1 di 1
    • Using a pair of tweezers from the precision tweezer set, carefully remove the screen from the metal frame.

    • Since the tweezers could shatter the screen, causing for broken glass, exercise extreme caution.

Conclusione

To reassemble your device, follow these instructions in reverse order.

8 Commenti

Hi.

Where can you buy a replacement screen?

Ben - Replica

Hi.

Where can you buy a replacement screen?

my contact is josem6073@gmail.com

Thank you .

Jose Martins - Replica

Please add Torx T5 screwdriver at the tool needed, required at step 5

macreateur - Replica

Hi.

Where can you buy a replacement screen?

my contact is cpapacon@gmail.com

Thank you .

Costis Papaconstantinou - Replica

Hi.

Where can you buy a replacement screen?

my contact is Keithdurkan@gmail.com

Thank you .

Keith Durkan - Replica

Aggiungi Commento

Visualizza Statistiche:

Ultime 24 Ore: 0

Ultimi 7 Giorni: 7

Ultimi 30 Giorni: 11

Tutti i Tempi: 2,965