Introduzione
This guide will help you replace the battery.
Cosa ti serve
Panoramica Video
-
-
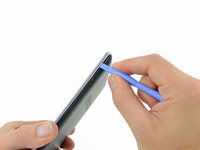
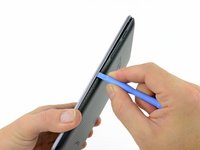
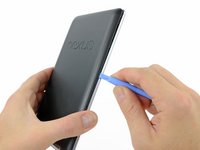
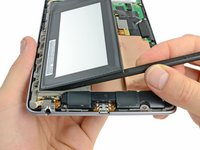
Gently insert a plastic opening tool near the top of the Nexus 7 between the rear panel and the front panel assembly.
-
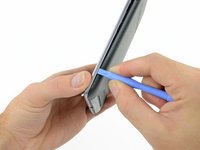
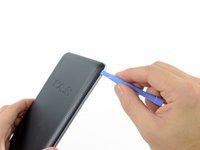
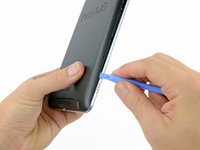
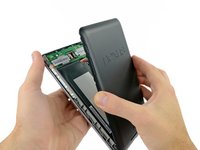
Carefully run the plastic opening tool along the top edge to pry the rear panel away from the front panel assembly of the Nexus 7.
My Nexus 7 looks nothing like this. These instructions are horrible as they do not work.
someone help? my nexus looks completely different
-
-
-
-
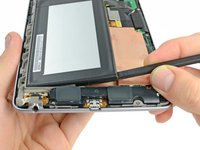
Using the tip of a spudger, push first on one side then the other to "walk" the battery cable straight out of its socket on the motherboard.
I have the newer version of Nexus and the battery connection inside is different from pictured here. I can't seem to get any part of the connector backed out. Any further details about how to accomplish this step?
After my post I tried it again, and realized the connector comes straight UP, not OUT. Once I went this direction, the process was simple.
I followed this, everything worked fine. Even though the battery is now charging, the OS doesn't recognise when the USB cable is connected to a wall socket or a PC. The battery icon when the tablet is shut down shows charging so it works, but the OS in itself doesn't seem to know about it...any ideas?
/D
Thanks for your guide. It makes the process very straightforward. Easier than I was expecting.
Yes, this is a really helpful guide. I wouldn't have had a clue without it, but it all turned out to be very simple. Thanks a lot!
Step 6 could be much clearer. I thought it meant to pry the connector upward, away from the surface. When I did this, all the pins broke off. The correct procedure would appear to be to slide the connector along the surface toward the wire side and battery, leaving the pins at parallel to the surface.
Unfortunately I don't think my Nexus 7 is salveagable now.
Watching a YouTube video helped. Dislodge the battery first, then pull the battery away from the connector and the connector will become dislodged quite easily.
-
-
-
Wedge the flat end of a spudger inbetween the battery and the front panel assembly.
-
Run the flat end of a spudger along the top edge of the battery to separate it from the adhesive securing it to the front panel assembly.
-
-
-
Wedge the flat end of a spudger between the bottom right corner of the battery and the front panel assembly.
-
Carefully run the spudger along the bottom edge of the battery while slowly lifting the battery to completely separate it from the adhesive securing it to the front panel assembly.
-


To reassemble your device, follow these instructions in reverse order.
To reassemble your device, follow these instructions in reverse order.
Annulla: non ho completato questa guida.
Altre 186 persone hanno completato questa guida.

24 Commenti
My battery says me3 puj1. Will this kit work to replace that battery?
Crys -
Thank you so much for this! I had dropped my nexus from about 2 feet onto a carpet and knocked the battery cable loose ( a know problem) but your set by step directions encouraged me to fix it myself instead of sending the whole thing back to Google.
I can't get anything between the rear and front panels... plastic nor metal. What's the secret to getting it started?
never mind, finally got in by taking out the sim card slot filler (I don't have a sim card, but got the option just in case)
After battery is taken out of Nexus 7 is how can it be checked using a stand alone battery tester? Specifically, which pins on cable should be pinged? Coming out of battery there are 2 black leads, 2 red leads, one white and one yellow lead? Also, please make an article to check confirm Nexus 7 charging system is working or not. Thank you.
I have a Nexus 7, My daughter forced the charger plug and now not recognized. The card is integrated on the motherboard? You can not change?
Hugo, just replace the small board. The charger plug and audio socket are on a sub-board. Very easy to do once you have the Nexus open and the battery disconnected. You can buy the board from Amazon for about £15.
took 5 mins 1 min to walk to garage to get IFIXIT toolkit 4 min follow instructions and replace battery.
Toolkit keeps paying for itself
thanks
This is a very easy fix it you have both the recommended tools, follow the instructions and be gentle with stuff. Thanks guys.
Will this work for the google nexus 7, 32 gig?
Not only was this tutorial extremely helpful, a youtube video showing how to open a tablet with fingernails shows the design philosophy of impenetrable Apple products to Google's easy access. I was amazed how easy it was to pry open a corner and work a plastic pen clip along the cover to unsnap it. Two years of steady use appears to wear out the battery so a replacement is already on order.
thanks again the kit has well and truly paid for itself and it gives a million dollars satisfaction to fix the (deliberatly made ) unfixable
Do you have any advice, thoughts, or suggestions if we were successfully able to replace the battery but the device will no longer charge after replacing the battery? The tablet worked fine with the new battery but would not charge and now that the battery has died the device is appears to be bricked.
My original ASUS battery was junk less than a year after I bought the Nexus 7. Does anyone know about any of the following...
1. I'm told that ASUS brand batteries for the Nexus 7 have not been made for quite a while, so any bought now would be old stock. Is this correct?
2. A lot of the new unbranded (or non-ASUS brand) batteries I see listed for sale are 4270mAh, whereas the original was 4325mAh. Are they okay to use, or is it better to find an ASUS brand 4325mAh battery?
Geoff
Mine doesn't look like this. There is no metal band around it. The only opening looks like its between the front glass and back which is on the front. I'm afraid to try it for fear of breaking it. Any suggestions?
Kim McCauley - Replica
There is no front or rear panel. There’s no sign of any seam whatsoever. The front and back are one solid piece of plastic.
Proud Liberal - Replica