Salta al contenuto principale

Nexus 6P Back Cover Replacement

Cosa ti serve

  1. Nexus 6P Back Cover Replacement, Back Cover: passo 1, immagine 1 di 3 Nexus 6P Back Cover Replacement, Back Cover: passo 1, immagine 2 di 3 Nexus 6P Back Cover Replacement, Back Cover: passo 1, immagine 3 di 3
    • It is possible to remove the back cover with an iOpener as seen in this guide but it's a lengthy and difficult procedure. We recommend a heat gun or something similar. The adhesive in the Nexus 6P is extremely sticky and especially the glass and plastic cover on the backside break or bend most of the time whilst doing this repair.

    • Use a SIM card eject tool, to pop out and remove the SIM card tray.

    • Use an iOpener to loosen the adhesive underneath the small plastic cover at the bottom of the phone.

  2. Nexus 6P Back Cover Replacement: passo 2, immagine 1 di 3 Nexus 6P Back Cover Replacement: passo 2, immagine 2 di 3 Nexus 6P Back Cover Replacement: passo 2, immagine 3 di 3
    • The knife is really sharp. Take care, not to cut yourself or your phone.

    • Insert a knife between the phone and the plastic cover. Pry up the plastic cover until you can insert an opening pick.

    • Slide the opening pick underneath the plastic cover to cut the adhesive.

  3. Nexus 6P Back Cover Replacement: passo 3, immagine 1 di 2 Nexus 6P Back Cover Replacement: passo 3, immagine 2 di 2
    • Use an iOpener to loosen the adhesive underneath the glass cover at the top of the phone.

    • Insert a knife between the phone and the glass cover. Pry up the glass cover until you can insert an opening pick.

  4. Nexus 6P Back Cover Replacement: passo 4, immagine 1 di 3 Nexus 6P Back Cover Replacement: passo 4, immagine 2 di 3 Nexus 6P Back Cover Replacement: passo 4, immagine 3 di 3
    • Glass may break. Wear protective glasses and protective gloves.

    • Slide the opening pick underneath the glass cover and use it to cut the adhesive underneath.

    • Pry off the glass cover.

  5. Nexus 6P Back Cover Replacement: passo 5, immagine 1 di 3 Nexus 6P Back Cover Replacement: passo 5, immagine 2 di 3 Nexus 6P Back Cover Replacement: passo 5, immagine 3 di 3
    • Remove the six Phillips #00 screws.

    • Use tweezers to remove any stickers covering the screw to allow better seating for the driver.

  6. Nexus 6P Back Cover Replacement: passo 6, immagine 1 di 3 Nexus 6P Back Cover Replacement: passo 6, immagine 2 di 3 Nexus 6P Back Cover Replacement: passo 6, immagine 3 di 3
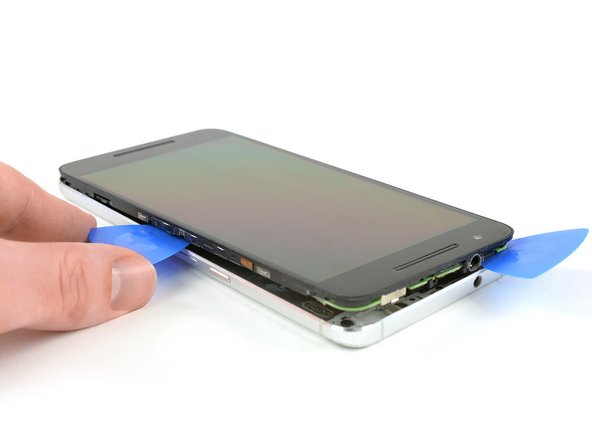
    • Insert a razor knife between the metal back cover and the front glass to create a gap. Insert an opening pick into the gap and slide it to the top right corner.

    • The knife is really sharp, be careful, not to cut yourself or your phone.

    • Insert a second opening pick and slide it to the top left corner.

    • Slide the opening picks along the edges to seperate the plastic clips, holding back cover and midframe together.

    • Remove the rear cover.

Conclusione

To reassemble your device, follow these instructions in reverse order. When reassembling your phone apply new adhesive where it is necessary.

Altre 11 persone hanno completato questa guida.

Team

iFixit Membro di iFixit

Staff

136 Membri

16.573 Guide realizzate

Un commento

The first picture of Step-6 is very misleading when looking at guitar pick.

By mistake, I pulled apart my front glass from digitizer by taking the pic as reference.

Vijay Bhaskar - Replica

Aggiungi Commento

Visualizza Statistiche:

Ultime 24 Ore: 0

Ultimi 7 Giorni: 0

Ultimi 30 Giorni: 16

Tutti i Tempi: 3,884