Salta al contenuto principale

Nexus 5X LCD Screen & Digitizer Replacement

Cosa ti serve

  1. Nexus 5X LCD Screen & Digitizer Replacement, SIM Card Tray: passo 1, immagine 1 di 3 Nexus 5X LCD Screen & Digitizer Replacement, SIM Card Tray: passo 1, immagine 2 di 3 Nexus 5X LCD Screen & Digitizer Replacement, SIM Card Tray: passo 1, immagine 3 di 3
    • Insert a SIM card ejection tool into the hole on the SIM card tray, located on the left edge of the phone.

    • Press in to eject the SIM card tray.

    • Remove the SIM card tray.

  2. Nexus 5X LCD Screen & Digitizer Replacement, Rear Panel: passo 2, immagine 1 di 3 Nexus 5X LCD Screen & Digitizer Replacement, Rear Panel: passo 2, immagine 2 di 3 Nexus 5X LCD Screen & Digitizer Replacement, Rear Panel: passo 2, immagine 3 di 3
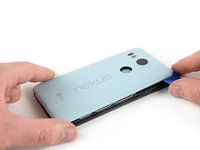
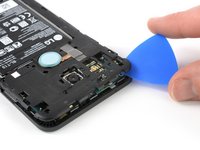
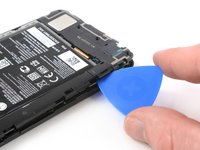
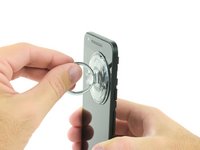
    • Place an opening pick in the opening of the SIM card tray slot and twist it sideways to release the first plastic clip that holds the rear panel in its place.

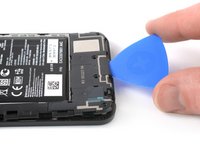
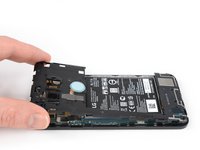
    • Slide the opening pick around the top edge of the phone to release the plastic clips that secure the rear panel.

  3. Nexus 5X LCD Screen & Digitizer Replacement: passo 3, immagine 1 di 3 Nexus 5X LCD Screen & Digitizer Replacement: passo 3, immagine 2 di 3 Nexus 5X LCD Screen & Digitizer Replacement: passo 3, immagine 3 di 3
    • Continue to slide the opening pick around all sides of the phone to release all clips that secure the rear panel.

  4. Nexus 5X LCD Screen & Digitizer Replacement: passo 4, immagine 1 di 2 Nexus 5X LCD Screen & Digitizer Replacement: passo 4, immagine 2 di 2
    • Tilt the opening pick to lift the rear panel a little bit.

    • There are two more plastic clips next to the fingerprint sensor. Release them by gently pulling the rear panel.

    • Remove the rear panel.

  5. Nexus 5X LCD Screen & Digitizer Replacement, Midframe: passo 5, immagine 1 di 1
    • Remove the ten 3.6 mm Phillips screws that secure the midframe.

  6. Nexus 5X LCD Screen & Digitizer Replacement: passo 6, immagine 1 di 2 Nexus 5X LCD Screen & Digitizer Replacement: passo 6, immagine 2 di 2
    • Insert an opening pick into the SIM card tray slot and twist the opening pick sideways to release the plastic clips.

  7. Nexus 5X LCD Screen & Digitizer Replacement: passo 7, immagine 1 di 2 Nexus 5X LCD Screen & Digitizer Replacement: passo 7, immagine 2 di 2
    • Continue sliding the opening pick around the upper part of the midframe to release the plastic clips.

  8. Nexus 5X LCD Screen & Digitizer Replacement: passo 8, immagine 1 di 2 Nexus 5X LCD Screen & Digitizer Replacement: passo 8, immagine 2 di 2
    • Use the plastic pick to pry open the plastic clips on the long edge of the midframe and on the bottom edge.

    • Make sure the clips on the long edge are released. The midframe is prone to break here if they are not disconnected properly.

  9. Nexus 5X LCD Screen & Digitizer Replacement: passo 9, immagine 1 di 2 Nexus 5X LCD Screen & Digitizer Replacement: passo 9, immagine 2 di 2
    • Make sure all the clips are free.

    • Carefully remove the midframe.

  10. Nexus 5X LCD Screen & Digitizer Replacement, Battery Disconnect: passo 10, immagine 1 di 2 Nexus 5X LCD Screen & Digitizer Replacement, Battery Disconnect: passo 10, immagine 2 di 2
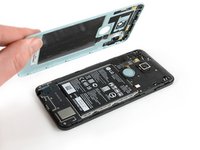
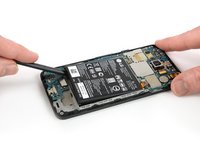
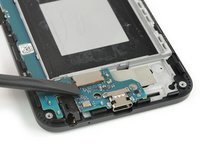
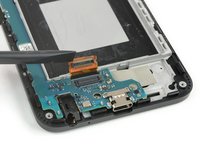
    • Use the edge of a spudger to pry up and disconnect the battery flex cable located at the bottom right of the motherboard.

  11. Nexus 5X LCD Screen & Digitizer Replacement, Battery: passo 11, immagine 1 di 1
    • Use an iOpener to loosen the adhesive beneath the battery. Apply the iOpener on the back of the phone for at least two minutes.

  12. Nexus 5X LCD Screen & Digitizer Replacement: passo 12, immagine 1 di 2 Nexus 5X LCD Screen & Digitizer Replacement: passo 12, immagine 2 di 2
    • Try your best not to deform the battery during the following removal process. Soft-shell lithium-ion batteries can leak dangerous chemicals, catch fire, or even explode if damaged. Do not use excessive force or pry at the battery with metal tools.

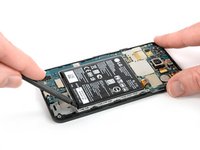
    • Insert the flat end of a spudger under the bottom left corner of the battery and gently pry upwards.

    • The adhesive is only located beneath the edges of the battery so there's no need to pry beneath its center.

    • If you are having trouble prying up the battery, the adhesive may not be loose enough. You can apply some isopropyl alcohol under each corner of the battery and allow it to penetrate for several minutes to help weaken the adhesive.
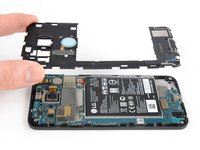
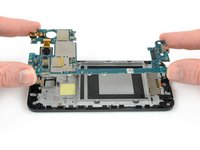
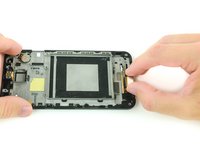
  13. Nexus 5X LCD Screen & Digitizer Replacement: passo 13, immagine 1 di 2 Nexus 5X LCD Screen & Digitizer Replacement: passo 13, immagine 2 di 2
    • Insert the flat end of a spudger under the bottom right corner of the battery and gently pry upwards to loosen the remaining adhesive.

  14. Nexus 5X LCD Screen & Digitizer Replacement: passo 14, immagine 1 di 1
    • Remove the battery.

    • Do not reuse the battery after it has been removed, as doing so is a potential safety hazard. Replace it with a new battery.

    • Before installing a new battery remove any remaining adhesive from the phone, and clean the glued areas with isopropyl alcohol and a lint-free cloth.

    • Secure the new battery with pre-cut adhesive or double-sided adhesive tape. In order to position it correctly, apply the new adhesive into the phone at the places where the old adhesive was located, not directly onto the battery. Press the new battery firmly into place for 5-10 seconds.

  15. Attenzione: i passaggi 15-18 provengono da una guida contrassegnata come in corso.

    Nexus 5X LCD Screen & Digitizer Replacement, Motherboard Assembly: passo 15, immagine 1 di 1
    • Use an iOpener to loosen the adhesive beneath the rear facing camera. Place the iOpener across the top part of the phone for about 30 seconds.

  16. Nexus 5X LCD Screen & Digitizer Replacement: passo 16, immagine 1 di 2 Nexus 5X LCD Screen & Digitizer Replacement: passo 16, immagine 2 di 2
    • Apply the flat end of a spudger to the left side of the rear facing camera and carefully lever it up. Make sure all of the adhesive underneath is loosened.

  17. Nexus 5X LCD Screen & Digitizer Replacement: passo 17, immagine 1 di 2 Nexus 5X LCD Screen & Digitizer Replacement: passo 17, immagine 2 di 2
    • Use the flat end of a spudger to pry up the display flex connector.

  18. Nexus 5X LCD Screen & Digitizer Replacement: passo 18, immagine 1 di 3 Nexus 5X LCD Screen & Digitizer Replacement: passo 18, immagine 2 di 3 Nexus 5X LCD Screen & Digitizer Replacement: passo 18, immagine 3 di 3
    • Grip the lower part of the motherboard with your fingers and carefully lift it upwards.

    • There's a small plastic clip next to the rear-facing camera that holds the motherboard in place.

    • Gently pull the motherboard towards the bottom edge to free it from the plastic clip next to the rear-facing camera.

    • Carefully lift the motherboard out of the frame.

    • Be careful—the two cameras are still connected to the board.

  19. Nexus 5X LCD Screen & Digitizer Replacement, LCD Screen & Digitizer: passo 19, immagine 1 di 3 Nexus 5X LCD Screen & Digitizer Replacement, LCD Screen & Digitizer: passo 19, immagine 2 di 3 Nexus 5X LCD Screen & Digitizer Replacement, LCD Screen & Digitizer: passo 19, immagine 3 di 3
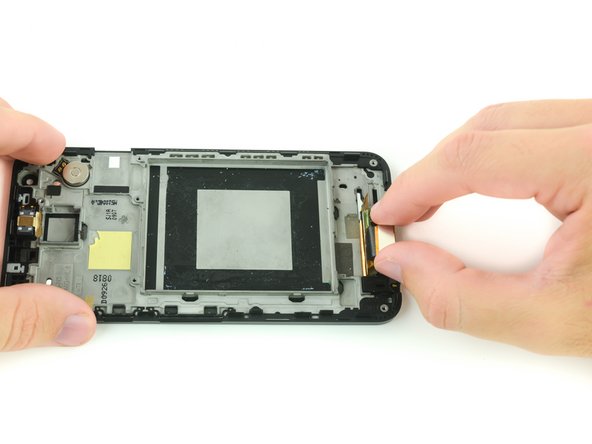
    • Use an iOpener or a heat gun over the digitizer ribbon cable to soften the adhesive that secures it to the plastic housing.

    • The Nexus 5X pictured here does not have a layer of shielding tape over the digitizer panel. If this tape is present on your device, simply peel it away from the plastic frame to free the digitizer panel.

    • You'll need to transfer or replace this strip of shielding tape when you install your new screen.

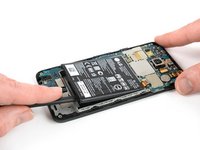
    • Gently wedge the flat end of a spudger into the gap between the battery housing and the digitizer ribbon cable, or use your fingers to gently pull the digitizer ribbon cable free.

  20. Nexus 5X LCD Screen & Digitizer Replacement: passo 20, immagine 1 di 2 Nexus 5X LCD Screen & Digitizer Replacement: passo 20, immagine 2 di 2
    Attrezzo utilizzato in questo passaggio:
    Heat Gun
    $24.99
    Compra
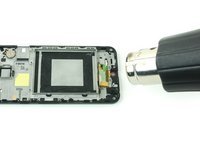
    • Use an iOpener or a heat gun to soften the adhesive underneath the edges of the screen.

    • In case you're using a heat gun hold it approximately 8 inches from your screen, and apply heat along the edges in a gentle back-and-forth motion for roughly 2 minutes.

  21. Nexus 5X LCD Screen & Digitizer Replacement: passo 21, immagine 1 di 2 Nexus 5X LCD Screen & Digitizer Replacement: passo 21, immagine 2 di 2
    • Use a suction cup and firmly pull the screen away from the frame to create a small gap.

    • This should not require excessive force. Apply additional heat as needed to soften the screen adhesive.

  22. Nexus 5X LCD Screen & Digitizer Replacement: passo 22, immagine 1 di 3 Nexus 5X LCD Screen & Digitizer Replacement: passo 22, immagine 2 di 3 Nexus 5X LCD Screen & Digitizer Replacement: passo 22, immagine 3 di 3
    Attrezzo utilizzato in questo passaggio:
    iFixit Opening Picks (Set of 6)
    $4.99
    Compra
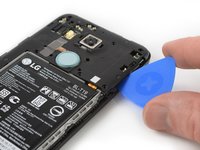
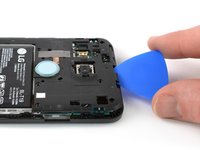
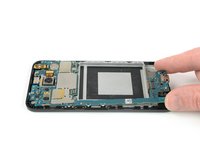
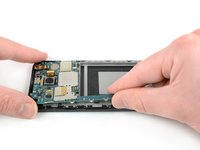
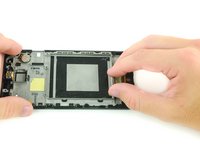
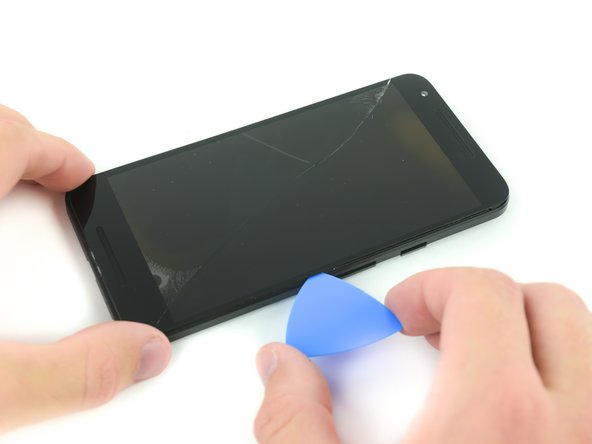
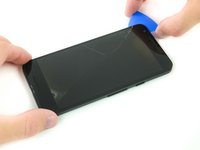
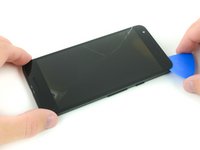
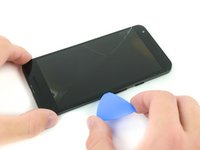
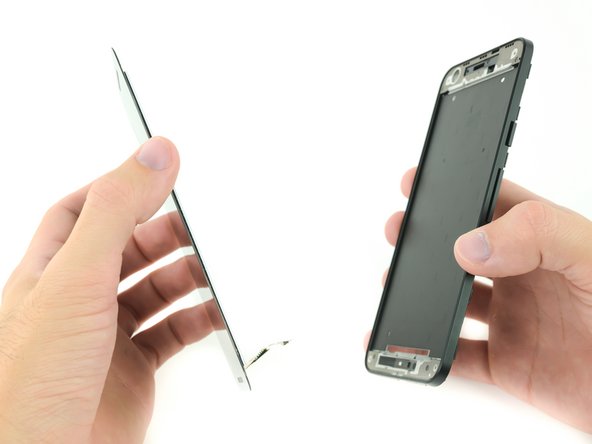
    • Insert a plastic opening pick into the gap between the screen and the plastic housing.

    • Slide the plastic opening pick along the border of the screen to free the screen from any remaining adhesive.

  23. Nexus 5X LCD Screen & Digitizer Replacement: passo 23, immagine 1 di 3 Nexus 5X LCD Screen & Digitizer Replacement: passo 23, immagine 2 di 3 Nexus 5X LCD Screen & Digitizer Replacement: passo 23, immagine 3 di 3
    • Remove the LCD screen & digitizer assembly.

    • Gently feed the digitizer ribbon cable through the frame.

    • Transfer your earpiece and speaker mesh to your new screen.

Conclusione

To reassemble your device, follow these instructions in reverse order.

Altre 36 persone hanno completato questa guida.

Richard

Membro da: 02/07/17

29.758 Reputazione

11 Guide realizzate

Team

iFixit Membro di iFixit

Staff

136 Membri

16.573 Guide realizzate

23 Commenti

Good guide, but not the end all - this guide doesn't accurately reflect how difficult the cameras and battery can be to remove. Also, if you are replacing the LCD+digitizer+frame, you will need to remove the LED, headphone jack, and vibration motor

Jay Miley - Replica

Hello Jay! Thank you for your comment. I've added some of the details you mentioned to help our readers. Guide specifics can vary since it's not always possible to judge the state of a reader's particular device, but that's the beauty of a repair wiki! We can all pitch in and create a comprehensive guide.

You are correct—additional components and/or parts may need to be transferred or removed depending on the replacement. You certainly can remove the LED panel, headphone jack, and vibration motor, but it is not required to free the LCD screen and digitizer in this guide. The cameras are removed in this guide due to their fragility and the potential for component damage during the replacement.

Always research replacement kits and parts before ordering, and make sure you've got everything you need for a successful repair!

Richard -

This guide helped tremendously, things got a little confusing after step 10 (my replacement screen came with the frame, which I think is the better option). As Jay Miley pointed out there are several other steps required for moving components from the old frame (and unfortunately it's easy to overlook some of the smaller pieces), but it was still nice to have this guide to reference.

Craig - Replica

Hiya Craig! I'm glad to hear that your replacement went well even though you had the +frame replacement part. There are two screen replacement options for the 5X; the +frame replacement part for the 5X requires additional components and gaskets to be transferred from your old frame. I'll try to get a guide up for the LCD & digitizer +frame replacement part in addition to this guide.

Richard -

I had a pre-assembled screen / frame so the only real difference was:

* heatgun and remove headphone jack

* power / volume buttons also needed to be switched over (very small flat head screw driver to pop-up)

Andrew Baron - Replica

Aggiungi Commento

Visualizza Statistiche:

Ultime 24 Ore: 0

Ultimi 7 Giorni: 6

Ultimi 30 Giorni: 20

Tutti i Tempi: 29,644