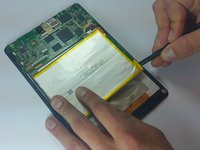
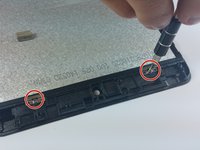
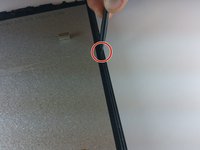
Salta al contenuto principale

Nextbook 8 Screen Replacement

Cosa ti serve

  1. Nextbook 8 Screen Replacement, Battery: passo 1, immagine 1 di 2 Nextbook 8 Screen Replacement, Battery: passo 1, immagine 2 di 2
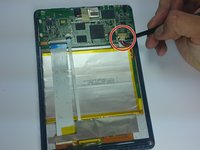
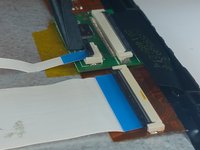
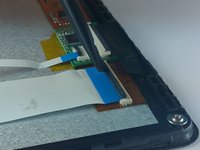
    • Use the plastic opening tool to remove the back cover. Carefully slide the tool between the front glass and back cover.

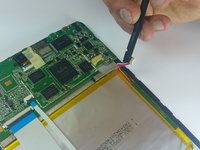
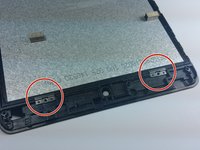
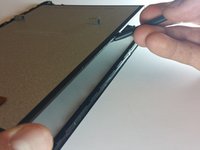
    • Slide the tool along the edge to work the back cover off.

    • It helps to have an extra tool to stick in the gap and keep the back cover separated from the glass as you slide the other tool.

  2. Nextbook 8 Screen Replacement: passo 2, immagine 1 di 2 Nextbook 8 Screen Replacement: passo 2, immagine 2 di 2
    • Remove the tape covering the motherboard.

    • Remove the silver tape holding the white ribbon cables to the battery.

  3. Nextbook 8 Screen Replacement: passo 3, immagine 1 di 2 Nextbook 8 Screen Replacement: passo 3, immagine 2 di 2
    • Use a spudger to carefully disconnect the battery connector from the motherboard.

    • When working with electronics, it's important to choose a tool that's ESD-safe to avoid accidental damage to the device. The regular black nylon spudger or a plastic opening tool should be used whenever possible.

  4. Nextbook 8 Screen Replacement: passo 4, immagine 1 di 1
    • Use a spudger to lift up the black bar on the two ZIF connectors located above the battery.

    • Pull the ribbon cables out of the connectors with tweezers or two fingers.

  5. Nextbook 8 Screen Replacement: passo 5, immagine 1 di 2 Nextbook 8 Screen Replacement: passo 5, immagine 2 di 2
    • Using the flat end of a spudger, carefully work the spudger under the battery, lifting it off of the device.

    • The battery is very malleable, so do not try to pull it off all at once.

  6. Nextbook 8 Screen Replacement, Screen: passo 6, immagine 1 di 1
    • Remove the silver and gold sticker at the bottom of the device.

    • Hold the brown circuit board down with your finger while you remove the sticker

  7. Nextbook 8 Screen Replacement: passo 7, immagine 1 di 2 Nextbook 8 Screen Replacement: passo 7, immagine 2 di 2
    • Use a spudger to lift up the black tabs on the three ZIF connectors.

    • Use ESD safe tweezers to pull the ribbon cables out of the three connectors.

  8. Nextbook 8 Screen Replacement: passo 8, immagine 1 di 2 Nextbook 8 Screen Replacement: passo 8, immagine 2 di 2
    • Remove the 5 black screws on the motherboard.

    • Carefully lift the motherboard off of the device and remove.

  9. Nextbook 8 Screen Replacement: passo 9, immagine 1 di 2 Nextbook 8 Screen Replacement: passo 9, immagine 2 di 2
    • Remove the two screws that hold the brackets in place.

    • Remove the two silver brackets that hold the screen in place.

  10. Nextbook 8 Screen Replacement: passo 10, immagine 1 di 2 Nextbook 8 Screen Replacement: passo 10, immagine 2 di 2
    • Remove the one silver screw on the small green circuit board at the bottom of the device.

    • Set aside the small circuit board for now.

  11. Nextbook 8 Screen Replacement: passo 11, immagine 1 di 1
    • Remove the two silver screws from the bottom of the device.

  12. Nextbook 8 Screen Replacement: passo 12, immagine 1 di 3 Nextbook 8 Screen Replacement: passo 12, immagine 2 di 3 Nextbook 8 Screen Replacement: passo 12, immagine 3 di 3
    • With the device face down, use a spudger to lift the screen off of the glass from the right side.

Conclusione

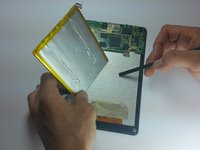
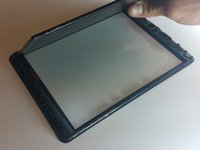
To reassemble your device, follow these instructions in reverse order.

Altre 21 persone hanno completato questa guida.

Dylan Wiese

Membro da: 03/11/15

1.853 Reputazione

5 Guide realizzate

Team

Un commento

where do I find the actual screen though

WiKiT Woo WoNKa - Replica

Aggiungi Commento

Visualizza Statistiche:

Ultime 24 Ore: 1

Ultimi 7 Giorni: 3

Ultimi 30 Giorni: 11

Tutti i Tempi: 23,845