Salta al contenuto principale

Questa guida ha delle modifiche più recenti. Passa all'ultima versione non verificata.

Nextbook 8 Glass Replacement

Cosa ti serve

  1. Nextbook 8 Glass Replacement, Battery: passo 1, immagine 1 di 2 Nextbook 8 Glass Replacement, Battery: passo 1, immagine 2 di 2
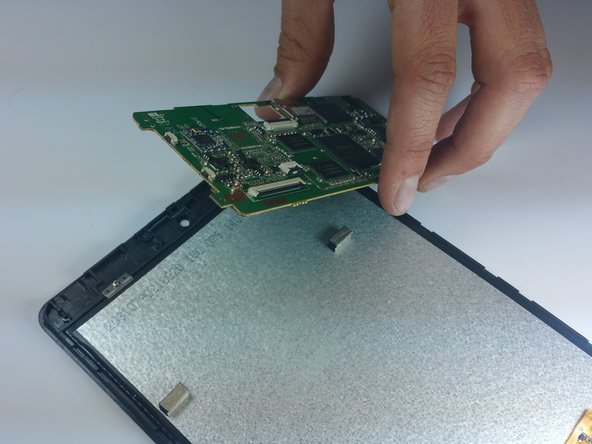
    • Use the plastic opening tool to remove the back cover. Carefully slide the tool between the front glass and back cover.

    • Slide the tool along the edge to work the back cover off.

    • It helps to have an extra tool to stick in the gap and keep the back cover separated from the glass as you slide the other tool.

  2. Nextbook 8 Glass Replacement: passo 2, immagine 1 di 2 Nextbook 8 Glass Replacement: passo 2, immagine 2 di 2
    • Remove the tape covering the motherboard.

    • Remove the silver tape holding the white ribbon cables to the battery.

  3. Nextbook 8 Glass Replacement: passo 3, immagine 1 di 2 Nextbook 8 Glass Replacement: passo 3, immagine 2 di 2
    • Use a spudger to carefully disconnect the battery connector from the motherboard.

    • When working with electronics, it's important to choose a tool that's ESD-safe to avoid accidental damage to the device. The regular black nylon spudger or a plastic opening tool should be used whenever possible.

  4. Nextbook 8 Glass Replacement: passo 4, immagine 1 di 1
    • Use a spudger to lift up the black bar on the two ZIF connectors located above the battery.

    • Pull the ribbon cables out of the connectors with tweezers or two fingers.

  5. Nextbook 8 Glass Replacement: passo 5, immagine 1 di 2 Nextbook 8 Glass Replacement: passo 5, immagine 2 di 2
    • Using the flat end of a spudger, carefully work the spudger under the battery, lifting it off of the device.

    • The battery is very malleable, so do not try to pull it off all at once.

  6. Nextbook 8 Glass Replacement, Screen: passo 6, immagine 1 di 1
    • Remove the silver and gold sticker at the bottom of the device.

    • Hold the brown circuit board down with your finger while you remove the sticker

  7. Nextbook 8 Glass Replacement: passo 7, immagine 1 di 2 Nextbook 8 Glass Replacement: passo 7, immagine 2 di 2
    • Use a spudger to lift up the black tabs on the three ZIF connectors.

    • Use ESD safe tweezers to pull the ribbon cables out of the three connectors.

  8. Nextbook 8 Glass Replacement: passo 8, immagine 1 di 2 Nextbook 8 Glass Replacement: passo 8, immagine 2 di 2
    • Remove the 5 black screws on the motherboard.

    • Carefully lift the motherboard off of the device and remove.

  9. Nextbook 8 Glass Replacement: passo 9, immagine 1 di 2 Nextbook 8 Glass Replacement: passo 9, immagine 2 di 2
    • Remove the two screws that hold the brackets in place.

    • Remove the two silver brackets that hold the screen in place.

  10. Nextbook 8 Glass Replacement: passo 10, immagine 1 di 2 Nextbook 8 Glass Replacement: passo 10, immagine 2 di 2
    • Remove the one silver screw on the small green circuit board at the bottom of the device.

    • Set aside the small circuit board for now.

  11. Nextbook 8 Glass Replacement: passo 11, immagine 1 di 1
    • Remove the two silver screws from the bottom of the device.

  12. Nextbook 8 Glass Replacement: passo 12, immagine 1 di 3 Nextbook 8 Glass Replacement: passo 12, immagine 2 di 3 Nextbook 8 Glass Replacement: passo 12, immagine 3 di 3
    • With the device face down, use a spudger to lift the screen off of the glass from the right side.

  13. Nextbook 8 Glass Replacement, Glass: passo 13, immagine 1 di 1
    • Separate the glass from the touch screen.

Conclusione

To reassemble your device, follow these instructions in reverse order.

Altre 12 persone hanno completato questa guida.

Dylan Wiese

Membro da: 03/11/15

1.853 Reputazione

5 Guide realizzate

Team

6 Commenti

Thank you for this!

Samuel Landers - Replica

Ok thanks for the guide very helpful. Where can I pick a glass up at? And what's the going price?

mikediehl99 - Replica

My repair kit has specifically the touch glass meaning i need to separate the glass form the frame, how do you do this?

Tanther Panther - Replica

I just found the frame can be separated from the glass with a spudger-type thing, I used a fine blade like a craft knife (be careful!!). started at the bottom inside end and worked my way around, trying not to damage the frame in the process. Just to clarify this is for the NX785QC8G.

The glass is attached to the frame with adhesive, so the new glass will need to be stuck back on in a similar way. It’s strange that this part wasn’t mentioned in the instructions, as it was supposed to be for replacing the actual glass digitiser screen, but didn’t quite get there… hope this is of some help.. although it’s 2021 now and you’ve probably gone and bought a new one lol ;) I love my tablet (well, my 4yr-old does) but I stood on it and I happened to have a digitiser on hand.

Sarah Bee -

I need a screen replacement guid like this one but for the Nextbook Ares 8 not 8a

Isaac De La Cruz - Replica

Aggiungi Commento

Visualizza Statistiche:

Ultime 24 Ore: 0

Ultimi 7 Giorni: 0

Ultimi 30 Giorni: 3

Tutti i Tempi: 6,020