Salta al contenuto principale

Nest Hello O-Ring Replacement

Cosa ti serve

  1. Nest Hello O-Ring Replacement, Casing and Faceplate: passo 1, immagine 1 di 1
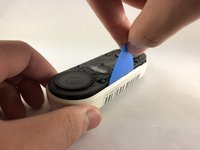
    • Insert the pick between the black faceplate and white casing of the Nest Hello.

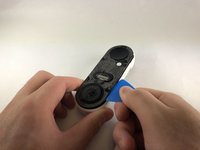
    • Pry the faceplate away from the device with the opening pick.

    • If you have not opened the Nest Hello before, there will be a protective foam mesh that is glued to the plastic covering and the inside of the mesh, use a pick to cut through the mesh as much as possible.

    • Completely remove the faceplate from the device, do not be afraid to pull hard.

    I had to use a metal spudger tool to start and then used guitar picks.

    Joel Lundi - Replica

    Be afraid to pull hard. The faceplate will break in two.

    B Bremer - Replica

    I did the JerryRigEverything method and slipped a razor under the faceplate to separate it carefully from the body. Worked perfectly and nothing was damaged

    There I Fixed It - Replica

    Be careful with the wiring and the heater element. I must have shorted something together when it put it back together and now it will no longer power up. It is probably best to cut the wires to the heater and deal with the consequences in the cold temperatures.

    Joe I. Fabritz - Replica

  2. Nest Hello O-Ring Replacement: passo 2, immagine 1 di 2 Nest Hello O-Ring Replacement: passo 2, immagine 2 di 2
    • Peel back the cover stickers and use the Phillips #000 screwdriver to remove the four screws.

    There is a small circle sticker over each screw, about the size of the red circles in the image above. It wasn't clear from the directions what the "cover stickers" were. A small exacto knife was helpful to pry up the edge of each sticker.

    Tim Scott - Replica

  3. Nest Hello O-Ring Replacement: passo 3, immagine 1 di 3 Nest Hello O-Ring Replacement: passo 3, immagine 2 di 3 Nest Hello O-Ring Replacement: passo 3, immagine 3 di 3
    • Insert opening pick between the white casing and the black internal circuitry and pry it out.

    • There is a ribbon cable connecting the white casing to the circuit boards. Be careful not to tear out the cable while separating the casing from the circuit boards.

    Where can you get a replacement faceplate from?

    nick - Replica

    I ended up doing the headlight lens restoration method - I scraped away any plastic that was flaking off and then I used progressively finer sandpaper (start with 400-600 grit and go up from there). I finished it with rubbing compound and polish. Looks decent.

    There I Fixed It - Replica

    Also - be careful not to cut or displace the rubber gasket that runs around the outside of the main body that has the circuitry - you'll risk losing the waterproofing

    There I Fixed It - Replica

    What is the replacement battery type please?

    Dave Pawson - Replica

    The top end has some kind of mild adhesive (the blue stuff). The bottom end came out more easily for me, and then I ended up bending my board slightly by trying to pry out the top end. May be better to start on the top end if you can get something under the edge of the board to get leverage.

    somebody - Replica

    The black ribbon cable was instantly sheared in half the moment I got the two halves apart, which took more force than I was hoping to need. Turns out the ribbon cable is attached to a sharp metal piece and it will easily tear through it. No longer worth it to replace the battery for me, sadly.

    Ryan Littlefield - Replica

  4. Nest Hello O-Ring Replacement, O-Ring: passo 4, immagine 1 di 1
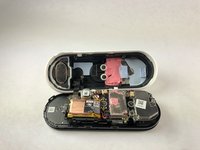
    • Remove the O-Ring (colored blue) from the device. It is placed around the edge of the motherboard.

    where can I get a new o-ring? I cant’t find it anywhere

    Curica - Replica

Conclusione

To reassemble your device, follow these instructions in reverse order.

Altre 3 persone hanno completato questa guida.

2 Commenti

Is there a link available for spare replacement parts? I can’t seem to find anything other than replacement internal batteries . Thanks!

Andres Chavez - Replica

Also looking for this replacement part. Googling did not produce results.

KB_KB - Replica

Aggiungi Commento

Visualizza Statistiche:

Ultime 24 Ore: 2

Ultimi 7 Giorni: 21

Ultimi 30 Giorni: 111

Tutti i Tempi: 2,873