Salta al contenuto principale

Nerf N-Strike Firestrike O-Ring and Plunger Replacement

Cosa ti serve

  1. Nerf N-Strike Firestrike O-Ring and Plunger Replacement, Remove battery cover: passo 1, immagine 1 di 1
    • Use a #1 Phillips screwdriver to remove the 10 -mm screw that secures the battery plate, then remove the battery cover using your hands.

  2. Nerf N-Strike Firestrike O-Ring and Plunger Replacement: passo 2, immagine 1 di 2 Nerf N-Strike Firestrike O-Ring and Plunger Replacement: passo 2, immagine 2 di 2
    • Slide out the two AAA batteries using your fingers.

  3. Nerf N-Strike Firestrike O-Ring and Plunger Replacement, Blaster Casing: passo 3, immagine 1 di 1
    • Remove the seven 10-mm black Phillips screws from the blaster casing with a #1 Phillips Screwdriver.

  4. Nerf N-Strike Firestrike O-Ring and Plunger Replacement: passo 4, immagine 1 di 2 Nerf N-Strike Firestrike O-Ring and Plunger Replacement: passo 4, immagine 2 di 2
    • Slowly pull apart the blaster casing, starting at the battery location.

    • Keep pulling apart slowly until it separates completely. Be cautious as to not send the internal components flying.

  5. Nerf N-Strike Firestrike O-Ring and Plunger Replacement: passo 5, immagine 1 di 2 Nerf N-Strike Firestrike O-Ring and Plunger Replacement: passo 5, immagine 2 di 2
    • For reassembly, ensure that the chrome nut gets put back in the proper location, signified by the red box.

    • For reassembly, ensure that all the parts are lined up correctly on the dowels, signified by the four orange boxes.

    • For reassembly, note the location of the springs as highlighted in the second photo.

  6. Nerf N-Strike Firestrike O-Ring and Plunger Replacement, O-Ring and Plunger: passo 6, immagine 1 di 3 Nerf N-Strike Firestrike O-Ring and Plunger Replacement, O-Ring and Plunger: passo 6, immagine 2 di 3 Nerf N-Strike Firestrike O-Ring and Plunger Replacement, O-Ring and Plunger: passo 6, immagine 3 di 3
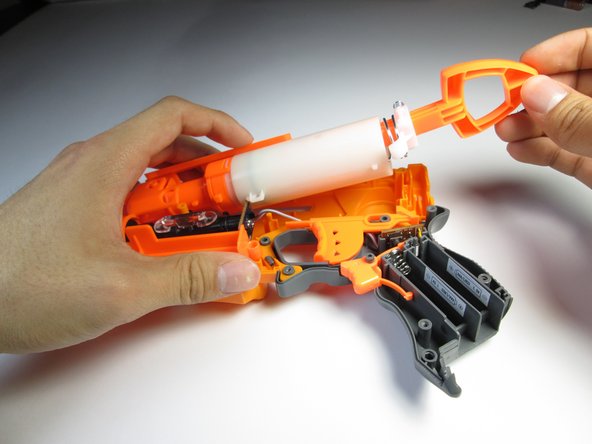
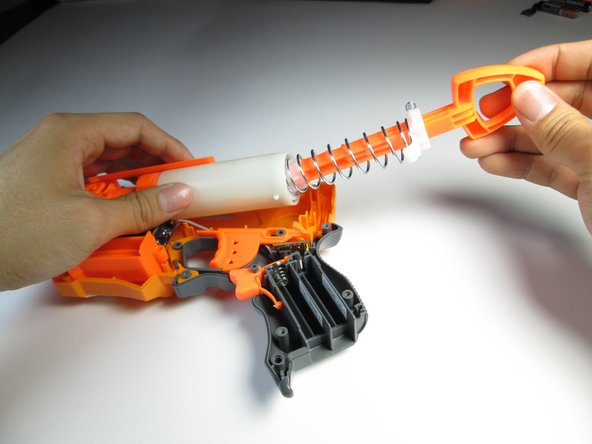
    • Without removing the barrel assembly, tilt it slightly upwards.

    • Slide the plunger out from the air chamber.

Conclusione

To reassemble your device, follow these instructions in reverse order.

Altre 3 persone hanno completato questa guida.

Clovis Jahan

Membro da: 04/23/15

200 Reputazione

1 Guida realizzata

Team

Cal Poly, Team 15-6, Amido Spring 2015 Membro di Cal Poly, Team 15-6, Amido Spring 2015

CPSU-AMIDO-S15S15G6

3 Membri

8 Guide realizzate

0 Commenti

Aggiungi Commento

Visualizza Statistiche:

Ultime 24 Ore: 0

Ultimi 7 Giorni: 7

Ultimi 30 Giorni: 26

Tutti i Tempi: 4,679