Salta al contenuto principale

Motorola W490 Keypad Replacement

Cosa ti serve

  1. Motorola W490 Keypad Replacement, Phone Casing: passo 1, immagine 1 di 2 Motorola W490 Keypad Replacement, Phone Casing: passo 1, immagine 2 di 2
    • Pick up the cell phone with the back facing towards you.

    • Push down on the silver tab located at the top center of the back of the Motorola W490 cellphone.

    • While pushing down on the silver tab, slide the back cover towards the silver tab. Remove the back cover.

  2. Motorola W490 Keypad Replacement, Battery: passo 2, immagine 1 di 2 Motorola W490 Keypad Replacement, Battery: passo 2, immagine 2 di 2
    • Remove the battery by pulling the battery from the top corners labeled "Pull Here" located on either side of the top of the battery.

    • Set the battery aside.

  3. Motorola W490 Keypad Replacement, SIM Card: passo 3, immagine 1 di 3 Motorola W490 Keypad Replacement, SIM Card: passo 3, immagine 2 di 3 Motorola W490 Keypad Replacement, SIM Card: passo 3, immagine 3 di 3
    • Use a plastic opening tool to make a gap between the SIM card and the phone.

    • Use your thumb and index finger to pull the SIM card from the phone.

  4. Motorola W490 Keypad Replacement, Keypad Membrane: passo 4, immagine 1 di 1
    • Open phone so the keypad is facing up.

  5. Motorola W490 Keypad Replacement: passo 5, immagine 1 di 1
    • Insert a push pin into the notch located on the left side of the keypad and push the pin under the keypad membrane.

  6. Motorola W490 Keypad Replacement: passo 6, immagine 1 di 1
    • Continue working the pin under the keypad membrane until it is elevated enough to grasp.

  7. Motorola W490 Keypad Replacement: passo 7, immagine 1 di 1
    • Grasp the keypad membrane firmly and remove it from the phone.

  8. Motorola W490 Keypad Replacement, Lower Metal Frame: passo 8, immagine 1 di 2 Motorola W490 Keypad Replacement, Lower Metal Frame: passo 8, immagine 2 di 2
    • After taking out the battery, locate four star-shaped 5.4 mm T6 screws on top and middle of the rear of the phone. Indicated by the red circles.

    • Remove all the screws using the Torx T6 Screwdriver.

  9. Motorola W490 Keypad Replacement: passo 9, immagine 1 di 3 Motorola W490 Keypad Replacement: passo 9, immagine 2 di 3 Motorola W490 Keypad Replacement: passo 9, immagine 3 di 3
    • Turn over the phone to the front side and open up the phone, displaying the keypad.

    • Use a plastic opening tool or your fingernail to make a gap between the front bottom cover and the phone.

    • Pull and set the glued plastic cover aside.

    • Be careful not to break the plastic cover when making a gap or pulling. The plastic cover is superglued to the phone.

  10. Motorola W490 Keypad Replacement: passo 10, immagine 1 di 2 Motorola W490 Keypad Replacement: passo 10, immagine 2 di 2
    • Under the plastic cover, locate two star-shaped T5 screws.

    • Use the Torx T5 Screwdriver to remove the two screws.

  11. Motorola W490 Keypad Replacement: passo 11, immagine 1 di 3 Motorola W490 Keypad Replacement: passo 11, immagine 2 di 3 Motorola W490 Keypad Replacement: passo 11, immagine 3 di 3
    • Turn over the phone to the back side of phone where the battery was removed.

    • Use hands to remove the unscrewed rear frame of the phone.

    • Set aside the rear metal frame.

  12. Motorola W490 Keypad Replacement, Circuit Board: passo 12, immagine 1 di 3 Motorola W490 Keypad Replacement, Circuit Board: passo 12, immagine 2 di 3 Motorola W490 Keypad Replacement, Circuit Board: passo 12, immagine 3 di 3
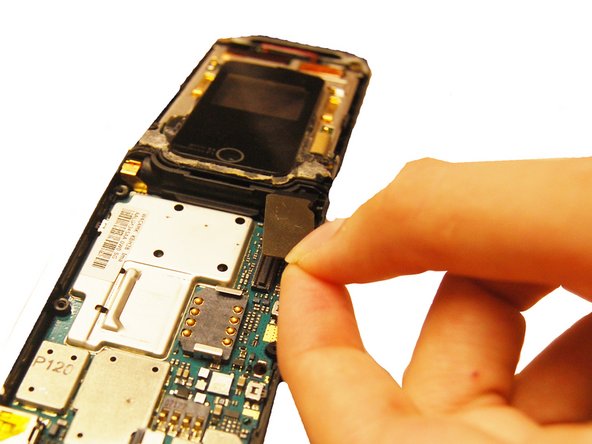
    • Identify the flex cable attachment. Indicated in a red square.

    • Detach the bottom half of the flex cable, pop it off of the circuit board.

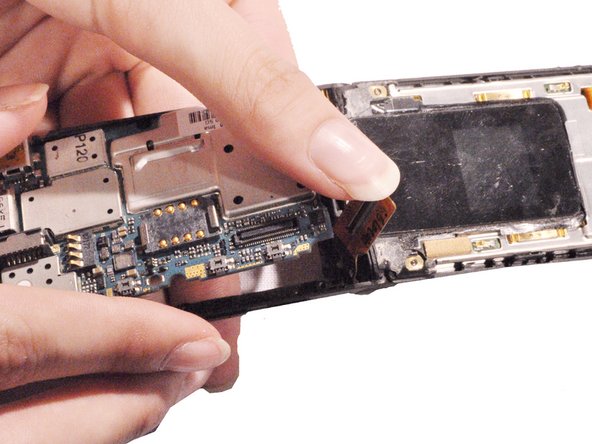
    • Pick up the loosened circuit board from the phone and set aside.

  13. Motorola W490 Keypad Replacement, Keypad: passo 13, immagine 1 di 3 Motorola W490 Keypad Replacement, Keypad: passo 13, immagine 2 di 3 Motorola W490 Keypad Replacement, Keypad: passo 13, immagine 3 di 3
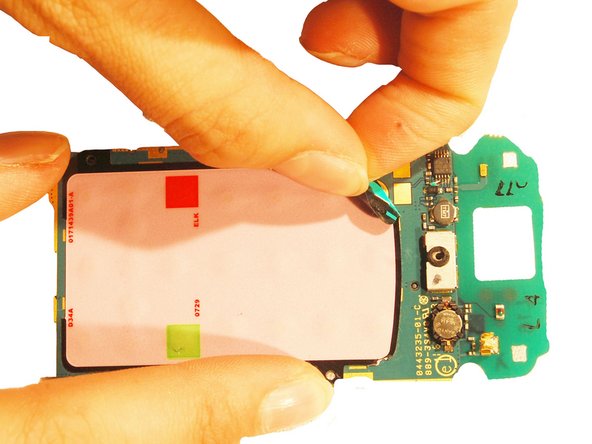
    • Lay the circuit board down with the keypad facing up.

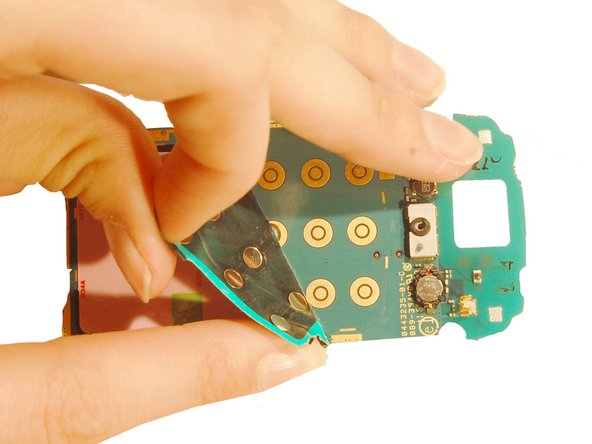
    • Grab the corner of the keypad and gently peel it away from the circuit board.

Conclusione

To reassemble your device, follow these instructions in reverse order.

Will Edwards

Membro da: 10/22/12

61 Reputazione

9 Guide realizzate

Team

Clemson, Team 14-1, Benson Fall 2012 Membro di Clemson, Team 14-1, Benson Fall 2012

CLEM-BENSON-F12S14G1

4 Membri

23 Guide realizzate

0 Commenti

Aggiungi Commento

Visualizza Statistiche:

Ultime 24 Ore: 0

Ultimi 7 Giorni: 0

Ultimi 30 Giorni: 2

Tutti i Tempi: 429