Salta al contenuto principale

Questa guida ha delle modifiche più recenti. Passa all'ultima versione non verificata.

Motorola V551 Circuit Board Replacement

Cosa ti serve

  1. Motorola V551 Circuit Board Replacement, Battery: passo 1, immagine 1 di 2 Motorola V551 Circuit Board Replacement, Battery: passo 1, immagine 2 di 2
    • Press down on the chrome button on the bottom of the chassis. Simultaneously slide the back cover down, away from the phone.

  2. Motorola V551 Circuit Board Replacement: passo 2, immagine 1 di 1
    • Lever the battery out by pressing upwards on the bottom corners of the battery.

  3. Motorola V551 Circuit Board Replacement, Circuit Board: passo 3, immagine 1 di 3 Motorola V551 Circuit Board Replacement, Circuit Board: passo 3, immagine 2 di 3 Motorola V551 Circuit Board Replacement, Circuit Board: passo 3, immagine 3 di 3
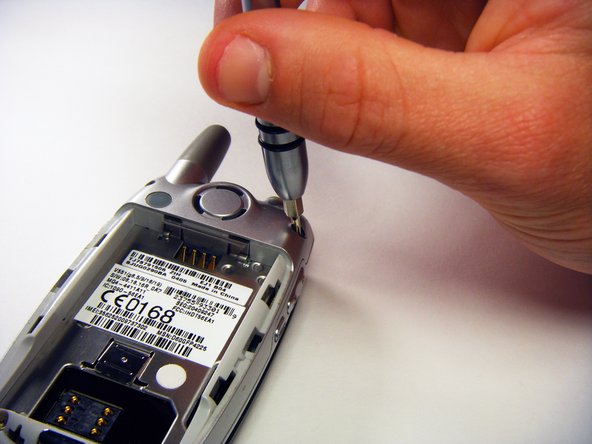
    • Remove the rubber screw covers using a plastic spudger.

    • Use a T-6 screw bit to remove the screws.

  4. Motorola V551 Circuit Board Replacement: passo 4, immagine 1 di 1
    • Unscrew the antenna.

  5. Motorola V551 Circuit Board Replacement: passo 5, immagine 1 di 3 Motorola V551 Circuit Board Replacement: passo 5, immagine 2 di 3 Motorola V551 Circuit Board Replacement: passo 5, immagine 3 di 3
    • Use a plastic opening tool to undo the latches at the indicated spots.

    • Dental tools may be used in place of a plastic opening tool, as they are difficult to use.

    • Warning: exercise caution as the plastic can break.

  6. Motorola V551 Circuit Board Replacement: passo 6, immagine 1 di 2 Motorola V551 Circuit Board Replacement: passo 6, immagine 2 di 2
    • Remove the circuit board connection (copper flap) by first loosening it with a plastic opening tool.

    • Lift the connection up with your finger.

  7. Motorola V551 Circuit Board Replacement: passo 7, immagine 1 di 3 Motorola V551 Circuit Board Replacement: passo 7, immagine 2 di 3 Motorola V551 Circuit Board Replacement: passo 7, immagine 3 di 3
    • Use your finger to remove the pressure pad from the buttons on the side of the casing.

    • Remove the plastic flap from around the buttons by lifting it up and pulling it out.

    • Gently lift the logic board up.

Conclusione

To reassemble your device, follow these instructions in reverse order.

Altre 3 persone hanno completato questa guida.

gregatron

Membro da: 10/29/09

105 Reputazione

6 Guide realizzate

Team

Cal Poly, Team 6-6, Maness Fall 2009 Membro di Cal Poly, Team 6-6, Maness Fall 2009

CPSU-MANESS-F09S6G6

4 Membri

12 Guide realizzate

0 Commenti

Aggiungi Commento

Visualizza Statistiche:

Ultime 24 Ore: 0

Ultimi 7 Giorni: 1

Ultimi 30 Giorni: 4

Tutti i Tempi: 3,143