Questa traduzione potrebbe non riflettere gli aggiornamenti più recenti dalla guida originale. Aiuta ad aggiornare la traduzione o visualizza la guida d'origine.
Introduzione
Se la scheda madre del tuo Moto Z2 Force ti crea problemi, usa questa guida per sostituirla.
Cosa ti serve
-
-
Disponi il telefono su una superficie piatta con lo schermo rivolto verso l'alto.
-
Inserisci l'estremità piatta di uno spudger in nylon nella fessura tra lo schermo e la scocca nell'angolo inferiore destro del telefono.
-
Fai leva per aprire parte dello schermo alzando l'attrezzo e lo schermo verso di te.
-
-
-
Incunea lo strumento di apertura in plastica nella fessura creata dalla separazione tra schermo e scocca nell'angolo inferiore destro per tenerlo aperto.
-
Inserisci lo spudger in nylon nell'angolo inferiore sinistro dello schermo e fai leva per sollevare il display.
-
Continua a inserire gli strumenti di apertura in plastica e lo spudger tutto attorno al telefono e fai leva sullo schermo nei vari punti finché non si separa completamente dal dispositivo.
No — *slaps wrist* No. Bad steps! Don’t use the suction cup at all, ever. It causes the two layers to separate immediately, long before the frame clips give way to let the screen come off.
I’m being super ultra very careful with this second attempt on a new device (that was in pretty pristine condition, if I can keep it that way!), and right when I tried pulling as instructed, the screen layers started to pull apart. Use a blade shoved into the edge of the phone and pry it apart, releasing the latches in the process!
I have to agree with Matt above. At the smallest bit of pressure on the suction cup, the screen de-laminated from the metal base. It still “works”, but….
None of the tools in the kit is terribly suited for getting in there and prying that clip apart without splitting the screen.
lease Read the Comments poste on “STEP 2”, When you apply the heat, the screen becomes unglued from the metal fram that it is attached to. I ended up damaging my screen. You need to make sure that what is coming unglued is the metal, and not just the plastic screen. I found out when I saw another video, where they do not apply heat, they just use a tool to pry the frame-display assembly… But apparently it was too late… You should be more specific about the warning…
A jimmy does not come with the kit. Buy one before beginning this procedure. It is the best way to lift the screen assembly without damaging the assembly.
This whole guide has been rewritten since my last comment, and I super appreciate it. The steps are now much more appropriate and less likely to cause damage. Jamming your Jimmy (huehue) into the edge of the screen is actually quite a good idea, not likely to hit anything as there’s nothing but body underneath it.
-
-
-
-
Inserisci lo spudger al di sotto del blocco del sistema di ritenuta che collega il nastro nero dello schermo alla scocca.
-
Spingi in alto il blocco per liberare la ritenuta.
-
Separa il nastro nero dalla ritenuta tirandolo delicatamente verso sinistra.
this is really for the digitizer and screen replacement. there are still more steps for just the screen.
There is an enormous amount of adhesive sticking this thing together. As the adhesive is not essential (it holds together with clips, mostly), you really need to focus on *removing* the adhesive, so that it doesn’t stretch and bunch-up, preventing clean reassembly. Leave behind the adhesive that you can prevent from bunching-up (by cleanly breaking it, in turn by holding down one edge to the phone or screen), so you have some sticky left, but just make sure it’s not bunched-up.
Revisiting this comment a year later: there’s now replacement adhesive available (or maybe there always was - wish I knew!) for this model in the iFixit store. So, it would be best to remove the adhesive whereever you see it, cleaning everything up and preparing for the new adhesive. That darn adhesive in step 9 below, though… ugh. Work slow, don’t expect it to all be apart by this point.
-
-
-
Svita dall'altoparlante le due viti Torx T4 da 3 mm.
There are actually 3 screws in the speaker
There are indeed 3 screws in mine as well. I updated this step.
-
-
-
Usa lo spudger in nylon per sollevare e rimuovere l'altoparlante dalla scocca del telefono.
It’s not mentioned in the guide but you need to make sure to gently pry the ambient light sensor off of the speaker before removing the speaker or you will likely end up ripping its cable and connector from the motherboard.
If this happens the phone will still boot and work but the screen will be stuck at full brightness and won’t shut off automatically when making phone calls.
-
-
-
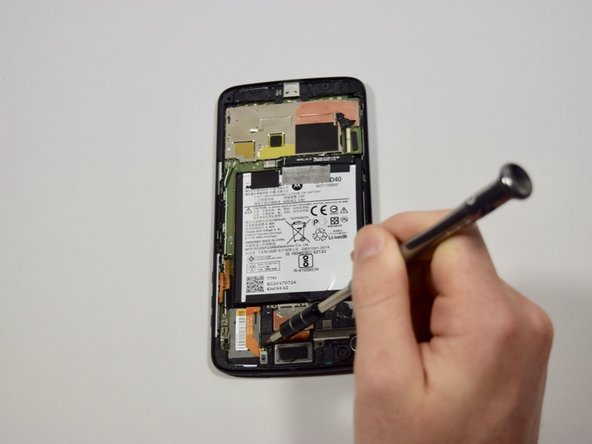
Inserisci l'estremità piatta dello spudger in nylon sul lato della fotocamera più vicino alla batteria.
-
Stacca la fotocamera premendo lo spudger verso il basso finché la fotocamera stessa non salta fuori.
-
-
-
Inserisci l'estremità piatta dello spudger in nylon sotto l'elemento di bloccaggio nero.
-
Sblocca il cavo a nastro sollevando l'elemento di bloccaggio con lo spudger in nylon.
-
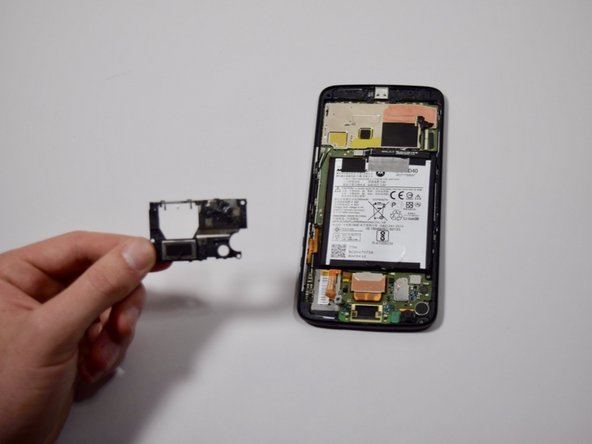
Separa la fotocamera dalla scheda tirando delicatamente verso la parte inferiore del telefono.
-
-
-
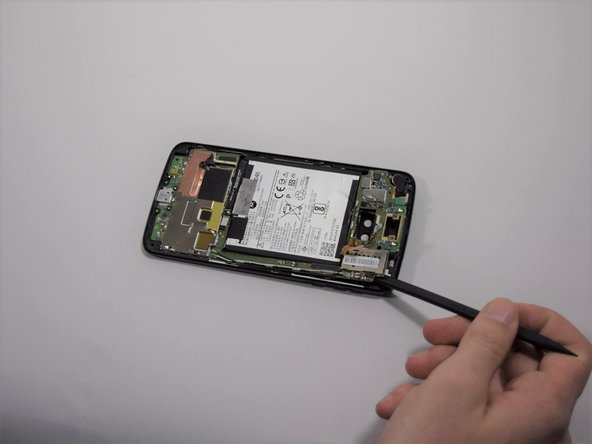
Incunea lo strumento di apertura in plastica sotto la scheda madre nella parte inferiore del telefono e usa l'estremità piatta dello spudger per creare una fessura.
-
Allarga progressivamente questa fessura in modo che la zona resti staccata anche quando togli lo spudger.
-
-
-
Inserisci l'estremità piatta dello spudger in nylon sotto il bordo del telefono vicino alla fotocamera.
-
Solleva delicatamente la scheda madre dal telefono finché non è alzata quanto basta per poter infilare un dito tra la scheda stessa il telefono.
-
Con le dita, stacca delicatamente il resto della scheda madre dal telefono.
-


Per rimontare il tuo dispositivo, segui queste istruzioni in ordine inverso.
Per rimontare il tuo dispositivo, segui queste istruzioni in ordine inverso.
Annulla: non ho completato questa guida.
Altre 5 persone hanno completato questa guida.
Un ringraziamento speciale a questi traduttori:
57%

albertob ci sta aiutando ad aggiustare il mondo! Vuoi partecipare?
Inizia a tradurre ›

Team

Cal Poly, Team S2-G1, Livingston Winter 2018 Membro di Cal Poly, Team S2-G1, Livingston Winter 2018
CPSU-LIVINGSTON-W18S2G1
4 Membri
26 Guide realizzate
4 Commenti
My lcd came apart the entire assembly didn't come up as the instructions showed it would and it tore the ribbon connector.
This phone is not a good first DIY for anyone. I’ve been repairing phones since years and i separated the AMOLED panel from it’s frame too. Lucky me i was gently, used a lot of heat and flooded it with IPA so i could still re use this panel, but i realized it can be a pain in the ass for someone less expert than me.
Rafael B -
Rafael, I also detached (partially) the AMOLED panel from the frame and now my display don’t light anymore. I know this not other part’s fault, because the phone vibers when I press the power button and also when I touch the fingerprint sensor. There is no visual damage neither in display/frame or the cables. A partial detaching is enough to make the screen dont power up anymore? Or is something else causing this problem?