Salta al contenuto principale

Motorola Moto Z Force Droid Opening Procedure

Solo Prerequisita
Questa guida è destinata a essere usata solo come prerequisito per altre guide. Da sola è incompleta.

Cosa ti serve

  1. Motorola Moto Z Force Droid Opening Procedure, Opening Procedure: passo 1, immagine 1 di 1
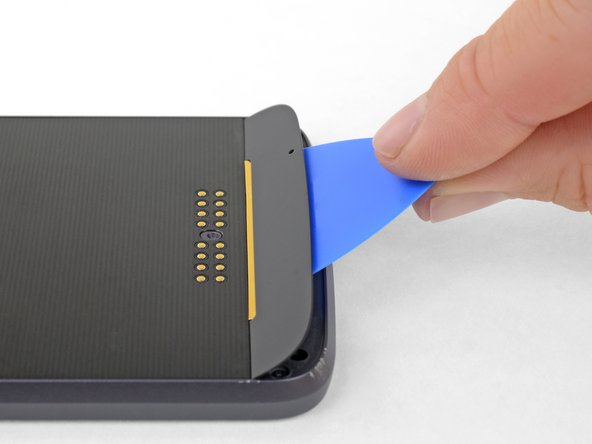
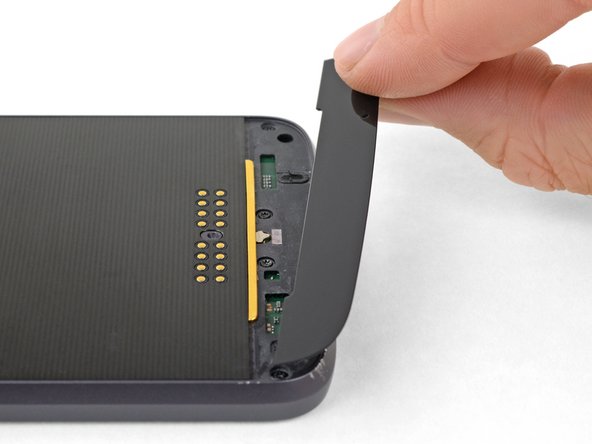
    • Apply a heated iOpener to the lower glass panel on the back of the phone for five minutes.

    • The panel is extremely stubborn, and you may need to reheat and reapply the iOpener several times to get the panel warm enough. Follow the iOpener instructions to avoid overheating.

    • A hair dryer, heat gun, or hot plate may also be used, but be careful not to overheat the phone—the display and internal battery are both susceptible to heat damage.

  2. Motorola Moto Z Force Droid Opening Procedure: passo 2, immagine 1 di 3 Motorola Moto Z Force Droid Opening Procedure: passo 2, immagine 2 di 3 Motorola Moto Z Force Droid Opening Procedure: passo 2, immagine 3 di 3
    • Insert an opening pick into the small gap between the rear case and the glass panel.

    • The gap between the panel and the frame is very tight, so it may help to rock or slide the pick back and forth as you push it down into the gap. Alternatively, you can use a thin blade or metal pry tool to lift the panel before prying the rest of the way with a pick, but work slowly and gently to avoid damaging the glass.

    • If you're having trouble inserting your pick, go back a step and heat the panel further. Loosening the panel requires significant heat, but avoid heating the middle of the phone where the battery is.

    • A few drops of high-concentration (at least 90%) isopropyl alcohol applied to the edges of the panel may help to loosen the adhesive as well.

    • Do not pry over the charging port. It is framed with plastic that can be damaged when prying.

    • With tip of the pick under the glass panel, carefully pry upward to slightly separate the rear case and the panel.

  3. Motorola Moto Z Force Droid Opening Procedure: passo 3, immagine 1 di 3 Motorola Moto Z Force Droid Opening Procedure: passo 3, immagine 2 di 3 Motorola Moto Z Force Droid Opening Procedure: passo 3, immagine 3 di 3
    • Slide the pick in between the panel and the rear case.

    • Slide the pick across the length of the panel to slice the adhesive holding it to the rear case.

  4. Motorola Moto Z Force Droid Opening Procedure: passo 4, immagine 1 di 3 Motorola Moto Z Force Droid Opening Procedure: passo 4, immagine 2 di 3 Motorola Moto Z Force Droid Opening Procedure: passo 4, immagine 3 di 3
    • Use the opening pick to carefully pry up the glass panel.

    • Remove the glass panel.

  5. Motorola Moto Z Force Droid Opening Procedure: passo 5, immagine 1 di 1
    Attrezzo utilizzato in questo passaggio:
    Tesa 61395 Tape
    $5.99
    Compra
    • Repeat the previous four heating and removal steps for the upper glass panel.

    • During reassembly, remove leftover adhesive from the panels and the rear case. Then clean those areas with high concentration isopropyl alcohol (greater than 90%) and a lint-free cloth. This will ensure proper adhesion of the panels.

    • Reinstall the panels using a pre-cut adhesive strip or double-sided tape.

  6. Motorola Moto Z Force Droid Opening Procedure: passo 6, immagine 1 di 1
    • Remove the six 4 mm T3 Torx screws securing the display assembly.

  7. Motorola Moto Z Force Droid Opening Procedure: passo 7, immagine 1 di 3 Motorola Moto Z Force Droid Opening Procedure: passo 7, immagine 2 di 3 Motorola Moto Z Force Droid Opening Procedure: passo 7, immagine 3 di 3
    • Insert the point of a spudger into the hole in the bottom right corner of the rear case.

    • Press the spudger into the hole to separate the display from the rear case.

  8. Motorola Moto Z Force Droid Opening Procedure: passo 8, immagine 1 di 2 Motorola Moto Z Force Droid Opening Procedure: passo 8, immagine 2 di 2
    • Use a finger to maintain separation between the display assembly and the rear case while you remove the spudger.

    • Reinsert the flat end of the spudger in the gap between the display assembly and the rear case.

  9. Motorola Moto Z Force Droid Opening Procedure: passo 9, immagine 1 di 3 Motorola Moto Z Force Droid Opening Procedure: passo 9, immagine 2 di 3 Motorola Moto Z Force Droid Opening Procedure: passo 9, immagine 3 di 3
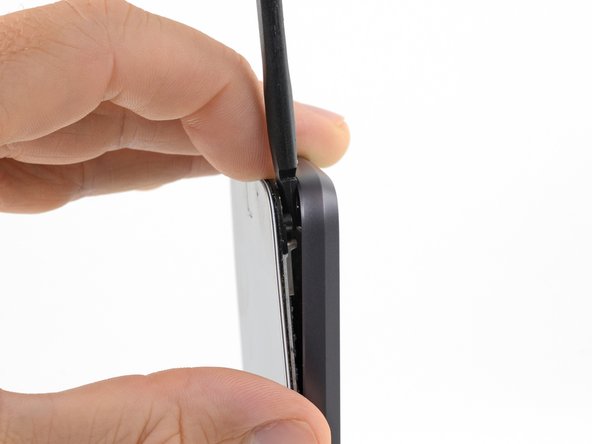
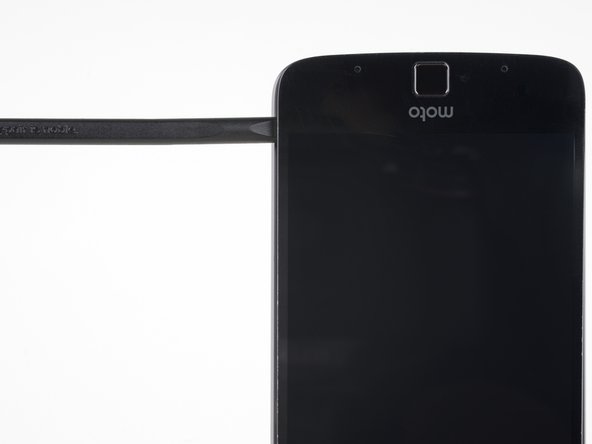
    • Slide the spudger along the side of the phone until you get to the clip securing the display to the rear case.

    • With the spudger right next to the clip, carefully twist the spudger to pry the display away from the rear case and release the clip.

  10. Motorola Moto Z Force Droid Opening Procedure: passo 10, immagine 1 di 3 Motorola Moto Z Force Droid Opening Procedure: passo 10, immagine 2 di 3 Motorola Moto Z Force Droid Opening Procedure: passo 10, immagine 3 di 3
    • Repeat the separation and prying process for the other side of the phone.

    • There is one clip on each side of the phone—make sure both are free before you continue.

    • Be careful not to separate the bottom edge of the display more than 0.5 inches (13 mm) from the rear case. The display cable is still connected and can be damaged if the bottom of the phone is opened too far.

  11. Motorola Moto Z Force Droid Opening Procedure: passo 11, immagine 1 di 2 Motorola Moto Z Force Droid Opening Procedure: passo 11, immagine 2 di 2
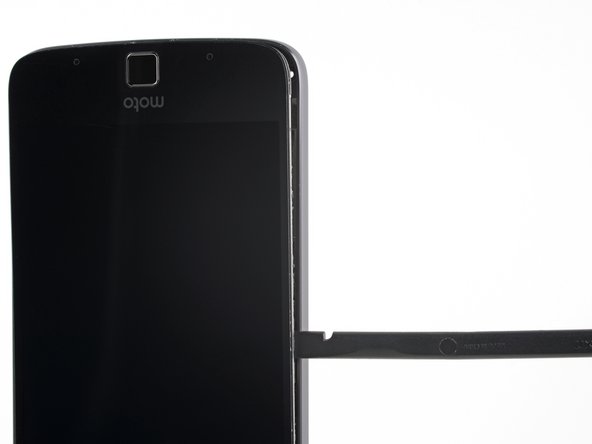
    • Tilt the top right corner of the display down to disengage one of the tabs that secure the top of the display.

    • Tilt the other corner down next, to disengage the other tab.

    • The display cable is still connected and can be damaged by too much display movement. Tilt the display carefully and stop if you encounter significant resistance.

  12. Motorola Moto Z Force Droid Opening Procedure: passo 12, immagine 1 di 3 Motorola Moto Z Force Droid Opening Procedure: passo 12, immagine 2 di 3 Motorola Moto Z Force Droid Opening Procedure: passo 12, immagine 3 di 3
    • Lift the right edge of the display to hinge the phone open like a book, no more than 45°.

    • Gently lift the display enough to clear the clip from the edge of the rear case, maintaining the 45º angle.

    • Rest the display on the table behind the phone and open to 90º to allow access to the display cable.

  13. Motorola Moto Z Force Droid Opening Procedure: passo 13, immagine 1 di 2 Motorola Moto Z Force Droid Opening Procedure: passo 13, immagine 2 di 2
    • Use the flat end of a spudger to lift the display cable connector up out of its socket.

    • Only pry up on the display connector itself and not the socket on the motherboard.

    • At this point during reassembly after the display is connected, turn the phone on and verify that the display functions correctly. If it does, turn the phone off and proceed with reassembly.

    • If it does not work, check that everything is assembled correctly and the connectors are clean. For further troubleshooting, visit our Answers Forum.

  14. Motorola Moto Z Force Droid Opening Procedure: passo 14, immagine 1 di 1
    Attrezzo utilizzato in questo passaggio:
    Tesa 61395 Tape
    $5.99
    Compra
    • Remove the display.

    • During reassembly, if you wish to replace the display adhesive strips, first use a spudger to scrape away all the old adhesive, and clean the adhesion area with some high-concentration (at least 90%) isopropyl alcohol on a lint-free cloth.

    • Apply a thin, high-bond tape, like 1 mm Tesa 61395, or a strip from a precut adhesive card, where the old adhesive was.

    • If you're installing a new display assembly, note where the adhesive is on the original assembly and apply adhesive in the same places on the new assembly.

Conclusione

To reassemble your device, follow these instructions in reverse order.

Adam O'Camb

Membro da: 04/11/15

194.899 Reputazione

416 Guide realizzate

0 Commenti

Aggiungi Commento

Visualizza Statistiche:

Ultime 24 Ore: 0

Ultimi 7 Giorni: 0

Ultimi 30 Giorni: 0

Tutti i Tempi: 69